Mastering Embroidery Stitch Types: A Professional Guide to Machine Digitizing in 2026
Most creators believe that mastering hundreds of intricate hand-sewn patterns is the key to great apparel, but in the commercial world, your success actually hinges on just three core embroidery stitch types. You’ve likely felt the frustration of a design that looks perfect on a computer screen but turns into a puckered, bird-nested mess once it hits the embroidery machine. It’s a common hurdle when automated software fails to account for technical nuances like fabric tension and pathing. We understand that inconsistent results from auto-digitizing tools can stall your production and waste valuable materials.
This professional guide will show you how expert digitizing transforms your artwork into high-quality production results that work the first time. You’ll gain the knowledge needed to communicate effectively with your digitizing partner and avoid the technical pitfalls that plague amateur files. We’ll explore the “Big Three” machine stitches, including Satin, Fill, and Run, and explain how their strategic application ensures commercial durability and aesthetic precision in 2026. By the end of this article, you’ll have a clear roadmap for achieving higher first-time-right rates on every project.
Key Takeaways
- Identify the functional differences between machine-based embroidery stitch types and traditional hand-sewn methods to ensure your designs are production-ready.
- Utilize satin stitches to create high-sheen, professional borders and crisp text that elevate the perceived value of your brand logos.
- Master the use of fill and tatami patterns to manage large surface areas effectively without risking snagging or fabric distortion.
- Discover how advanced running stitch techniques, like the Triple Run, provide bold outlines and intricate details that mimic artisanal craftsmanship.
- Learn how professional digitizing decisions impact machine wear and production speed, allowing you to scale your operations more efficiently.
The Big Three: Essential Machine Embroidery Stitch Types for Production
Machine embroidery isn’t just a decorative craft; it’s a precise engineering workflow. To achieve professional results, you must look past the hundreds of traditional embroidery stitches used in hand sewing. In the commercial sector, the architecture of a design relies on the “Big Three” functional families: Satin, Fill (often called Tatami), and Running stitches. These categories form the foundation of every high-quality file. Choosing the right embroidery stitch types ensures that your design remains durable through industrial laundering while maintaining the visual integrity of your original artwork.
The relationship between these stitches and your equipment is critical. A design isn’t just a picture; it’s a set of instructions that dictates machine speed and thread tension. If a digitizer selects the wrong family for a specific detail, the machine may struggle, leading to thread breaks or fabric damage. High-capacity production environments require files that run smoothly without constant operator intervention. This efficiency starts with a deep understanding of how thread interacts with different substrates.
Defining the Machine Embroidery Workflow
Professional embroidery digitizing is the process of translating vector paths into specific needle commands. It’s not just about tracing lines. A digitizer must assign specific embroidery stitch types based on the fabric’s weight, stretch, and texture. For example, heavy denim requires a different density and underlay than a thin performance polo. These complex instructions are stored within specialized embroidery file types, which tell the machine exactly where to penetrate the garment and how much thread to consume.
Why Manual Stitch Selection Matters
Many businesses try to cut corners with automated “one-click” digitizing software. This often leads to disaster. Auto-digitizing tools lack the cognitive ability to evaluate stitch direction or length. They frequently create files with excessive stitch counts that cause “bird-nesting” or needle breaks. A human expert evaluates how the thread will pull against the fabric. They adjust the “push and pull” compensation to ensure the final product matches the digital mockup exactly.
Manual oversight is the only way to guarantee first-time-right production results. It saves you time, reduces machine wear, and protects your profit margins. When a digitizer manually places every Satin and Fill area, they optimize the pathing. This reduces the number of trims and jumps, which are the primary causes of production delays. Precision in stitch selection isn’t just about aesthetics; it’s a fundamental requirement for scalable, commercial success. The same principle applies when considering embroidery digitizing for patches, where automated shortcuts are among the most common reasons production files fail to run cleanly.
Satin Stitches: Achieving Professional Luster and Detail
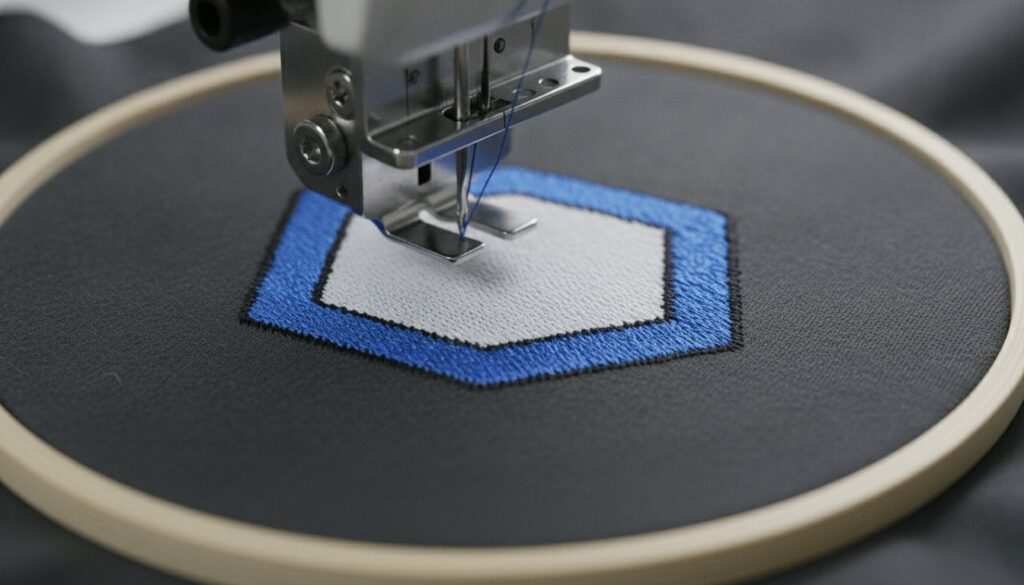
Satin stitches are the most recognized of all embroidery stitch types in the commercial world. They provide the classic, high-luster finish that customers expect on corporate apparel, sports headwear, and luxury monograms. Unlike flat fill stitches, satins consist of long threads that span the entire width of a shape without intermediate needle penetrations. This creates a smooth, reflective surface that catches the light beautifully, enhancing common embroidery styles by adding dimension and a premium feel to the final product.
While satin stitches offer a superior aesthetic, they come with strict technical constraints. In machine embroidery, a satin stitch has a hard physical width limit. Most professional digitizers cap the width at approximately 10mm to 12mm. If a stitch exceeds this length, it becomes loose and unstable. Long stitches are prone to snagging during wear and lack the tension required to stay flush against the garment. When a design element is too wide for a standard satin, a skilled digitizer must transition to a “split satin” or a fill stitch to maintain structural integrity. For brands looking to achieve this level of precision, our professional digitizing services ensure every satin column is perfectly balanced for your specific garment.
Optimizing Satin Stitches for Text
Precision is paramount when digitizing small lettering for embroidery. To maintain legibility, we utilize specific pathing techniques like “column” satin, where the stitches follow the curve of the letter. This is far superior to “contour” pathing, which can result in jagged edges on small fonts. Underlay stitches are equally vital here. They act as a foundational scaffold, slightly lifting the top satin stitches to prevent them from sinking into the fabric’s knit or weave. This ensures that even the smallest serif remains crisp and readable.
The 3D Puff Embroidery Technique
Wide satin stitches are the primary engine behind the 3D puff trend seen on modern headwear. By running these stitches over a layer of ethylene-vinyl acetate (EVA) foam, the design literally stands off the fabric. This requires specialized digitizing where the ends of the satin columns are “capped” with high-density stitches to trap and cut the foam cleanly. We typically increase the stitch density by 20% to 40% compared to flat designs. This extra coverage ensures the foam is completely hidden and the edges are sharp, creating a bold, architectural look that flat stitches simply cannot replicate.
Fill and Tatami Stitches: Managing Large Surface Areas
When a design element exceeds the 12mm width limit of a satin stitch, professional digitizers transition to fill stitches. Known frequently as Tatami or Celedon stitches, these are the workhorses of the industry. They consist of rows of running stitches placed closely together to create a solid surface. Unlike the long, floating threads of a satin stitch, fill stitches utilize frequent needle penetrations. This creates a durable, woven texture that resists snagging and maintains its shape over time. Understanding these Basic types of embroidery stitches is essential for anyone managing high-volume production.
One of the most critical factors in a successful fill is the stitch angle. By shifting the direction of the rows, a digitizer can control how light reflects off the thread. This technique adds depth and dimension to otherwise flat shapes. However, large fill areas present a unique challenge: push and pull. As the machine lays down thousands of stitches, the fabric naturally bunches and stretches. Without proper compensation, you’ll see unsightly gaps between the fill and the border. We mitigate this by over-digitizing the fill area slightly, ensuring a perfect overlap with the surrounding satin columns. This attention to detail is what separates commercial-grade embroidery stitch types from hobbyist attempts.
Adjusting Stitch Density for Fabric Types
Stitch density refers to the distance between individual rows of thread. If the density is too high, the result is “bullet-proof” embroidery that is stiff and uncomfortable to wear. Lightweight performance fabrics require a lower density to prevent the garment from puckering under the weight of the thread. Conversely, heavy canvas or denim can support a much tighter fill. A professional digitizer balances thread weight with density to ensure the garment retains its natural drape while providing full coverage without excessive bulk.
Creative Fill Patterns and Textures
Modern digitizing software allows for more than just flat, horizontal rows. We use embossed or patterned fills to replicate textures like wood grain, brick, or animal fur. This adds a sophisticated, tactile quality to simple shapes. For complex artwork, gradient fills allow for smooth color blending by varying the stitch density across a single area. To avoid the “tiling” effect where needle penetrations form visible lines, we use random stitch lengths. This creates a smoother, more organic appearance that mimics the flow of natural light across the design.
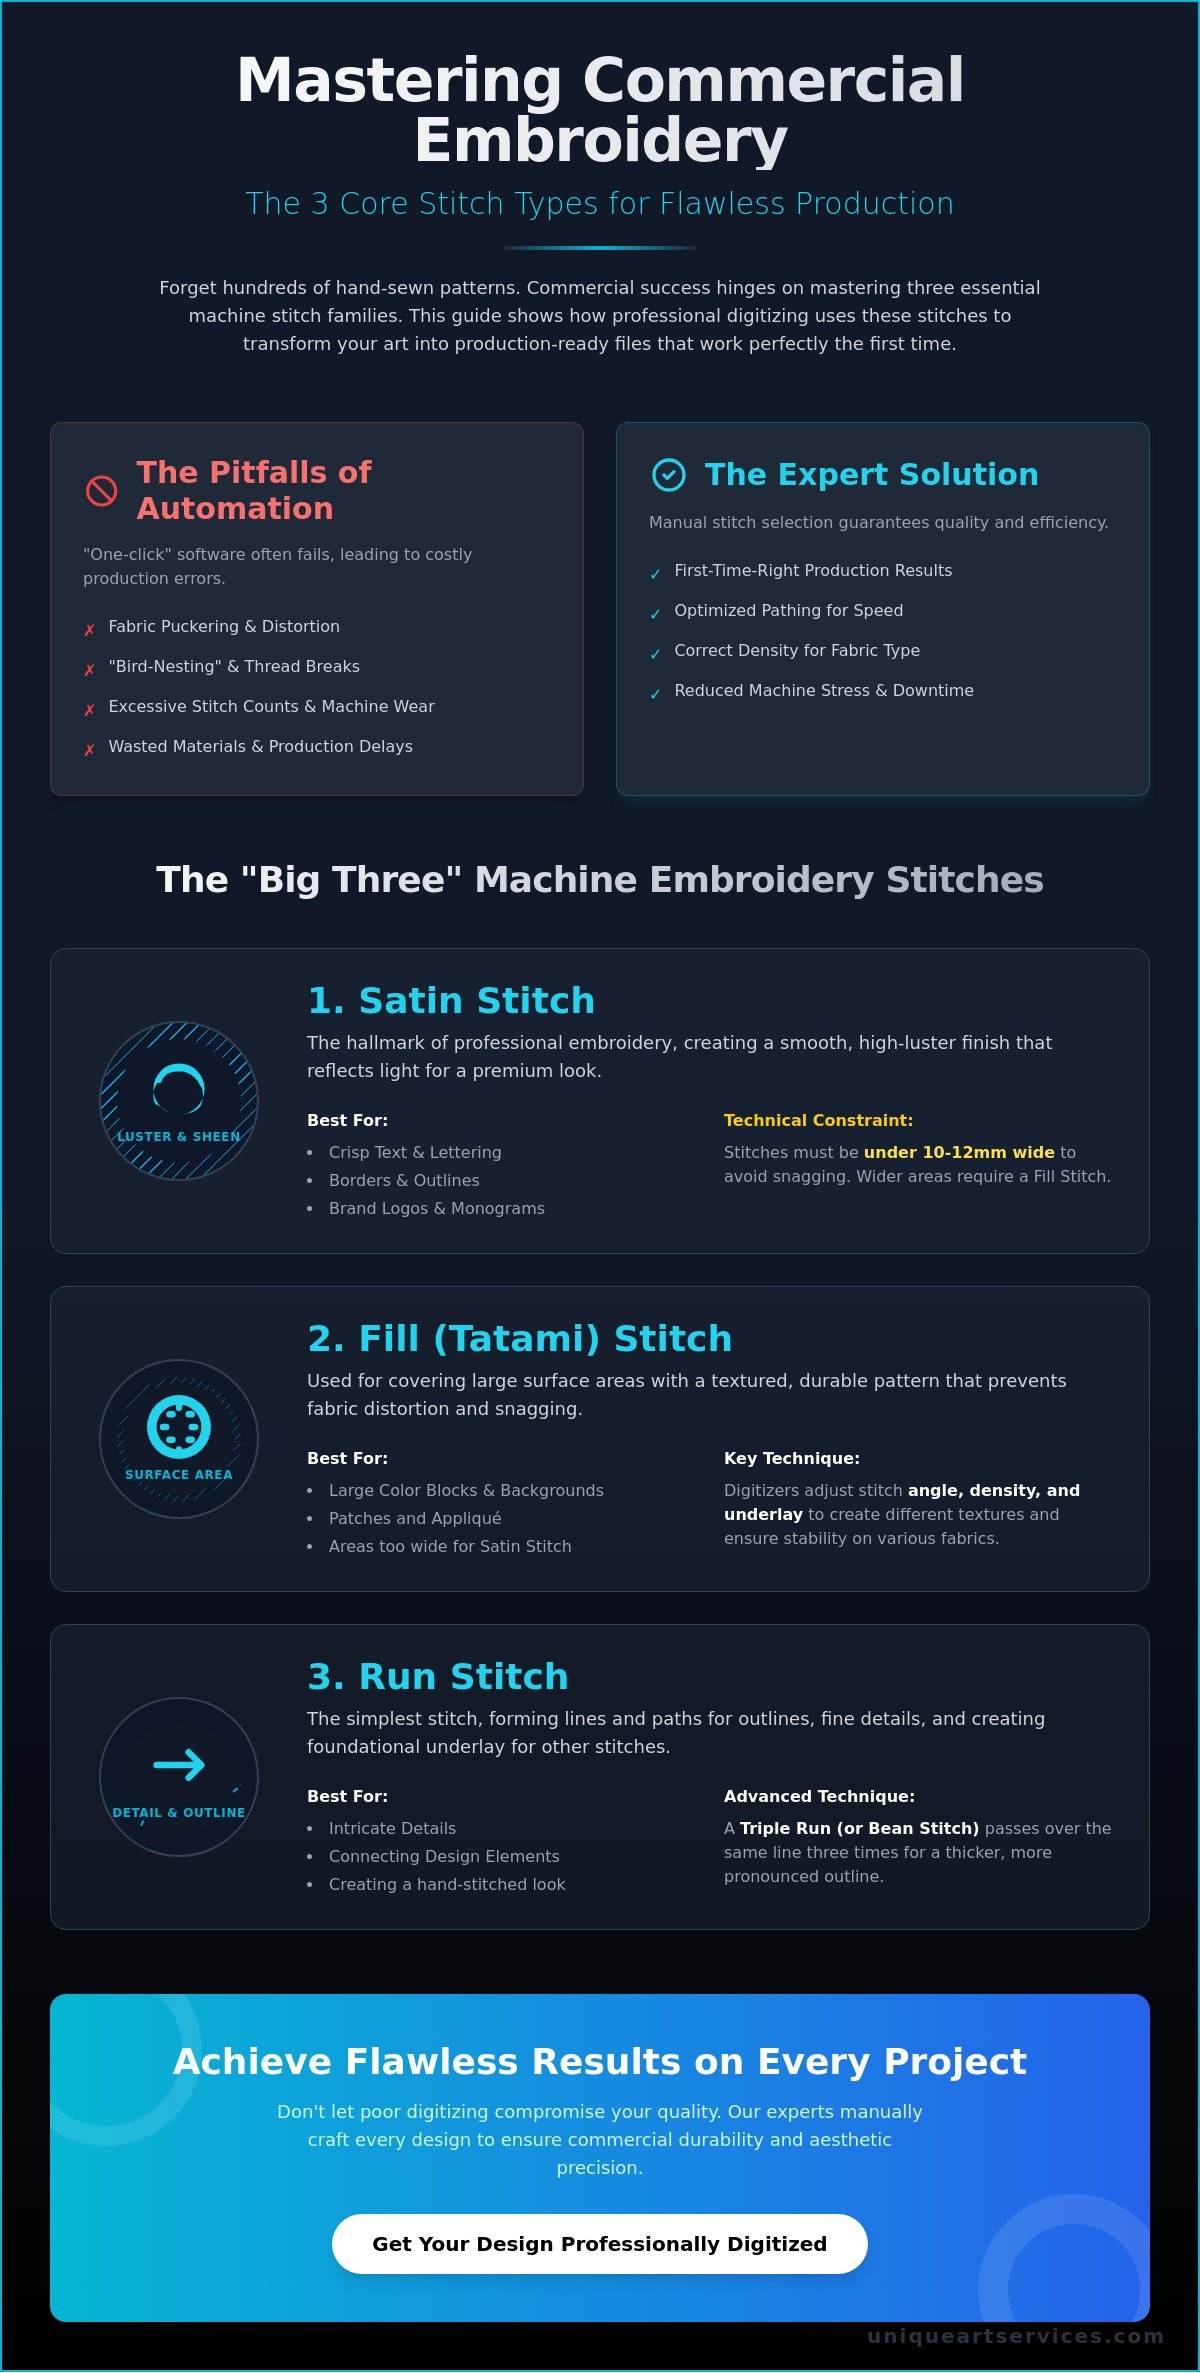
Run Stitches and Specialty Techniques for Complex Designs
Run stitches are often underestimated in the commercial industry. While hobbyists see them as simple lines, professional digitizers use them as the invisible connective tissue of a design. They serve as travel paths, moving the needle from one element to another without requiring a manual trim. This optimization significantly reduces production time and minimizes the risk of thread tails popping through the front of the garment. For high-volume orders, these strategic embroidery stitch types are essential for maintaining a clean, efficient workflow.
Travel paths are a hallmark of expert digitizing. Instead of jumping from one side of a logo to the other, a skilled digitizer uses run stitches tucked under future fill areas to move the needle. This “invisible” movement eliminates unnecessary trims. Fewer trims mean faster machine cycles. It also results in less wear on your equipment. This is a critical consideration for commercial shops where every second of machine time counts toward the bottom line. If you want to optimize your production speed, get your logos digitized by professionals who understand these technical efficiencies.
Specialty techniques like the Bean stitch offer a solution for designs that require a hand-sewn look with machine-grade durability. Other specialty effects include appliqué digitizing, which relies on run stitches to provide placement and tack-down lines for fabric overlays. Chenille effects and cross-stitch patterns also utilize specific run sequences to achieve their unique textures. These advanced embroidery stitch types provide the versatility needed for modern, complex artwork that demands more than just standard fills. When these same techniques are applied to structured formats, understanding the nuances of embroidery digitizing for patches becomes especially important, as border tension and fill pathing behave differently on patch substrates than on standard garments.
The Functional Role of Underlay Stitches
Underlay stitches represent the unseen architecture of every professional file. They act as a foundational scaffold, securing the garment to the stabilizer before the decorative thread is applied. A center run underlay is perfect for narrow columns, while an edge run provides a crisp boundary for wider satin areas. For large fill sections, a double-zigzag underlay creates a dense mesh that prevents the fabric from shifting. Ignoring these steps is a primary cause of puckering and poor registration, especially on stretchy performance wear.
Digitizing for Intricate Details
Managing intricate details requires a balance between aesthetics and machine mechanics. If a line is too thin for a satin stitch, we utilize a single run to maintain clarity. We also adjust the stitch length specifically for curves; shorter stitches allow the needle to follow tight radii without snapping the thread. A bean stitch is a triple-pass run stitch that provides extra thickness and durability for outlines that need to stand out. This level of technical precision ensures that your final product looks identical to your digital proof.
Choosing the Right Stitch: How Professional Digitizing Impacts Quality
Selecting the ideal embroidery stitch types is where technical expertise meets creative vision. A professional digitizer doesn’t just look at an image; they visualize how the needle will move across the specific grain of your fabric. This decision-making process involves balancing aesthetic luster with the mechanical realities of the embroidery machine. When a design is digitized correctly, it runs smoothly, maintains crisp edges, and lasts for the life of the garment. Conversely, poor stitch selection leads to production delays and damaged inventory.
Efficiency in a commercial shop is measured by “up-time.” Every thread break or needle change costs money. Cheap digitizing services often rely on automated software that ignores the physical limits of thread and fabric. They might use overly long satin stitches or excessive densities to hide poor pathing. This results in “bullet-proof” designs that are uncomfortable to wear and hard on your equipment. A professionally digitized file optimizes every movement, reducing trims and jumps to ensure your machines stay running at peak capacity. To understand how to evaluate and select a reliable partner, learn more about choosing the best embroidery digitizing services for production success before committing to a vendor.
Before you send a file to the machine, use this final evaluation checklist:
- Density: Is the stitch count appropriate for the fabric weight?
- Underlay: Is there a solid foundation to prevent sinking and puckering?
- Pathing: Are travel runs used to minimize unnecessary trims?
- Compensation: Has the digitizer accounted for the natural push and pull of the thread?
The Unique Art Services LLP Quality Standard
With over 15 years of industry experience, we’ve refined a process that guarantees the optimal stitch for every unique design. We don’t believe in “one-click” solutions. Our team provides professional manual digitizing that respects the nuances of your artwork. This dedication to craftsmanship allows us to maintain a 99% first-time-right rate. We understand that your business moves fast, which is why we offer a 12-hour standard turnaround on most projects without compromising on technical precision.
Getting Started with Your Design
Your production success begins with a thorough technical analysis. When you submit your artwork to us, we evaluate the complexity of the design and suggest the best embroidery stitch types for your target substrate. We operate through global service hubs in the US, UK, and Australia to provide reliable support across all time zones. This global reach ensures that expert help is always available when you need it. Get your logo digitized with professional stitch pathing today and experience the difference that manual expertise makes in your final production results.
Elevating Your Production Standards for 2026
Mastering the technical application of different embroidery stitch types is the definitive step toward commercial excellence. You now understand how the strategic use of Satin, Fill, and Run stitches ensures structural integrity while delivering a high-end aesthetic. By prioritizing manual expertise over automated shortcuts, you eliminate common frustrations like puckering and thread breaks. This precision doesn’t just improve the visual appeal of your apparel; it protects your equipment and scales your overall output. Precision in the digitizing phase is the backbone of a profitable embroidery business.
With 15+ years of manual digitizing expertise, our team is ready to transform your artwork into flawless production files. We maintain a 99% first-time-right production rate, ensuring your designs are ready for the machine the moment they arrive. Whether you need a standard turnaround or a rush order delivered in just 4 hours, we provide the reliability your brand deserves. Upload your artwork for professional embroidery digitizing in 12 hours and start producing with absolute confidence. Your creative vision is in expert hands.
Frequently Asked Questions
What is the most common embroidery stitch type for logos?
The satin stitch is the most common choice for commercial logos and branding. It provides a high-sheen, raised finish that makes text and borders stand out clearly. Because it consists of long, parallel threads without intermediate needle penetrations, it catches light better than other embroidery stitch types. This makes it the industry standard for achieving a premium, professional look on corporate apparel and headwear.
How do I know if my design needs a satin stitch or a fill stitch?
Selection is primarily determined by the width of the design element. We generally use satin stitches for elements between 1mm and 12mm wide. If an area exceeds this 12mm threshold, we transition to a fill or tatami stitch. This ensures the threads remain secure and don’t snag during wear or laundering. A professional digitizer evaluates each shape to maintain structural integrity and a clean appearance.
What happens if a satin stitch is too wide?
A satin stitch that exceeds the 12mm limit becomes loose and structurally unsound. The thread lacks the necessary tension to stay flush against the fabric, which creates a significant snagging hazard. Over time, these long loops will pull and distort the design. To avoid this, we use split satins or fill patterns to break up the span while maintaining the desired aesthetic and durability.
Can I use hand embroidery stitch names when talking to a professional digitizer?
It’s helpful to use machine-specific terminology to ensure clear communication. While hand-sewing names provide a creative reference, they don’t always align with the mechanical requirements of a commercial machine. Focusing on the “Big Three” families, Satin, Fill, and Run, helps your digitizer understand exactly how to path the file for the best production results on industrial equipment.
Why does my embroidery look gapped or show the fabric underneath?
Gapping typically occurs when the digitizer fails to account for push and pull compensation. As the needle penetrates the fabric, the material naturally stretches and shifts. If the file doesn’t include a slight overlap between adjacent areas, the fabric will show through the gaps. Increasing stitch density or adding a proper underlay foundation usually solves this registration issue and ensures full coverage.
What is stitch density and why does it matter for my production?
Stitch density refers to the spacing between individual rows of thread in your design. It’s a critical factor because it determines both the coverage and the flexibility of the finished piece. If density is too low, the fabric shows through. If it’s too high, the embroidery becomes stiff and uncomfortable. Correct density ensures a soft drape, professional coverage, and smooth machine operation without thread breaks.
How does stitch type affect the price of embroidery digitizing?
The complexity of the chosen embroidery stitch types and the total stitch count directly impact the digitizing process. Intricate designs with multiple textures, gradients, or specialty stitches require more manual time to path correctly. Higher stitch counts also increase the time your machine spends on each garment. Quality digitizing optimizes these factors to balance visual impact with production efficiency and your bottom line. When evaluating vendors, reviewing how top-tier embroidery digitizing services structure their pricing can help you identify transparent partners who prioritize file precision over volume discounts.
Is there a specific stitch type for small lettering?
The satin stitch is the preferred choice for small lettering because it offers the highest level of detail and clarity. For very fine text, we adjust the density and use a center-run underlay to lift the thread off the fabric surface. This prevents the letters from sinking into the knit or weave. Proper pathing ensures that even the smallest serifs remain sharp, crisp, and readable after production.