The Ultimate Guide to Professional Embroidery Digitizing in 2026
An algorithm can suggest a color palette, but it will never understand how a needle interacts with 100% organic cotton versus heavy-duty denim. High-performance embroidery digitizing is a manual craft, not just an algorithmic output. You’ve likely felt the frustration of a production line grinding to a halt because of a poorly digitized file. Frequent thread breaks and puckering aren’t just minor technical glitches. They’re profit killers. They delay client orders and damage your professional reputation. In the 2026 market, relying on “one-click” automated software is a risk your business can’t afford.
We’re here to help you master the technical essentials required to achieve zero-defect production files. You’ll learn how professional manual pathing and expert fabric compensation ensure your machines run smoothly from start to finish. This guide covers everything from the latest Wilcom EmbroideryStudio 2026 features to 3D puff techniques and tone-on-tone minimalism. By the end, you’ll know exactly how to secure faster turnaround times and deliver the high-end results your clients expect.
Key Takeaways
- Understand why professional embroidery digitizing requires human logic to translate complex artwork into efficient machine instructions.
- Learn how manual pathing eliminates excessive jump stitches and messy tie-offs that often plague automated software outputs.
- Discover the technical balance between stitch density and pull compensation to ensure flawless results across different fabric types.
- Identify the specific artwork formats and sizing details your digitizer needs to deliver production-ready files the first time.
- Evaluate the ROI of using a global service hub to meet tight deadlines and scale your apparel business without increasing overhead.
What is Embroidery Digitizing? The Blueprint of Modern Apparel
Embroidery digitizing is the specialized process of converting 2D artwork into digital stitch data. It isn’t a simple file conversion; it’s an intricate translation. A commercial embroidery machine cannot “see” a JPEG, PDF, or PNG. It requires a specific command set, usually in formats like DST or PES, to understand exactly where to move the hoop and when to drop the needle. This file serves as the definitive blueprint for the machine’s mechanical components, guiding every movement with mathematical precision. Understanding the full range of embroidery file types and their compatibility with different machines is essential before you begin any production run.
Many beginners mistake this process for “auto-tracing.” However, professional embroidery digitizing involves far more than just outlining a shape. It requires a deep understanding of how thread interacts with different textures and fabric weights. A human digitizer must manually assign stitch types, directions, and densities while predicting how the fabric will shift under the needle. They plan the most efficient route for the needle to take. This manual pathing reduces the number of jump stitches and unnecessary thread trims, which are the primary causes of production delays and machine errors.
The Evolution from Manual Punching to Digital Files
The history of machine embroidery reveals a journey from physical paper tapes to sophisticated digital architecture. In the early days, “punchers” literally punched holes into paper to guide mechanical looms. Today, we use advanced software, but the core principle remains the same: absolute precision. With over 15 years of industry experience, our team understands how to build files that handle the high speeds of modern commercial equipment. We’ve moved far beyond simple hobbyist designs. Today’s commercial files must account for high-speed vibrations, complex thread tensions, and the mechanical limits of multi-head machines to ensure a flawless finish.
Why High-Quality Digitizing is the Backbone of Your Shop
A poor file doesn’t just look bad on a shirt; it breaks your entire workflow. High-quality digitizing acts as the technical DNA of every embroidered garment. It dictates the efficiency of your production floor and the longevity of your hardware. When a file is built correctly, you see fewer thread breaks, minimal bird-nesting, and zero registration issues. This precision protects your equipment from unnecessary wear and tear caused by excessive needle strikes in the same position or poorly planned tie-offs. A well-digitized file ensures your machines spend more time running and less time sitting idle for repairs. It’s the stable foundation that allows you to scale your business and meet demanding client expectations with confidence.
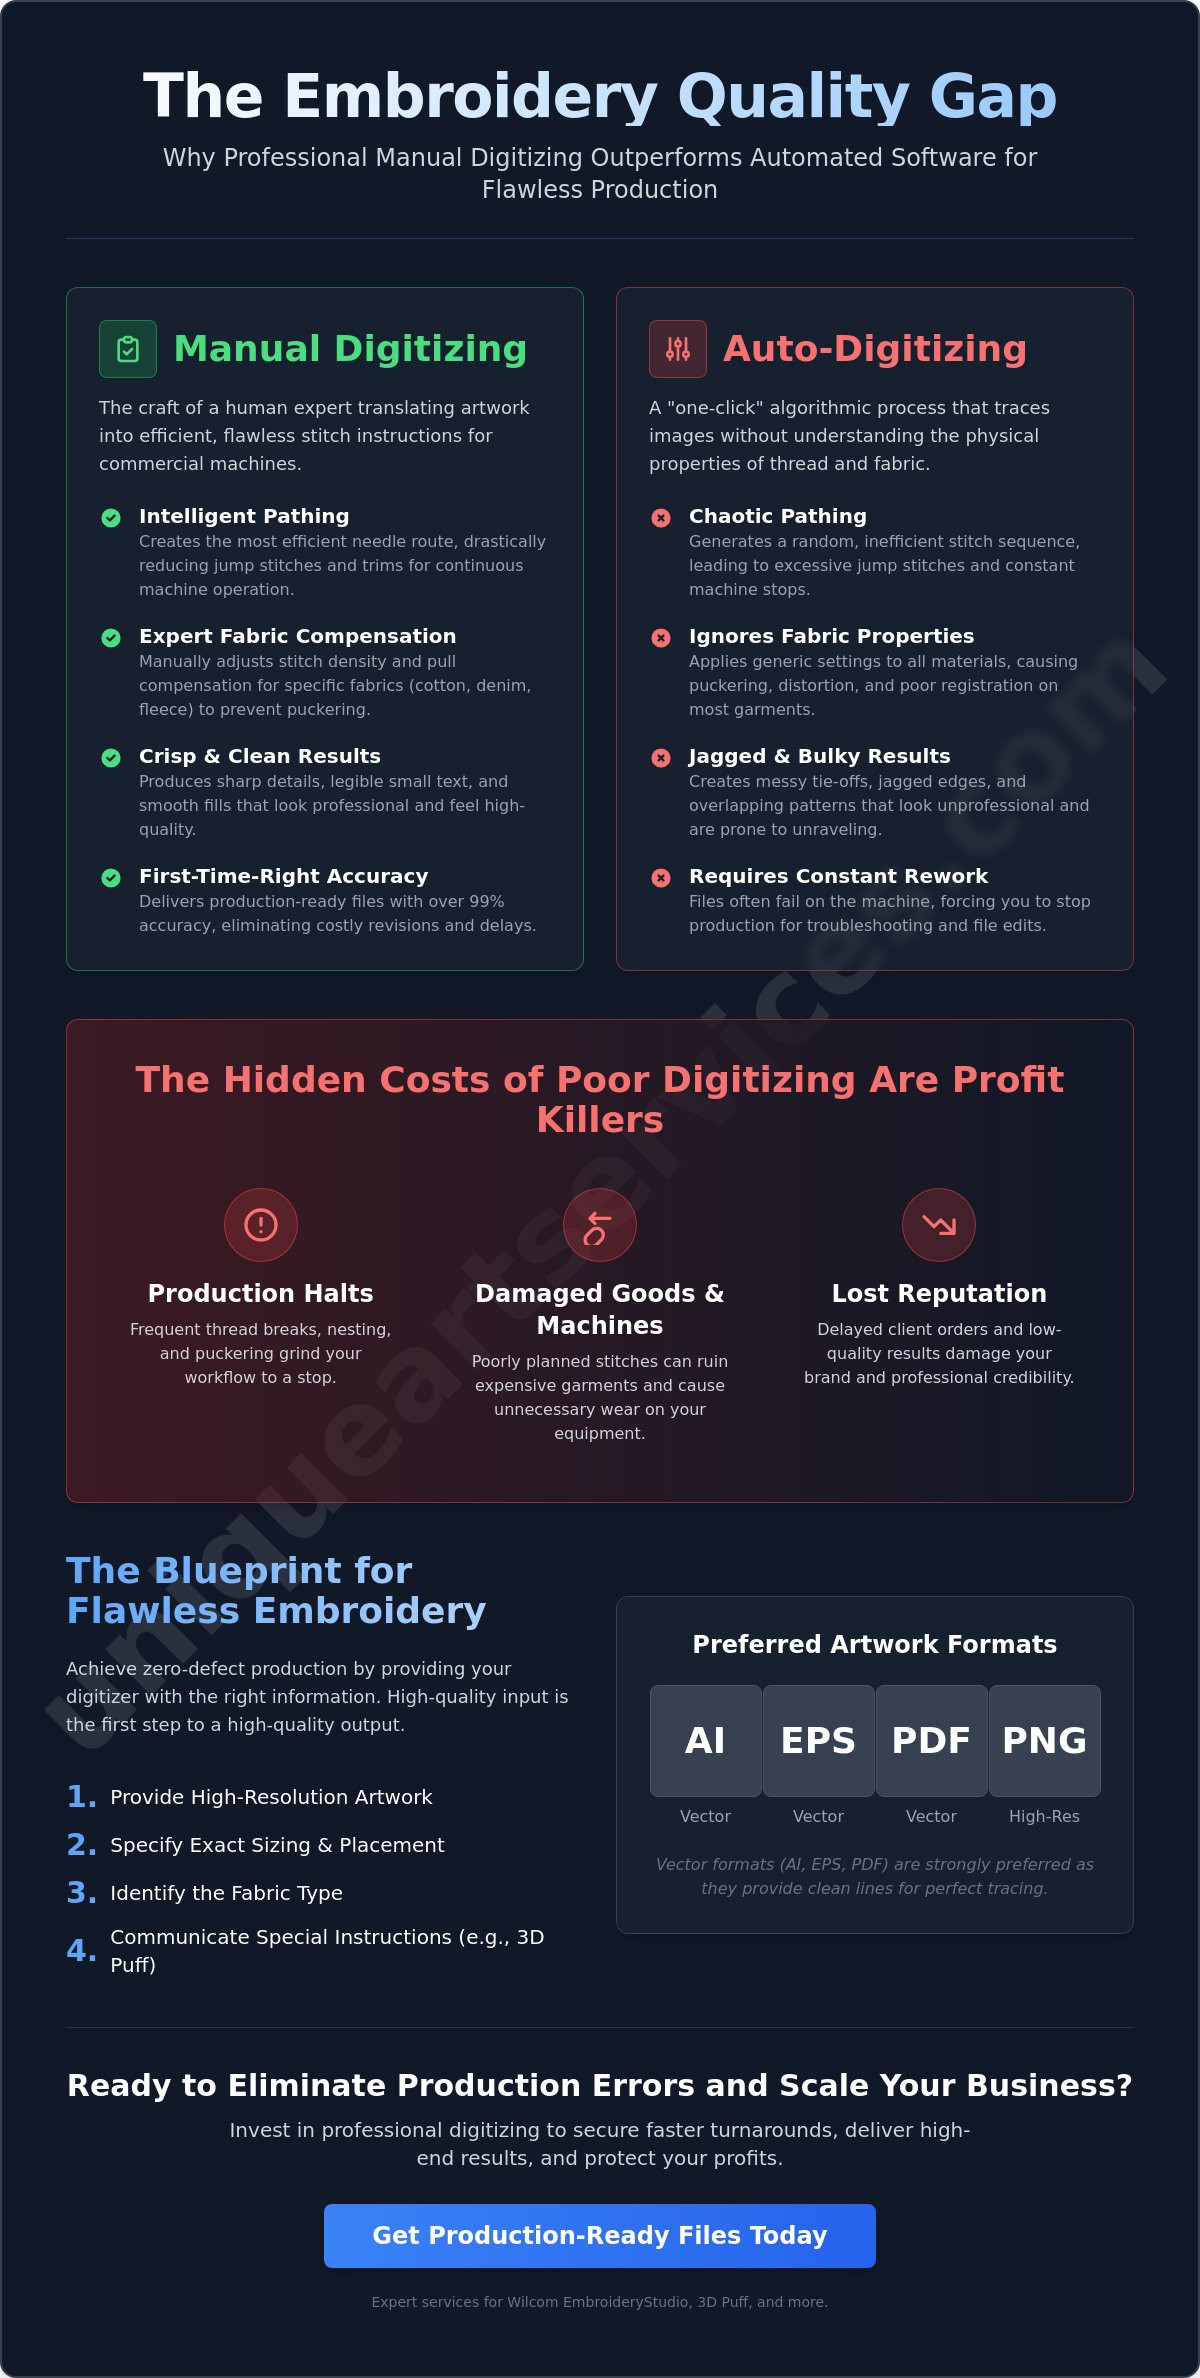
Manual Digitizing vs. Auto-Software: The Quality Gap
Algorithms excel at many tasks, but they struggle to replicate the nuanced logic of professional embroidery digitizing. While automated software can “trace” an image in seconds, it lacks the spatial awareness required for high-speed production. A human digitizer views a logo as a sequence of movements, planning a logical route that minimizes the distance between elements. In contrast, automated tools often create a chaotic path. This results in excessive jump stitches and messy tie-offs that force your machine to stop and trim constantly, killing your production rhythm.
The visual difference is immediately apparent under a magnifying glass. Professional manual pathing produces clean, crisp borders and smooth gradients. Auto-digitizing frequently generates jagged edges and overlapping stitch patterns that look unprofessional and feel bulky. For businesses looking to scale, the “First-Time-Right” metric is vital. Achieving 99% accuracy on the first file version prevents the back-and-forth edits that delay shipping. High-performance shops rely on this precision to maintain a steady workflow and keep their machines running at peak RPM.
The Hidden Costs of “Free” Auto-Digitizing
Choosing “free” or low-cost automated tools often leads to expensive production failures. When software fails to account for stitch density, you encounter “nesting.” This is where thread bunches up under the needle plate, potentially damaging the garment and the machine. Calculating the cost of a ruined premium jacket or thirty minutes of downtime reveals the true price of poor files. Small text and complex logos are particularly difficult for software to handle. Manual redrawing ensures that every letter remains legible and every fine detail is structurally sound, preventing the thread breaks that haunt automated outputs. If you want to avoid these technical hurdles, consider partnering with a professional digitizing service to ensure your files are production-ready.
Precision Pathing: Reducing Production Time
Every second your machine spends trimming or jumping is a second it isn’t earning revenue. A professional digitizer minimizes these non-productive movements by creating a continuous flow. They utilize logical sequencing, often building the design from the center out to the edges. This method provides maximum stability and prevents the fabric from shifting or “flagging” during the process. Additionally, manual underlay is essential for structural integrity. Unlike software that applies a generic grid, a human expert tailors the underlay to the specific fabric type. This creates a solid foundation that supports the top stitching, ensuring the design remains flat and vibrant even after multiple washes.
Technical Essentials: Stitches, Density, and Pull Compensation
Precision in embroidery digitizing relies on three primary variables: stitch selection, density settings, and pull compensation. You can’t simply apply a standard template to every design. Each fabric has a unique “personality” that reacts differently to thread tension. Mastering these technical essentials ensures your machine produces clean results without the common pitfalls of puckering or misaligned borders. It’s the difference between a logo that looks “pasted on” and one that integrates seamlessly with the garment.
Understanding the physics of the needle is crucial. As the machine runs, the thread creates tension that pulls the fabric inward. Simultaneously, the needle’s downward force pushes the fabric outward. Professional digitizers anticipate these forces, adjusting the digital file to counteract physical distortion. This technical foresight is especially vital when switching between structured items like hats and flexible items like performance tees.
Mastering Stitch Types for Different Textures
- Satin Stitches: These are best for lettering and borders. They provide a high-sheen, premium look by wrapping thread closely together. We typically use them for elements between 2mm and 10mm in width.
- Fill (Tatami) Stitches: When you need to cover large areas, fill stitches are the standard. They consist of rows of run stitches that create a textured surface. Managing the “stitch angle” here is vital to prevent the fabric from puckering under heavy coverage.
- Run Stitches: These are single lines of thread used for fine details, outlines, or traveling between sections. They define the precision of a professional logo, especially in complex mascot designs.
For a deeper technical breakdown of how each of these options performs across different garment types, our guide to mastering embroidery stitch types for machine digitizing covers the professional application of Satin, Fill, and Run stitches in detail.
Pull Compensation: The Secret to Perfect Circles
A digital circle in your software isn’t a physical circle on the machine. Without pull compensation, that perfect shape will likely become an oval once the thread tension takes hold. Digitizers “over-build” certain areas by slightly extending the stitch ends in the software. This ensures that when the thread pulls the fabric tight, the final result matches the original artwork exactly. This adjustment must be customized for every material. For example, a pique polo requires more compensation than a stable woven twill because the knit structure is more prone to shifting.
Fabric-specific adjustments extend to the “Goldilocks” zone of stitch density. If the density is too high, the needle will shred the fabric or break the thread. If it’s too low, the garment color will bleed through the design. We also adjust the pathing for specific items. When digitizing for hats, we use a “bottom-up, center-out” approach. This specific sequence pushes any fabric slack toward the edges, preventing the “flagging” or bunching that often ruins headwear production. High-quality embroidery digitizing accounts for these mechanical realities before the first stitch is ever sewn.
Preparing for Success: How to Brief Your Digitizer
Efficient production begins long before the first stitch. A clear, technical brief is the most effective way to ensure your embroidery digitizing project moves from the design phase to the machine without a single revision. When you provide precise details, you remove the guesswork that leads to production delays. This clarity allows your digitizer to build a file that is specifically optimized for your equipment and your chosen garment.
To achieve the best results, always specify the target material. A file digitized for heavy denim will fail on a lightweight performance tee because the push and pull forces are entirely different. Additionally, stating the final dimensions is non-negotiable. A design intended for a 3.5-inch left chest logo requires different stitch density and underlay than a 10-inch jacket back. Finally, list your preferred thread brands, such as Madeira or Isacord. This ensures your digitizer uses the correct color mapping for your specific thread inventory.
Artwork Requirements for 12-Hour Delivery
Speed is a competitive advantage in the apparel industry. To meet a standard 12-hour delivery window, you must provide high-resolution artwork. Low-resolution, blurry JPEGs force digitizers to spend valuable time interpreting the design rather than digitizing it. High-resolution raster files (at least 300 DPI) or clean vector files (AI, EPS, or SVG) provide the sharpest foundation. If your current logo is pixelated or poor quality, using a professional vector art conversion service is a necessary first step. This ensures every line and curve is perfectly defined before the digitizing process begins. You should also simplify complex digital effects like drop shadows or glows, as these don’t translate directly into thread and require creative interpretation by the expert. For designs that include small text elements, understanding the specific techniques for digitizing small lettering for embroidery is essential to ensure every character remains crisp and readable at production scale.
Specifying Garment Types for Custom Pathing
The garment type dictates the machine’s pathing logic. For example, headwear requires a “bottom-up and center-out” approach. This specific sequence prevents the fabric from shifting or bunching against the cap’s internal structure. If you don’t specify that the design is for a hat, the digitizer might use a standard left-to-right pathing, which often leads to registration errors. Similarly, delicate fabrics like silk or thin knits require a lighter touch. In these cases, we reduce stitch density to prevent the needle from cutting the material. Providing these details upfront guarantees a production-ready file on the first attempt. Ready to start your next project? Submit your artwork now for professional processing.
Scaling Your Business with Professional Digitizing Services
Efficiency is the engine of growth in the modern apparel industry. Your ability to meet tight client deadlines often determines whether you win a contract or lose it to a faster competitor. Many shops struggle with the heavy overhead of maintaining in-house talent. The estimated total first-year cost for a full-time, in-house digitizer is approximately $69,500 once you account for software, taxes, and benefits. By outsourcing your embroidery digitizing needs to a global service hub, you transform this high fixed cost into a flexible, scalable expense that matches your current order volume.
This strategic shift also ensures absolute brand consistency. A professional partner provides a unified workflow for vector art, logo design, and complex digitizing. This prevents the visual discrepancies that often occur when using multiple unverified vendors. When your technical files are handled by the same expert team, your production quality remains stable across every garment type and order size. This reliability is the foundation of a stable and trustworthy brand.
Eliminating the Bottleneck in Your Embroidery Shop
Seasonal spikes shouldn’t force you into a hiring crisis. A dependable service partner allows your shop to absorb sudden increases in volume without adding to your permanent payroll. Our 99% first-time-right rate provides operational peace of mind. It ensures your machines don’t sit idle while you wait for file corrections or pathing adjustments. For businesses pursuing high-value corporate contracts, speed is everything. Utilizing 4-hour and 12-hour turnaround options allows you to accept “last-minute” requests that other shops are forced to turn down. This agility directly increases your revenue potential and market share.
Why Unique Art Services LLP is the Global Choice
We combine over 15 years of technical expertise with a robust network of global service hubs in the UK, USA, and Australia. This international reach ensures that your projects receive professional attention regardless of your local time zone. We remain dedicated to a “Manual Only” promise. We never use automated tracing tools because they cannot replicate the precision of a human expert. This commitment to manual craftsmanship ensures that every file is optimized for the highest production speeds and the lowest thread-break rates. Don’t let technical bottlenecks limit your shop’s potential. Get your production-ready files in as little as 4 hours and start scaling your production capacity today.
Future-Proof Your Embroidery Production
High-performance apparel decoration requires more than just high-end machinery. It demands a technical foundation that only manual expertise can provide. We’ve explored how manual pathing and fabric-specific pull compensation eliminate the production bottlenecks caused by inferior automated software. By prioritizing these technical essentials, you ensure your equipment runs at peak efficiency while delivering the “quiet luxury” and 3D puff finishes that define the 2026 market.
Scaling your shop shouldn’t mean compromising on quality or missing deadlines. With over 15 years of manual embroidery digitizing expertise and a 99.9% first-time-right rate, we’re ready to act as your stable technical backbone. Whether you need a 12-hour standard turnaround or a 4-hour rush order to secure a corporate contract, our global service hubs provide the precision you require. It’s time to remove the friction from your creative process and focus on growing your business with confidence.
Get Your Professional Embroidery Digitizing Quote Now
Frequently Asked Questions
What is the difference between embroidery digitizing and graphic design?
Graphic design focuses on creating visual art for digital screens or flat printing. Embroidery digitizing is the technical process of translating that art into a series of mechanical commands for a needle and thread. While a graphic designer works with pixels and vectors, a digitizer must account for the physics of thread tension, fabric push and pull, and the structural integrity of the garment.
Can I use any image file for embroidery digitizing?
We can work with most standard image formats, including JPEG, PNG, and PDF. However, the quality of the final stitch file depends heavily on the clarity of the source image. High-resolution raster files or clean vector art provide the best foundation because they allow the digitizer to see fine lines and small text clearly. If an image is too blurry, it may require manual redrawing or vector art conversion before the digitizing process can begin.
How long does it take to digitize a logo for embroidery?
Standard professional turnaround is typically 12 hours. For urgent projects, rush order processing can deliver production-ready files in as little as 4 hours. The total time depends on the complexity of the design and whether the initial brief includes all necessary technical details like garment type and final size.
What is a DST file and why do I need it?
A DST file is the industry standard format for commercial embroidery machines. It contains only the essential coordinate data that tells the machine where to move the hoop and when to trim the thread. Unlike hobbyist formats, DST files are universal across most professional multi-head machines, ensuring your design can be produced at high speeds without technical errors. To understand how DST compares to other formats and which file type is right for your specific machine, refer to our comprehensive guide to embroidery file types and production standards.
Why does my embroidery look puckered or messy?
Puckering is usually caused by a mismatch between the digitizing file and the fabric it’s sewn on. If the stitch density is too high for a lightweight material, the fabric will bunch up under the tension. Messy results often stem from poor underlay or a lack of proper pull compensation, which fails to stabilize the material during the embroidery process.
Is auto-digitizing software good enough for commercial use?
Auto-digitizing software is generally insufficient for professional production. It lacks the human logic required for efficient pathing, often resulting in excessive jump stitches and unnecessary thread breaks. Commercial shops avoid these tools because they lead to higher machine downtime and wasted garments. Professional embroidery digitizing remains a manual craft that requires an expert to plan the most effective needle route.
How much does professional embroidery digitizing cost?
Pricing is determined by the complexity of your design, the total stitch count, and how quickly you need the finished file. Simple left-chest logos are handled differently than large, complex jacket backs with high stitch counts. To ensure you receive a fair price that matches your specific project, it’s best to submit your artwork for a custom quote based on your production requirements.
What is pull compensation in embroidery?
Pull compensation is a technical adjustment where the digitizer slightly “over-builds” certain parts of a design in the software. Thread naturally pulls the fabric inward as the machine runs, which can distort shapes like circles into ovals. By adding compensation, the digitizer ensures that the final physical result perfectly matches the original digital artwork after the thread tension takes effect.