Digitizing Small Lettering for Embroidery: The Professional 2026 Guide
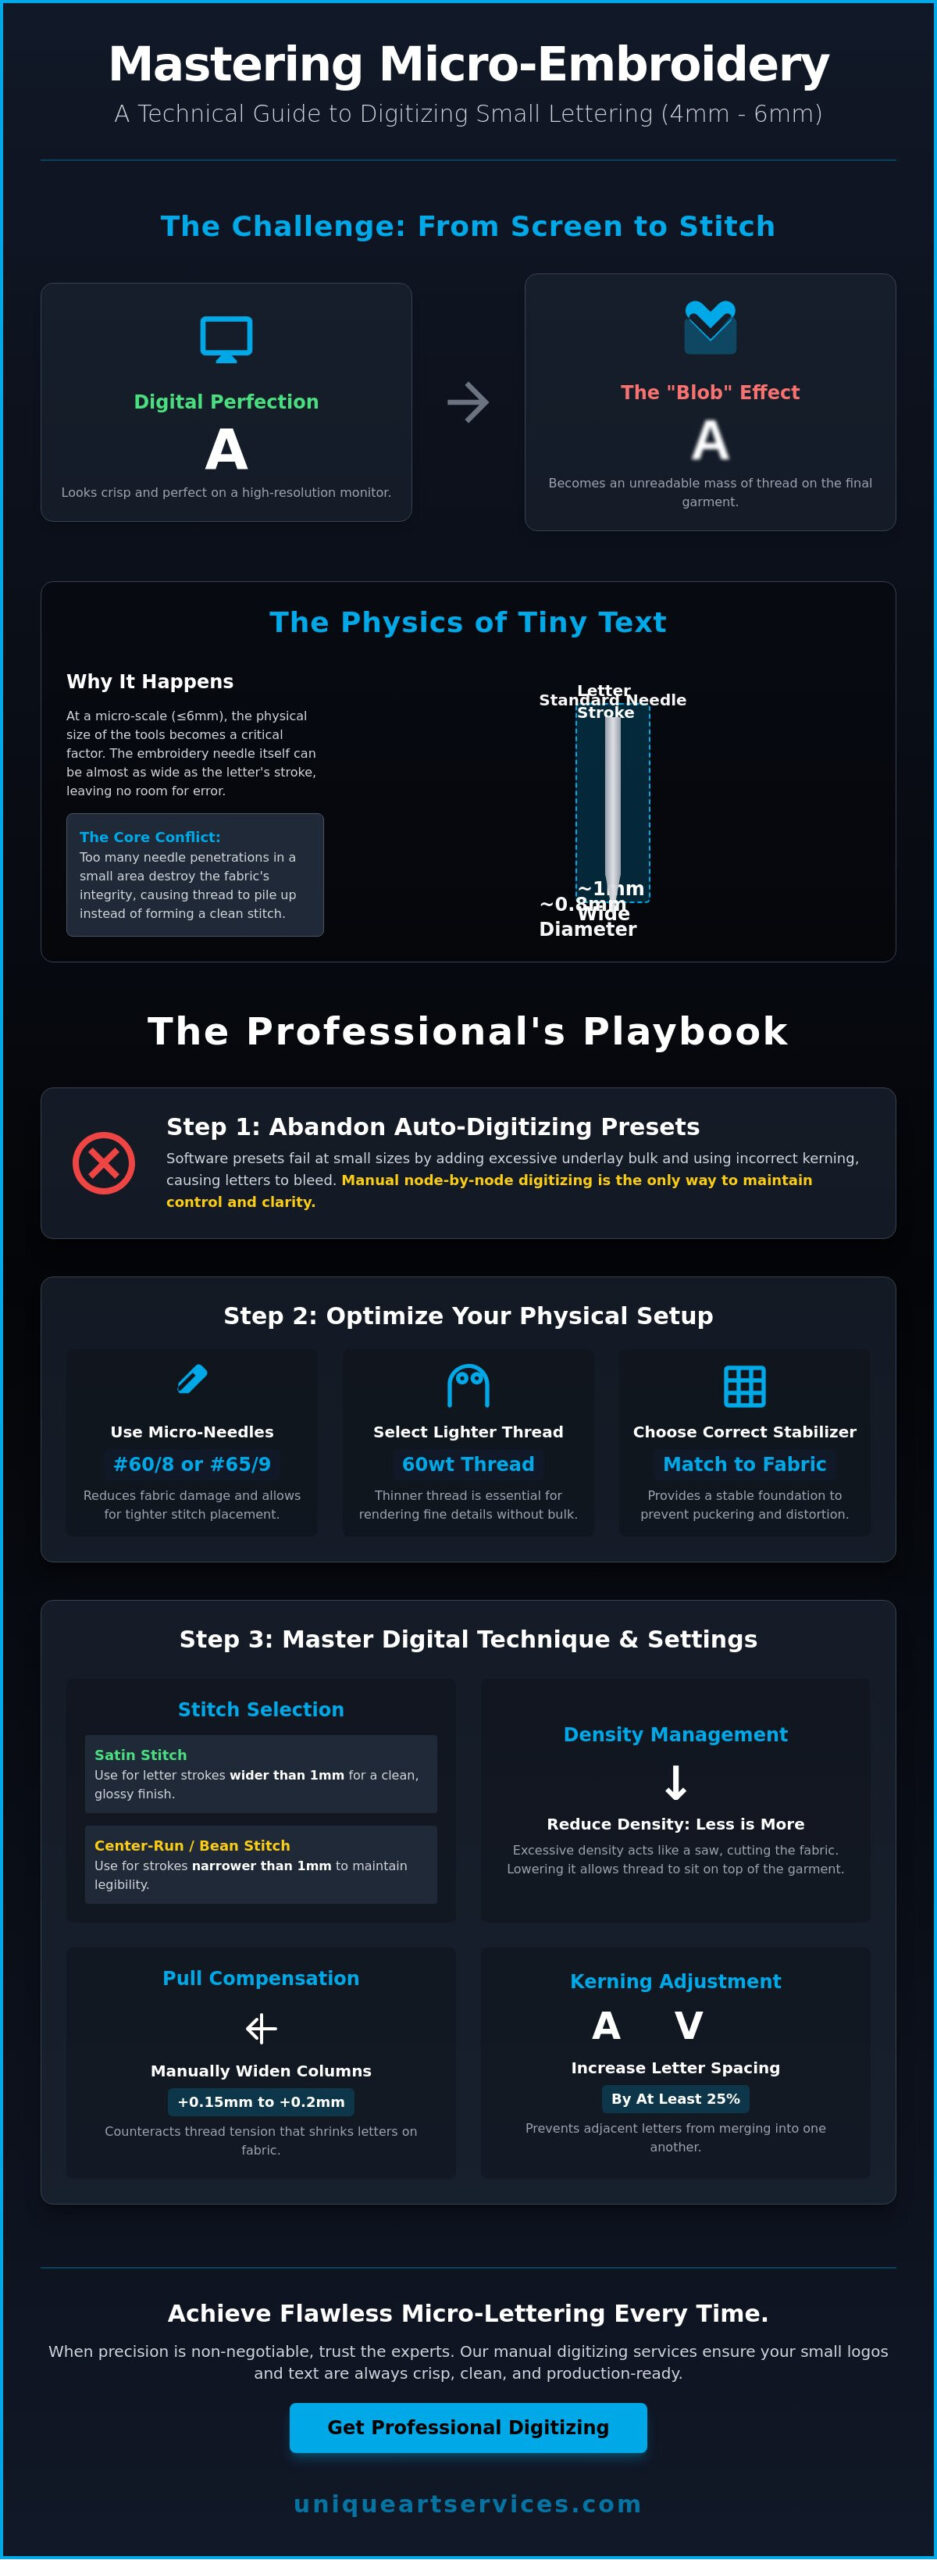
Why does a 5mm letter look perfect on your high-resolution monitor but turn into an unreadable “blob” of thread once the machine starts running? You’ve likely felt the frustration of watching tiny text sink into the fabric or dealing with constant thread breaks during a tight production window. Mastering the technical precision of digitizing small lettering for embroidery requires moving beyond standard software presets. It demands a firm grasp of how thread and fabric interact at a microscopic level.
We understand that failed test runs are a significant drain on your shop’s efficiency and profitability. This professional 2026 guide provides the technical precision needed to produce crisp, readable text between 4mm and 6mm that survives the production process. You’ll learn the manual pathing and pull compensation techniques that industry experts use to maintain clarity. We will cover essential standards, including why you should increase kerning by at least 25% and how to optimize your workflow for the latest 2026 software releases.
Key Takeaways
- Identify the physical constraints of micro-embroidery where standard needle widths often exceed letter stroke thickness.
- Learn to select the optimal stitch type, including the strategic use of center-run stitches for complex or serif-heavy fonts.
- Master manual pathing when digitizing small lettering for embroidery to reduce thread trims and improve machine efficiency.
- Optimize your production results by matching high-precision digital files with the correct 60wt thread and specialized needles.
- Understand why manual node-by-node digitizing is essential for preserving fine details and preventing costly garment damage.
The Technical Challenges of Micro-Embroidery Lettering
Micro-lettering is a specific technical category in the embroidery world, defined as text that is 6mm (1/4 inch) or smaller. At this scale, the laws of physics begin to work against the digitizer. While a 10mm letter offers plenty of “real estate” for stitches to sit comfortably, a 4mm letter forces every element into a microscopic space. Successful digitizing small lettering for embroidery begins with recognizing that the tools of production have physical limits. For example, a standard #75/11 needle has a diameter of approximately 0.8mm. When you consider that a stroke in a 5mm letter might only be 1mm wide, it becomes clear that the needle itself occupies nearly the entire width of the column.
To master these challenges, one must understand the fundamental Machine Embroidery Process, where the mechanical movement of the hoop must perfectly synchronize with the needle’s penetration. If you attempt to pack too many stitches into these tiny areas, you encounter the “blob” effect. This happens when excessive needle penetrations destroy the fabric’s structural integrity, causing the thread to sink or pile up into an unreadable mass. There is a hard limit to what can be achieved; if a client requests a complex serif font at 3mm, a professional must explain that the needle-to-thread ratio makes it physically impossible to maintain clarity. In such cases, simplifying the font or increasing the size is the only way to ensure a quality result.
Why Auto-Digitized Fonts Fail at Small Scales
Most software presets are designed for standard-sized logos and fail to account for the unique “pull” of thread on a tiny radius. Automated underlay is often the primary culprit. It adds unnecessary bulk that lifts the top stitching, making small letters look distorted. Default kerning also fails to anticipate how thread “spreads” on the garment. Without manual intervention, the letters will likely bleed into one another, turning a professional brand name into an illegible string of knots. Professional digitizing small lettering for embroidery requires stripping away these automated layers and rebuilding the text with manual pathing.
The Relationship Between Needle Size and Letter Clarity
Precision at the micro-level depends heavily on the footprint of the needle. A standard needle creates a hole that is often too large for high-detail work, leading to “needle deflection” where the needle bends slightly upon impact. This ruins the alignment of small text. Switching to a micro-needle, such as a #60/8 or #65/9, reduces this footprint and allows for much tighter tolerances. To achieve maximum readability, we focus on the Stitch-to-Space Ratio: the precise balance between thread coverage and the open gaps that define the letter’s shape. Maintaining this ratio ensures that the “holes” in letters like ‘e’ or ‘a’ remain open and crisp during production.
Choosing the Right Stitch Types and Density for Small Text
Selecting the appropriate stitch type is a critical decision in the digitizing process. For most text, the satin stitch is the gold standard because it provides a clean, glossy finish. However, a satin stitch requires a minimum column width of 0.8mm to 1mm to remain stable. If the stroke of a letter is narrower than this, the machine may struggle to create a distinct stitch, leading to thread breaks or a messy appearance. When columns become too thin, professional digitizers often transition to a center-run or bean stitch to maintain legibility. Understanding how each of these embroidery stitch types behaves at micro-scale is essential for making the right technical choice for your design.
Density management is equally vital when Digitizing Small Lettering. A common mistake is increasing density to make small letters appear “fuller.” In reality, excessive density in a confined space acts like a saw, cutting through the fabric and causing the design to sink. A “less is more” approach is more effective. Reducing density allows the thread to sit on top of the garment rather than burying itself in the fibers. For complex projects, our team provides expert embroidery digitizing to ensure your micro-text remains crisp and production-friendly.
Pull compensation is perhaps the most misunderstood aspect of micro-embroidery. In the digital environment, a letter might look perfectly proportioned. On the machine, however, the tension of the thread pulls the fabric inward, making the letter appear thinner and taller than intended. To counteract this, you must manually increase the width of your satin columns in the software. For text under 5mm, a pull compensation of 0.15mm to 0.2mm is often necessary to achieve the final desired width on the garment. This adjustment ensures that the physical thread accounts for the real-world shrinkage that occurs during the stitch-out.
Satin Stitches vs. Bean Stitches for Micro-Text
While satin stitches are preferred for their professional look, they have limitations. For “hairline” serifs or extremely small fonts where the stroke is under 0.8mm, a bean stitch is a superior choice. A bean stitch travels back and forth, creating a bold line without the width of a satin column. It’s also important to filter out “short stitches” below 1mm in your software. These tiny movements provide no visual benefit but significantly increase the risk of bird-nesting and production delays. By focusing on essential paths, you maintain the integrity of the design.
Underlay Strategies for Small Lettering
Standard underlay techniques often backfire on small text. You should avoid edge-run underlay, as the stitches can easily peek out from the sides of a 4mm letter. A single center-run underlay is usually sufficient. It provides a stable foundation for the top stitching without adding excessive bulk. In cases where you’re digitizing text at the absolute physical limit, such as 4mm or smaller, it’s often better to skip the underlay entirely. This reduces the total stitch count and prevents the “blob” effect that occurs when too much thread is packed into a tiny area.
A Step-by-Step Guide to Manual Pathing and Kerning
Manual pathing is the difference between a high-speed, profitable production run and a constant cycle of machine trims and bird nests. When digitizing small lettering for embroidery, the primary objective is to create a logical, continuous flow that minimizes downtime. This process involves more than just selecting a font; it requires a strategic plan for how the needle travels from the first stitch to the last. Unlike automated systems that often insert unnecessary jumps, manual pathing allows for travel stitches to be hidden beneath the final satin columns.
To maintain perfect registration, always follow a “bottom-up, left-to-right” logic. This methodology ensures that the fabric is pushed away from the needle in a predictable direction, preventing the material from bunching or shifting as the design progresses. Additionally, tie-ins and tie-offs must be handled with extreme care. In micro-text, these knots can become visible “bumps” if placed on the edges of a letter. Instead, bury them within the thickest part of the letter body to maintain a smooth, professional finish. Mastering these techniques ensures that your designs are as functional as they are aesthetic.
The Manual Pathing Workflow
Efficiency in production starts with a disciplined sequence. By strategically placing travel stitches beneath subsequent satin columns, you create a seamless transition that automated software often misses. Follow these steps for a cleaner result:
- Step 1: Map the sequence to minimize the distance between exits and entries. Analyze the word as a single unit to find the most efficient path.
- Step 2: Use “running stitches” hidden under the next letter to connect characters. This creates a bridge that the machine follows without stopping.
- Step 3: Eliminate “trim commands” between letters in the same word. Every trim adds seconds to the production time and increases the risk of the needle unthreading.
- Step 4: Verify the “exit point” of the final letter. It should lead safely to the next design element without crossing over completed work.
Kerning Adjustments for Thread Spread
Kerning for embroidery requires significantly more space than print media. Thread has a natural tendency to spread once it’s released from the tension of the machine. Industry standards suggest that increasing letter spacing by at least 25% compared to standard print layouts is often necessary for clarity. Letters with tight internal loops, such as “a”, “e”, and “g”, require manual intervention to open up the “white space.” If the counter of an “e” is too small, the thread will inevitably fill the hole, resulting in a solid blob. Similarly, you must adjust ascenders and descenders to prevent them from overlapping, especially when digitizing small lettering for embroidery on unstable knit fabrics. This extra breathing room ensures the text remains legible even after the fabric relaxes.
Optimizing Physical Variables: Needles, Thread, and Stabilizer
Physical variables act as the bridge between a high-precision digital file and a professional finished product. Even a perfectly executed file will fail if the machine setup is not calibrated for micro-scale work. When digitizing small lettering for embroidery, you must account for the specific thickness of the thread and the diameter of the needle. Standard 40wt thread is often too bulky for micro-text under 6mm. Switching to 60wt or 75wt thread provides the necessary finesse, enabling tighter turns and sharper serifs. However, thread changes require a corresponding needle adjustment. A #60/8 or #65/9 needle is essential for high-detail work to reduce the penetration footprint and prevent the fabric from becoming unstable under the weight of the stitches.
Stabilization is another non-negotiable factor for success. For micro-text, a heavy-weight cutaway stabilizer is mandatory. Tearaway stabilizers lack the long-term support needed to keep tiny letters from shifting or distorting during the production process. You should also pay close attention to tension tuning. Reducing top tension slightly prevents thread “looping” on tight corners. If the tension remains too high, the thread may snap or pull the fabric into the needle plate. Achieving this mechanical balance ensures that every letter remains crisp and readable after the garment is removed from the hoop.
The 60wt Thread Advantage
Using 60wt thread offers a distinct advantage for micro-embroidery projects. It is approximately 25% to 30% thinner than standard 40wt thread, which allows you to increase stitch density without creating the “blob” effect described in earlier sections. Keep in mind that 60wt thread requires a needle with a smaller eye to prevent “flagging,” which occurs when the fabric moves vertically with the needle. Unique Art Services LLP digitizes specifically for your thread weight, ensuring the stitch counts are optimized for these thinner filaments. If you need a file that handles these tight tolerances, you can order professional embroidery digitizing tailored to your specific equipment setup.
Fabric-Specific Adjustments
Different materials require unique digitizing strategies to maintain clarity. For pique polos, the textured weave can “swallow” small text, making a water-soluble topping necessary to keep stitches afloat on the surface. Performance wear presents a different challenge due to its high stretch factor; you’ll need to apply extra pull compensation to prevent the letters from distorting as the fabric relaxes. Finally, for caps and hats, always follow the “Center-Out” digitizing rule. Starting from the center and moving toward the sides prevents registration shifts on the curved surface. These adjustments are vital when digitizing small lettering for embroidery across diverse product lines.
Why Professional Manual Digitizing is Essential for Small Logos
The financial cost of a digitizing error is never limited to the price of the file itself. In a high-volume production environment, a single “bird-nest” caused by poor pathing can instantly ruin a $50 premium garment and stop a multi-head machine for ten minutes or more. When digitizing small lettering for embroidery, the margin for error is non-existent. Professional manual digitizing acts as an insurance policy for your production floor. It ensures that the needle moves with surgical precision, protecting both your equipment and your inventory from avoidable damage and costly waste.
Manual redrawing is the only reliable way to achieve clarity at the 5mm scale. While automated software often relies on auto-tracing to create shapes, this method generates hundreds of unnecessary nodes. These extra points cause the machine to stutter and the thread to bunch, leading to the unreadable “blobs” discussed earlier. A professional digitizer places every node by hand, simplifying the geometry of the letter to ensure the smoothest possible stitch-out. This meticulous approach directly impacts your production efficiency by reducing machine downtime and eliminating the need for constant thread-break troubleshooting. Shops looking to evaluate their options should review what separates reliable embroidery digitizing services from automated shortcuts that lead to costly production failures.
Scaling a commercial embroidery business requires a reliable partner who can handle the technical heavy lifting of complex micro-text. Outsourcing these projects to specialists allows your in-house team to focus on production and customer engagement rather than trial-and-error testing. This strategy is particularly effective for high-capacity shops that cannot afford the downtime often associated with digitizing small lettering for embroidery. Relying on seasoned experts ensures that your brand maintains a reputation for quality, even on the most challenging micro-scale logos.
The Unique Art Services LLP Advantage
With over 15 years of industry leadership, we specialize in high-precision embroidery digitizing. Our team understands that micro-lettering requires a human touch to navigate the complex physics of thread and fabric tension. We utilize manual pathing for every project to ensure zero-trim efficiency, which significantly extends the life of your machine’s trimming blades. Our commitment to technical accuracy has resulted in a 99% first-time-right rate, allowing you to move from file delivery to production without the need for multiple revisions or costly test runs.
Rush Solutions for Tight Deadlines
In the fast-paced world of commercial embroidery, waiting days for a file isn’t an option for your business. Our 4-hour rush order processing is designed to keep your machines running during peak seasons or when last-minute client changes arise. We operate through global service hubs to provide 12-hour standard turnarounds for clients worldwide, ensuring that your workflow remains uninterrupted regardless of your time zone. If you’re ready to elevate the quality of your micro-text, Contact Unique Art Services LLP today to discuss your next small-lettering project and experience the difference of professional manual digitizing.
Elevate Your Production Standards for Micro-Text
Achieving legibility in text under 6mm requires a technical shift from software-driven presets to physics-driven manual precision. Success in digitizing small lettering for embroidery is found in the synergy between manual pathing, correct pull compensation, and the use of specialized materials like 60wt thread. These refinements don’t just improve aesthetics; they protect your production efficiency by minimizing thread breaks and preventing damage to high-value garments. By prioritizing these professional standards, you can transform micro-embroidery from a technical bottleneck into a reliable service offering for your clients.
Unique Art Services LLP provides the stable backbone needed for shops to scale their micro-text capabilities without the risk of failed test runs. Our team leverages over 15 years of experience and a 99% first-time-right rate to deliver production-ready files that respect the limits of embroidery physics. With a 12-hour standard turnaround, we ensure your machines stay active and profitable. Get Production-Ready Small Lettering Digitized in 4 Hours and experience the reliability of a global specialist. Move forward with the confidence that your most challenging projects are in expert hands.
Frequently Asked Questions
What is the smallest size text can be for embroidery?
The practical limit for legible embroidery text is generally 4mm to 5mm, which is approximately 3/16 of an inch. While some specialized setups can push to 3mm, most commercial machines struggle to maintain character definition below this threshold. Successful results at this scale depend on simple font choices and precise manual pathing to ensure the needle has enough physical space to form each letter.
Why does my small lettering look like a bird’s nest?
A bird’s nest often indicates excessive stitch density or a lack of proper tie-ins and tie-offs. When digitizing small lettering for embroidery, packing too many stitches into a tiny area causes thread to pile up under the needle plate. Reducing density by 15% to 20% and ensuring logical travel paths without unnecessary trims can often resolve this issue and keep your machine running smoothly.
Do I need special thread for small embroidery fonts?
Yes, switching to 60-weight or 75-weight thread is highly recommended for text under 6mm. These threads are roughly 25% to 30% thinner than standard 40-weight polyester, allowing for sharper details and tighter turns. Using thinner thread reduces bulk and prevents the letters from merging into a solid mass, which is a common problem when using standard production materials for micro-text.
What is the best stitch type for 4mm lettering?
A center-run stitch or a bean stitch is often the best choice for 4mm lettering, especially for serif fonts with delicate strokes. If you use a satin stitch, the column width must be at least 0.8mm to remain stable on the fabric. For strokes narrower than this, a single or triple run stitch provides better clarity without the risk of the thread “bleeding” together and losing its shape. For a deeper understanding of how each option performs in production, reviewing a comprehensive guide to embroidery stitch types can help you make the most informed decision for your specific project.
How do I prevent small letters from sinking into fleece or pique?
To prevent small letters from sinking into textured fabrics, use a water-soluble topping combined with a heavy-weight cutaway stabilizer. The topping holds the stitches on top of the fabric fibers until the design is complete, while the stabilizer provides the necessary foundation. This combination ensures that micro-text remains visible and doesn’t disappear into the garment’s nap or weave during the stitch-out.
Can I use auto-digitizing for small logo text?
No, auto-digitizing is generally unsuitable for small logo text because it lacks the nuance required for micro-scales. Automated tools often create too many nodes and incorrect underlay, leading to poor registration and thread breaks. Professional digitizing small lettering for embroidery requires manual node placement to ensure every stitch serves a functional purpose and the machine pathing remains as efficient as possible.
Should I use a different needle for small lettering?
Yes, you should switch to a smaller needle, such as a #60/8 or #65/9, when working with micro-lettering. A standard #75/11 needle creates a hole that is often too large for 60wt thread, which can lead to poor stitch definition and fabric damage. A smaller needle minimizes fabric displacement and allows for the high precision needed to maintain the integrity of tiny characters.
How much pull compensation should I add for small text?
For text under 5mm, you should typically add between 0.15mm and 0.2mm of pull compensation in your software. This adjustment accounts for the natural tendency of the thread to pull the fabric inward during the embroidery process. Without this manual override, your letters will appear much thinner and more distorted on the finished garment than they appeared on your digital design screen.