How to Convert a Logo to an Embroidery File: A Professional Digitizing Guide (2026)
Digitizing isn’t a simple file conversion; it’s a technical blueprint for motion and tension. Many creators assume that learning how to convert logo to embroidery file formats is as easy as clicking a button, but the reality involves a precise translation of digital paths into physical thread movements. You’ve likely experienced the frustration of a design that looks sharp on your monitor but results in distorted fabric or frequent thread breaks once it hits the machine.
We know how discouraging it is to deal with puckering or confusing terminology like density and underlay. This guide provides a clear path to transforming your digital logos into production-ready embroidery files that maintain their integrity on any garment. You’ll learn the technical methodologies required for clean, professional results and minimal machine downtime. We will preview the latest industry standards for 2026, ensuring your designs are scalable, efficient, and ready for high-capacity production.
Key Takeaways
- Understand the fundamental shift from digital pixels to physical stitch paths to ensure design accuracy and production stability.
- Identify the critical roles of underlay stitches and density settings in preventing fabric distortion and common production errors.
- Learn the essential artwork preparation steps to convert logo to embroidery file formats that remain clean and scalable.
- Compare the long-term efficiency of manual digitizing against automated tools to maximize machine uptime.
- Explore how professional digitizing services and quality assurance protocols optimize your overall production capacity.
Understanding Why Logos Require Technical Digitizing Rather Than Simple Conversion
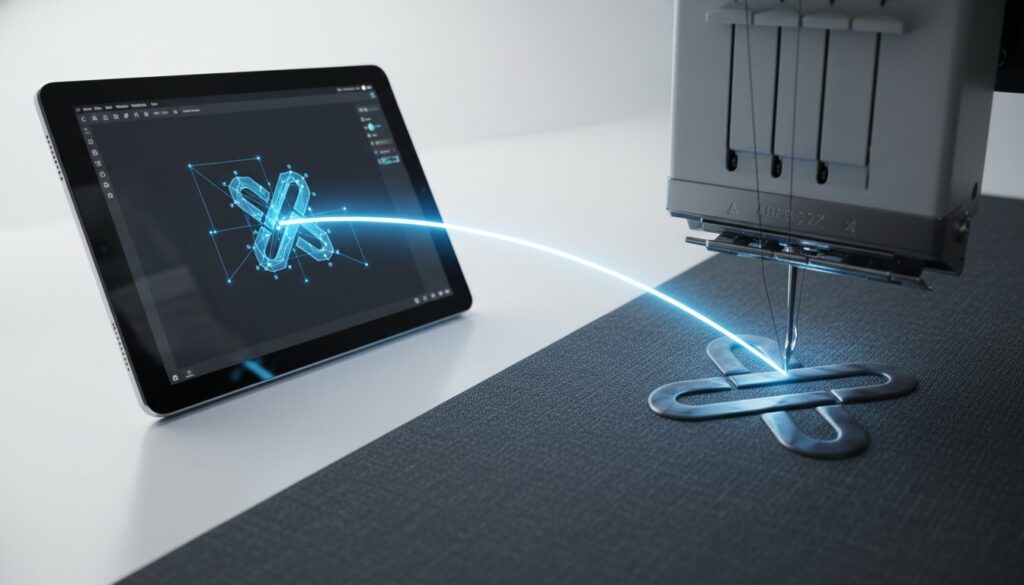
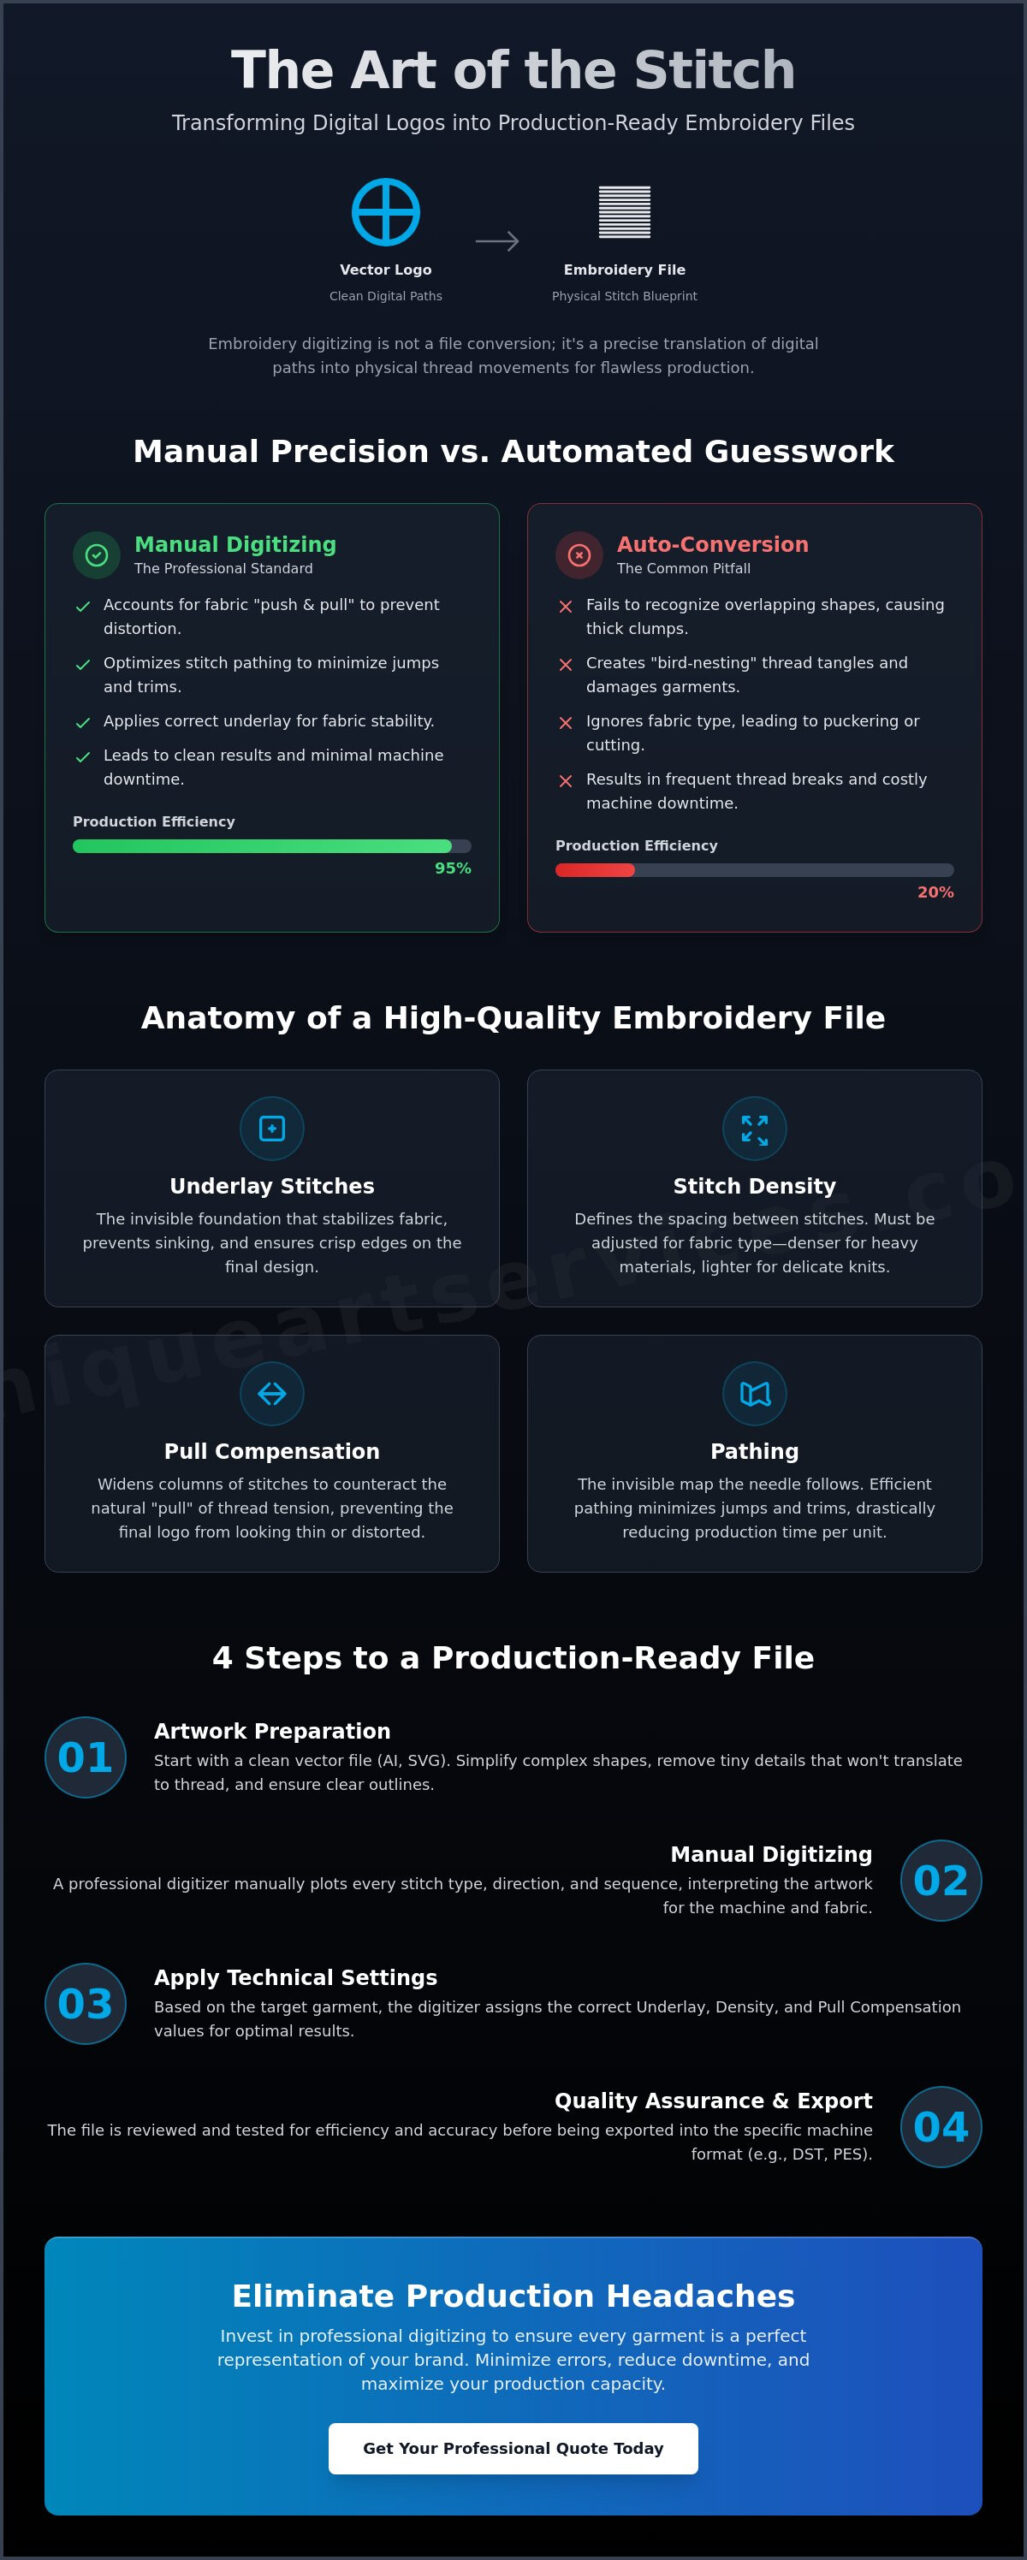
Converting a visual design into a physical stitch pattern is far more than a simple file export. In the world of commercial branding, embroidery digitizing is the specialized process of mapping precise needle paths for production equipment. Unlike a standard document print, where a printer simply lays ink on paper, an embroidery machine needs to know the exact sequence, direction, and density of every single stitch. Learning how to convert logo to embroidery file formats correctly is the difference between a high-end garment and a ruined batch of inventory.
Many users feel frustrated when they realize a “Save As” command doesn’t exist for formats like DST or PES. This happens because those files aren’t images; they’re machine commands. When you attempt to convert logo to embroidery file types, you’re transitioning from visual logic to machine logic. Visual logic focuses on how a logo looks on a screen. Machine logic focuses on how a needle interacts with moving fabric under tension. It isn’t a picture. It’s a set of instructions.
The Limitations of Raster and Vector Files in Embroidery
JPEGs and PNGs are made of pixels, which are essentially colored dots on a grid. These files lack the spatial coordinate data that a computerized embroidery machine requires to function. Vector files, such as AI, EPS, or SVG, are a step closer because they use mathematical paths rather than pixels. However, even the cleanest vector file doesn’t tell a machine where to start a satin stitch or how much underlay is needed to keep the fabric from shifting. Understanding the fundamental differences between vector vs raster file formats is essential before attempting to prepare artwork for embroidery production. Professional software must interpret these shapes and assign specific stitch types based on the final garment’s texture and weight.
Why “Auto-Digitizing” Often Fails in Production
While AI and automated tools have improved, they often struggle with the complexities of real-world production. Automated software frequently fails to recognize overlapping shapes, leading to excessive stitch build-up. This often results in “bird-nesting,” a phenomenon where thread tangles into a thick clump under the needle plate. This causes immediate machine downtime and can damage the garment.
Manual pathing provides the precision that automation lacks. A professional digitizer chooses the sequence of elements to minimize jumps and trims. They account for “push and pull,” which is the natural tendency of fabric to distort as thread is applied. Without this human expertise, even a high-resolution logo can result in a puckered, unprofessional mess on the production floor. Precision in the file leads to efficiency on the machine.
The Core Technical Elements of a High-Quality Embroidery File
High-quality digitizing relies on a series of invisible foundations that dictate the success of the production run. Underlay stitches serve as this groundwork. They stabilize the fabric and provide necessary lift for the top stitching. Without a proper underlay, your design may sink into the pile of a fleece or lose its crisp edges on a structured cap. It acts as a scaffold. This ensures the final logo remains vibrant and durable through multiple wash cycles.
Stitch density is equally critical. It defines the distance between needle penetrations. While a standard density of 0.4mm works for many 40-weight threads, this value must shift based on the substrate. Heavier fabrics can handle higher density. Delicate knits require a lighter touch to avoid “cookie-cutting” the material. To convert logo to embroidery file data successfully, every stitch must serve a purpose. When you work with various embroidery file formats, the internal density settings dictate how the machine handles these variables.
Pull compensation addresses the physical reality of thread tension. As the machine sews, the thread naturally pulls the fabric inward. If a digitizer doesn’t compensate by slightly over-extending the width of satin columns, the finished logo will look distorted or skinny. This is a common pitfall in automated tools that lack the intuition of a professional specialist. If you’re struggling with thread breaks or distorted logos, our team at Unique Art Services LLP can help refine your technical blueprints for better production results.
Pathing: The Secret to Efficient Production
Pathing is the invisible map the needle follows. Efficient pathing minimizes jumps, where the needle moves without sewing, and trims, where the thread is cut. Every trim adds seconds to the production time. Over a run of 500 shirts, poor pathing can lead to hours of wasted machine time. Expert digitizers hide travel stitches beneath the top layers of embroidery to keep the design moving seamlessly. This reduces machine wear and tear significantly.
Stitch Types: Satin, Fill, and Run Stitches
Choosing the right stitch type transforms a flat image into a textured masterpiece. Satin stitches are the industry standard for borders and text. They offer a glossy, raised finish. For larger filled areas, Tatami or Fill stitches provide a durable, woven appearance. Fine details and thin outlines rely on Run stitches. When you convert logo to embroidery file formats, selecting the wrong stitch for the wrong area can lead to puckering or thread looping. For a deeper look at technical standards, review our Comprehensive Guide to Embroidery File Types.
Manual Digitizing vs. Auto-Conversion Software: Choosing the Right Path
Choosing between automated software and manual digitizing is a decision that dictates your production efficiency. While automated tools promise speed, their “First-Time-Right” rate is significantly lower than that of an expert digitizer. When you convert logo to embroidery file formats using a human-led process, you gain the advantage of technical analysis that software simply cannot replicate. A machine doesn’t understand the physics of fabric tension. It sees pixels; a professional sees a garment.
The expertise gap is most visible when selecting stitches for specific fabrics. Software treats a pique polo the same way it treats a performance polyester, but these materials react differently under the needle. Professional digitizers apply human analysis to complex logo elements like gradients and fine details. They understand how to blend thread colors and adjust density to ensure the final product looks like the digital original. Without this intervention, your logo might look distorted or “puckered” once the stitching is complete.
Poor file conversion leads to excessive machine downtime. Every thread break or needle snap represents lost revenue. If your machine sits idle for twenty minutes to fix a “bird-nest” caused by bad pathing, that file has already cost you more than a professional service fee. Precision in the blueprint ensures that your machines stay running, maximizing your hourly output and protecting your bottom line.
When to Use Automated Tools
Automated conversion tools have a place in the market, primarily for low-stakes scenarios like personal hobby projects. If you’re experimenting with simple geometric shapes on scrap fabric, the limitations of automation are less critical. However, we advise against using these tools for commercial or high-volume orders. The risk of inconsistent quality across a large run is too high for a professional shop to ignore. Automation lacks the intuition required for production-grade reliability.
The ROI of Professional Manual Digitizing
The return on investment for manual digitizing is immediate. A small one-time fee for a production-ready file can save hundreds of dollars in ruined high-end garments. Professional firms provide the agility your business needs, often offering 12-hour or even 4-hour rush turnarounds to keep your shop moving during peak seasons. These experts specialize in “small text” challenges, using specific pull compensation and underlay settings that automated software often misses. This level of detail keeps your machines running and your customers satisfied. Getting it right the first time is always the most cost-effective strategy. Before committing to a service provider, reviewing a logo digitizing buying guide for production-ready precision can help you identify the technical criteria that separate quality manual digitizing from inferior automated alternatives.
Step-by-Step: How to Prepare and Convert Your Logo for Production
Transforming a digital image into a production-ready blueprint requires a methodical approach. To convert logo to embroidery file data successfully, you must follow a sequence that respects the physical limitations of thread and fabric. Precision at the start prevents failure at the machine. Follow these five essential steps to ensure your designs are ready for the production floor.
- Step 1: Clean up the artwork. Simplify complex gradients and remove unnecessary overlapping lines. Embroidery cannot replicate the infinite detail of a high-resolution screen; simplify the art to improve stitch quality.
- Step 2: Scale the logo. Always set the design to its final production size before assigning any stitches. Scaling a digitized file after the fact can lead to density issues and distorted designs.
- Step 3: Assign stitch types. Select satin stitches for thin columns and tatami fills for large areas. The size of each element dictates the specific needle movement required for a professional finish.
- Step 4: Set the pathing. Design the sequence to move from the center-out or bottom-up. This methodology provides maximum stability and prevents the fabric from shifting or “bunching” during high-speed production.
- Step 5: Export to the correct format. Choose the specific extension required by your equipment. This is often .DST for Tajima or .PES for Brother machines.
Preparing Your Artwork for Success
High-resolution vector files are the gold standard for input. Unlike raster images, vectors provide clean paths that software can easily interpret. You must also apply the “Minimum Detail” rule. Elements smaller than 1.5mm often won’t stitch well, as the needle can only move so close before the fabric integrity fails. If your logo contains microscopic text or intricate flourishes, these must be simplified or enlarged. For a deeper dive into technical preparation, The Ultimate Guide to Professional Embroidery Digitizing covers advanced art prep strategies in detail.
Choosing the Right Format for Your Machine
Understanding the difference between expanded and condensed file types is essential for smooth production. A .DST file is an expanded format. It contains specific stitch data but lacks color information. It remains the universal language for commercial embroidery. In contrast, condensed files like .EMB or .PXF retain the original design properties, allowing for easier editing. Always verify your machine’s compatibility before starting a run. If you need a production-ready file quickly, our Rush Order Processing ensures your machines stay active without delays.
Verifying machine compatibility involves a simple checklist. Ensure the file extension matches your machine’s requirements. Confirm the hoop size is appropriate for the design dimensions. Finally, check that the stitch count falls within the machine’s memory limits. These steps ensure you convert logo to embroidery file formats that work perfectly every time.
Optimizing Your Workflow with Professional Digitizing Services
Efficiency is the backbone of a profitable embroidery shop. Outsourcing the technical task to convert logo to embroidery file formats allows your business to pivot its focus toward high-volume production. When you aren’t stuck behind a computer screen attempting to troubleshoot a complex path, you’re on the floor keeping the needles moving. This shift in focus directly impacts your bottom line by maximizing machine capacity and reducing labor costs associated with file preparation.
Quality Assurance isn’t just a buzzword; it’s a technical necessity. Professional firms like Unique Art Services LLP implement a rigorous review process for every design. This involves checking stitch counts, density settings, and pathing logic before the file is ever delivered. Having a global service hub provides 24/7 technical support, ensuring that your production doesn’t stop just because of a time zone difference. This reliability is built on a First-Time-Right philosophy. In an industry where a single missed deadline can damage a client relationship, having a file that sews perfectly on the first attempt is non-negotiable.
Meeting Deadlines with 4-Hour Rush Processing
Production bottlenecks often occur at the most inconvenient times. Our 4-hour rush processing removes these friction points entirely. With a dedicated design team on standby, you can accept last-minute commercial orders with total confidence. Professional manual redrawing maintains a 99% accuracy rate, ensuring that even the most urgent projects meet your high standards. It’s the difference between turning away a lucrative contract and delivering a flawless product ahead of schedule.
Scaling Your Business with Expert Partners
Predictable overhead is essential for scaling any creative enterprise. A flat-rate fee model allows you to quote your customers accurately without worrying about fluctuating digitizing costs. Expert partners also provide the specialized knowledge required for different substrates. As discussed previously, a logo digitized for a standard t-shirt won’t work on a structured six-panel cap or a heavy canvas bag. Professionals adjust the pull compensation and underlay specifically for the garment type. To ensure your production stays on track and your quality remains consistent, convert your logo with Unique Art Services LLP for guaranteed results. This partnership provides the stable backbone your business needs to handle significant volume while maintaining an attention to fine detail.
Mastering Your Production Pipeline
Achieving professional embroidery results requires more than just high-end machinery. It demands a technical blueprint that respects the physics of thread and fabric. You now understand why manual precision is essential to avoid costly production errors and ruined garments. When you choose to convert logo to embroidery file formats with a focus on machine logic, you ensure your business operates at peak efficiency. It’s the most effective way to turn a creative vision into a tangible, durable brand asset without sacrificing quality.
Ready to eliminate machine downtime and scale your output? Get Your Logo Digitized Professionally in as Little as 4 Hours. We bring over 15 years of industry experience and a 99% first-time-right accuracy rate to every project. Whether you need our 12-hour standard service or an urgent 4-hour rush turnaround, our team provides the reliable support your business deserves. Your craftsmanship deserves a technical foundation that never fails. Let’s get your next design production-ready today.
Frequently Asked Questions
Can I convert a JPEG to an embroidery file for free?
You can use open-source tools like Ink/Stitch to convert files for free, but this requires a steep learning curve and manual pathing. Automated free converters found online rarely produce production-ready results. These tools often skip critical steps like underlay and pull compensation, leading to thread breaks and ruined garments on the machine. For commercial quality, professional manual digitizing is the standard.
What is the best file format for embroidery machines?
The best format depends on your specific equipment, though .DST is the universal standard for commercial machines. It’s an expanded format that provides precise stitch coordinates for Tajima and other multi-needle systems. Home users typically require proprietary formats like .PES for Brother or .EXP for Bernina. Always check your machine’s manual to confirm which extension it recognizes before starting a run.
Why does my embroidered logo look puckered or wrinkled?
Puckering is usually caused by a lack of proper stabilizing underlay or incorrect tension settings in the digital file. When you convert logo to embroidery file data without accounting for fabric push and pull, the thread tension physically distorts the material. Professional digitizers adjust these settings based on your specific fabric type to ensure the design lays flat and maintains its shape after stitching.
How do I resize an embroidery file without losing quality?
You must resize the design using the original “condensed” file, such as an .EMB or .PXF, rather than the “expanded” .DST file. Resizing a stitch-only file like a .DST doesn’t recalculate the stitch count, which results in gaps or excessive density. Professional software allows you to scale the underlying geometry so the program can automatically regenerate the correct number of stitches for the new size.
What is the difference between a DST and a PES file?
.DST is a commercial format that contains only stitch commands and lacks specific color data, requiring manual setup at the machine. In contrast, .PES is a proprietary format used by Brother home machines that includes both stitch paths and color information. While .DST is more versatile across different commercial brands, .PES is more user-friendly for hobbyists who want their machine to recognize thread colors automatically.
Can any logo be digitized for embroidery?
Most logos can be digitized, but designs with microscopic text or complex photographic gradients often require simplification. A needle and thread have physical width, meaning they can’t replicate details smaller than the thread itself. We often recommend enlarging small text or simplifying intricate flourishes to ensure the final embroidered result remains crisp and legible on the garment.
Do I need special software to convert my logo to embroidery?
Yes, professional results require specialized digitizing software like Wilcom or Pulse. These programs are distinct from standard graphic design tools because they generate machine-readable coordinates rather than just visual pixels. While some basic plugins exist for vector software, they lack the advanced controls for density, underlay, and pathing that are necessary to convert logo to embroidery file formats for commercial use.
How long does it take to professionally digitize a logo?
A standard professional turnaround usually ranges from 12 to 24 hours for most left-chest or cap logos. However, high-capacity service providers often provide rush processing that delivers completed files in as little as 4 hours. The total time depends on the complexity of the artwork and the level of manual pathing required to ensure the file runs smoothly on your production floor.