What is a DST Embroidery File? A Technical Guide to the Industry Standard
Your high-end embroidery machine is only as capable as the instructions it receives. In the commercial world, those instructions almost always arrive as a dst embroidery file. It’s frustrating when a design looks perfect on your screen but triggers a “file not recognized” error or produces messy, inconsistent stitching once it hits the needle. You’ve likely experienced the confusion of opening a file only to find the original artwork colors have vanished, replaced by a generic palette. This happens because the DST format focuses on mechanical precision rather than visual aesthetics.
We understand that production delays and ruined garments are not an option for your business. This guide will demystify the technical specifications of the DST format, explaining why it remains the universal industry standard despite its unique limitations. You’ll discover how to prepare production-ready files that eliminate machine errors and ensure every stitch aligns with your vision. We will cover everything from header metadata to jump command limits, providing the clarity you need for flawless machine performance.
Key Takeaways
- Understand why the DST format serves as the universal language for commercial embroidery machines and high-volume production.
- Learn the technical anatomy of a dst embroidery file, including how coordinate systems and core commands dictate precise needle movement.
- Identify the critical differences between DST, PES, and EMB formats to ensure you select the right file type for your specific hardware.
- Master the reality of thread color management to eliminate confusion when your software displays generic or “incorrect” palettes.
- Discover why manual pathing is essential for creating production-ready files that avoid the common pitfalls of automated conversion.
What is a DST Embroidery File? The Industry Standard Explained
A dst embroidery file is the foundational data format for industrial embroidery. Originally developed by the Tajima Group, it’s known as an “expanded” format. This means the file contains specific, low-level instructions for the machine’s hardware rather than high-level design objects. It tells the needle exactly where to move on a 2D plane using a coordinate system. Because of this direct, instruction-heavy approach, it quickly became the universal language for commercial production. It’s the standard that ensures your design translates perfectly from a computer screen to a physical garment.
Before the digital age, embroidery machines relied on paper tape punch cards. These physical tapes were fragile, cumbersome, and difficult to store. The transition to the DST format revolutionized the industry by digitizing these punch patterns into a robust binary format. Today, it’s the most widely recognized format globally. Most commercial machines are built to read DST data by default. This makes it a non-negotiable requirement for professional digitizers and apparel manufacturers who value speed and accuracy.
The Origins of the Tajima DST Format
Tajima’s dominance in the 1980s and 90s solidified the .dst extension as a global standard. While other manufacturers originally pushed their own proprietary formats, the industry required a common ground for cross-brand compatibility. The technical specifications of DST files allow machines from different manufacturers to interpret the same stitch data without errors. This shift from closed, exclusionary systems to an open-standard approach allowed the global embroidery market to scale. It created a predictable environment where a single file could run on almost any industrial machine.
Why Machine Compatibility Matters
Modern high-volume manufacturing requires equipment that works together seamlessly. Whether you operate a fleet of Tajima heads or a mix of brands like Barudan, Brother, and Melco, the DST file provides the necessary bridge. It translates simple X and Y coordinates into physical needle movements with high precision. This reliability is the primary reason commercial shops prefer DST over home-use formats like PES. It removes the guesswork from complex, multi-head production runs. When your machine recognizes the file immediately, your production line stays moving. Efficiency is the backbone of a successful commercial enterprise.
The Technical Anatomy of a DST File: Stitches and Commands
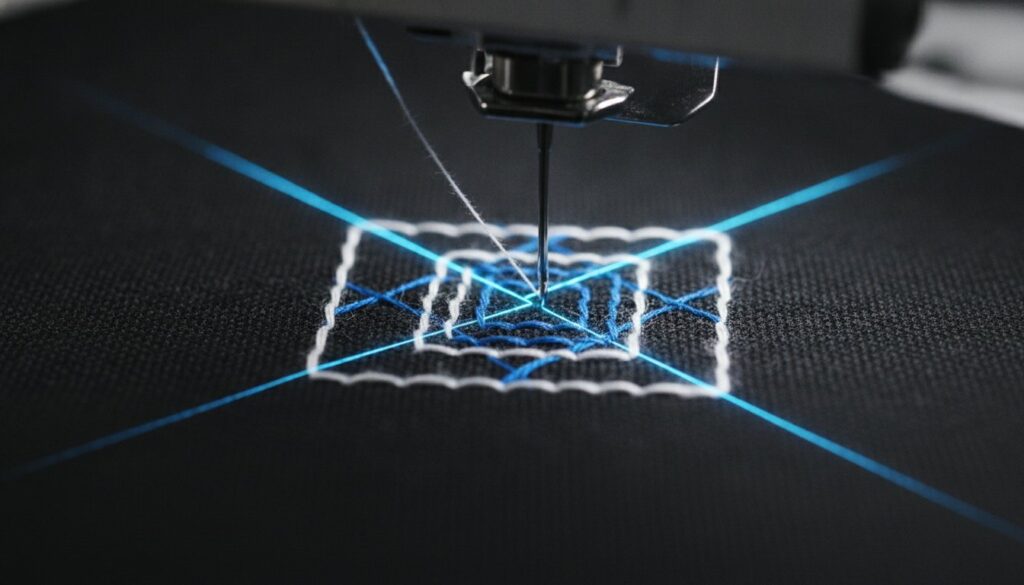
A dst embroidery file functions as a precise set of coordinates. It doesn’t contain shapes, curves, or vector objects. Instead, it utilizes a Cartesian coordinate system where every point is measured in tenths of a millimeter, often called “Tajima units.” The machine reads these as relative movements from the current needle position. This “low-level” data structure is the reason DST is categorized as an expanded format. It’s the final output of the digitizing process, stripped of the creative logic used to construct the design and reduced to raw mechanical instructions.
Precision is the hallmark of this format. Every move is calculated to ensure the frame shifts exactly where it needs to be before the needle penetrates the fabric. Because the file is a literal list of movements, the machine doesn’t have to “think” or calculate densities on the fly. This simplicity makes the format incredibly stable. It’s the primary reason industrial machines can run at high speeds without the software lag that might plague more complex, object-based files. Efficiency in the file structure leads directly to efficiency on the production floor.
Expanded vs. Condensed Files
Understanding the distinction between expanded and condensed files is vital for any commercial operation. A native digitizing file, such as an .EMB, is “condensed.” It stores “object” data like stitch types, densities, and underlay settings. When you export this as a dst embroidery file, it becomes “expanded.” All that high-level logic is converted into a static list of needle drops. This is why you shouldn’t resize a DST file. If you scale it up by 20%, the machine simply moves the existing stitches further apart, creating unsightly gaps. It’s always best to keep your original source files for edits and rely on professional embroidery digitizing to ensure your production files are correctly sized from the start.
Understanding Machine Commands
The language of a DST file is remarkably focused. It relies on three primary commands to guide the machine:
- Stitch: The machine moves to a coordinate and drops the needle to create a stitch.
- Jump: The machine moves to a new location without dropping the needle. This allows the machine to navigate between different elements of a design.
- Trim: This command instructs the machine to cut the thread, preventing “nesting” or messy connections between design segments.
One technical limitation of the DST format is the maximum stitch length. A single command can only move the frame approximately 12.1 millimeters. If a design requires a longer gap, the digitizer must program multiple jump commands in a sequence to reach the destination. Another resource compares DST to other formats and highlights how these command structures vary across different machine types. Finally, “Stop” commands are embedded to signal a color change, even though the file itself doesn’t know which thread color is currently loaded on the machine head.
DST vs. PES and EMB: Choosing the Right Format
Choosing the right format is a matter of matching the file to your specific hardware. While a dst embroidery file is the gold standard for high-capacity industrial machines, home users often encounter formats like PES (Brother) or JEF (Janome). The fundamental difference lies in the level of data stored within the code. PES files are designed for consumer convenience, often embedding specific thread brands and colors. In contrast, DST is a lean, instruction-only file built for speed and cross-brand reliability. It’s the “raw” data that keeps production lines moving without software conflicts.
Commercial decorators insist on DST because it removes the software-specific “noise” that can cause machine errors during high-speed runs. It provides a clean slate of coordinates that any industrial head can interpret. However, many modern home machines can read DST files, though they may lose some user-friendly features like on-screen color previews. For a deeper look at these technical nuances, this Ultimate Guide to Embroidery File Formats provides a solid foundation for understanding the broader ecosystem.
Industrial vs. Home Embroidery Formats
Scalability is the primary dividing line between these categories. Home formats are often restricted by hoop size and simple stitch types. Industrial DST files handle complex production requirements, such as digitizing for 3D puff embroidery, where precise stitch density and pathing are critical for achieving physical loft. Additionally, DST files are smaller in size. This was essential for older machines with limited onboard memory, and it remains beneficial for modern shops managing thousands of active design files across a local network.
The Metadata Gap
When you convert a design into a dst embroidery file, you lose the “metadata” or high-level instructions. This includes information about the original vector objects, specific thread colors, and the ability to scale the design without recalculating every stitch. This is why the .EMB file is considered the “Master File.” It’s object-based and fully editable. If you need to update a logo next year or change a satin stitch to a fill, you’ll need the EMB file to make clean adjustments. Without it, you’re essentially trying to rebuild a design from a static list of needle points.
| Feature | DST (Expanded) | EMB (Condensed) | PES (Home) |
|---|---|---|---|
| Primary Use | Industrial/Commercial | Design/Editing | Home/Hobbyist |
| Color Data | None (Manual set) | Full Palette | Specific Thread Brands |
| Scalability | Limited (Stitch-based) | Excellent (Object-based) | Moderate |
| Compatibility | Universal Industrial | Software Specific | Brother/Baby Lock |

The “No Color” Myth: Managing Thread Palettes in DST
One of the most common points of confusion for new operators is why a dst embroidery file looks different in software than it does on the final garment. You might open a file expecting a vibrant corporate logo, only to see a jarring mix of neon greens and purples. This isn’t a file error or a sign of poor digitizing. It’s a technical reality of the format. A DST file is purely a mechanical instruction set. It dictates where the needle goes and when the machine should stop, but it has no capacity to store specific thread color data.
When you load a design onto your machine, you’re responsible for the “color mapping” process. The machine sees a “Stop” command and pauses, waiting for the operator to ensure the correct thread is active on the next needle. This manual intervention is what allows commercial shops to be so flexible. You can run the same dst embroidery file on a white polo with navy thread and then immediately switch to a black hoodie with silver thread without ever touching the digital file. The control stays entirely in the hands of the production team.
Why DST Files Lack Color Data
The absence of color information is a legacy of the 3rd-generation Tajima format, which prioritized minimal file sizes for limited hardware memory. During this era, data storage was expensive and processing power was low. Including RGB or hex code data for every thread change would have made files too large for the machines of the time. Consequently, the format was designed to only recognize “Stop” or “Color Change” commands rather than specific hue instructions. DST files default to random colors in software because the format lacks a dedicated data field for thread RGB or hex values, forcing the software to assign arbitrary placeholder colors from its own internal palette.
Best Practices for Production Run Sheets
Since the file itself is “color blind,” a professional embroidery digitizing service will always provide a supplemental PDF run sheet or “color film.” This document is the bridge between the digital instructions and your physical thread inventory. It lists the sequence of “Stops” and identifies which part of the logo each stop represents. To ensure a flawless run, your production team should follow these steps:
- Verify the sequence: Match the “Stop 1,” “Stop 2,” etc., on the PDF to the design’s visual elements.
- Assign needles: Program your machine’s needle sequence to match the thread colors required for each stop.
- Check trims: Ensure the run sheet accounts for all necessary jumps and trims to prevent thread bleeding between colors.
Clear communication between the digitizer and the machine operator prevents costly mistakes. If you want to eliminate the guesswork and ensure your shop receives perfectly mapped designs, you can order production-ready digitizing services that include detailed color sequence sheets for every project.
Securing Production-Ready DST Files for Your Business
Securing a high-quality dst embroidery file is the final hurdle before your production run begins. While the internet is full of free “Image to DST” converters, these automated tools pose significant risks to your equipment and profit margins. Auto-converters lack the human logic required to determine stitch direction, density, and pathing. They often create “bulletproof” designs with excessive stitch counts that lead to frequent thread breaks, bird nesting, or even broken needles. A clean machine run depends on the deliberate, manual placement of every stitch. Professional digitizers understand how to balance visual detail with mechanical efficiency.
Our workflow is designed to move your projects from concept to the machine head with maximum speed. We transform your vector art into a production-ready DST file in as little as 12 hours. This process includes a thorough analysis of the artwork, manual pathing to minimize trims, and a final quality check to ensure the file meets industrial standards. By removing the friction from the digitizing process, we help you maintain a consistent production schedule and deliver high-quality results to your customers every time.
Manual Digitizing vs. Auto-Tracing
Stitch density control is the primary differentiator between manual work and automation. An auto-converter might stack thousands of stitches in a small area, creating a hard, inflexible patch that is difficult to sew. Professional embroidery digitizing services manually adjust density based on the garment type and design size. This prevents needle deflection and ensures the fabric retains its natural drape. High-quality underlay stitches are also essential. They act as the foundation, anchoring the fabric to the stabilizer and preventing the top stitches from sinking into the nap of the material.
Manual digitizers are essential for embroidery file types that require extreme precision, such as small text or intricate crests. A human expert can make micro-adjustments for “push and pull” compensation, ensuring that circles remain round and lines meet exactly where they should. These subtle corrections are impossible for software to replicate on its own. The result is a file that runs smoothly from the first stitch to the last, reducing the need for manual thread trimming and machine restarts.
Partnering with Unique Art Services LLP
Efficiency and reliability are the core of our partnership. With over 15 years of industry experience, Unique Art Services LLP provides first-time-right DST files that eliminate the need for costly revisions or sample re-runs. We understand that in the apparel industry, time is often your most valuable resource. That’s why we offer 4-hour rush processing for urgent production deadlines. This allows you to respond to last-minute client requests with the same professional confidence as your standard orders.
Our global support hubs ensure that quality checks happen across all time zones, providing you with 24-hour coverage for your digitizing needs. This global reach means your files are reviewed by experts before they ever reach your inbox. We don’t just provide a file; we provide a production-ready solution that protects your machines and enhances your brand’s reputation for quality. Trusting your digitizing to a seasoned partner removes the technical guesswork and lets you focus on growing your business.
Master Your Industrial Production Standards
Mastering the technicalities of the dst embroidery file is a vital step toward consistent production success. You now recognize that while this format provides the universal bridge between software and hardware, its lack of metadata makes professional manual pathing non-negotiable. By prioritizing clean commands and accurate run sheets, you eliminate the risks of needle breaks and inconsistent stitch quality.
Don’t let technical file errors slow down your shop’s growth. We bring 15+ years of industry expertise and a 99%+ first-time-right rate to every design we digitize. While we offer a standard 12-hour turnaround for our global clients, we also provide elite speed for your most pressing projects. Get your production-ready DST file in as little as 4 hours and experience the reliability your business deserves. We look forward to helping you achieve flawless machine performance on every run.
Frequently Asked Questions
Can I open a DST file in Photoshop or Illustrator?
No, you cannot open a DST file directly in Photoshop or Illustrator because these programs are built for pixel and vector graphics. A dst embroidery file contains coordinate-based stitch instructions that standard design software cannot translate into visual shapes. You’ll need specialized embroidery digitizing software or a dedicated file viewer to see the design or make any necessary adjustments before production.
How do I convert a JPG or PNG into a DST embroidery file?
Converting a JPG or PNG into a DST file requires a technical process called digitizing. This isn’t a simple “Save As” function; it involves manually pathing the artwork to define stitch types, directions, and densities. While some automated tools exist, they often produce poor results that can damage your machine. Professional digitizing ensures the file is clean and production-ready for industrial use.
Why does my DST file look different on the screen than on the machine?
Your design looks different on screen because DST files don’t store actual thread color metadata. Most software assigns a random color palette to the design elements so you can distinguish between different “Stop” commands. The physical thread color is determined by the machine operator who assigns specific needles to each design segment based on a provided run sheet.
Can I resize a DST file without ruining the quality?
Resizing a DST file usually leads to poor stitch quality and density errors. Since DST is an expanded format, the stitches are fixed in place. If you scale the design up, the gaps between stitches increase. If you scale it down, the density becomes too high and may break needles. It’s always best to use the original object-based master file for any resizing needs.
Does a DST file include the thread brands like Madeira or Isacord?
No, a dst embroidery file doesn’t include specific thread brand information like Madeira or Isacord. The file only contains mechanical instructions for when the machine should stop or change colors. You must refer to a separate color run sheet provided by your digitizer. This document tells you which thread color to load for each stop in the sequence.
What is the maximum number of stitches a DST file can hold?
A standard DST file can technically hold up to 999,999 stitches, though practical limits depend on your machine’s internal memory. Large designs with extremely high stitch counts might cause older hardware to lag or fail. Efficient digitizing helps keep stitch counts manageable while maintaining high detail. This ensures your machine processes the data smoothly without unnecessary interruptions during the run.
Is DST the best format for 3D puff embroidery designs?
DST is the preferred format for 3D puff embroidery because it’s the universal language of industrial machines capable of this work. While the format itself doesn’t create the 3D effect, it carries the precise density and pathing instructions required to cover the foam. It remains the most reliable way to ensure your 3D designs translate correctly from software to the garment.
How can I view a DST file for free without expensive software?
You can view a DST file for free using several web-based tools or light versions of professional software. Wilcom’s TrueSizer is a common choice for viewing designs and checking stitch counts without a paid license. Many online converters also offer a preview feature. These tools allow you to verify dimensions and design integrity before you commit to a full production run.