Mastering Digitizing for 3D Puff Embroidery: The Professional Production Guide
Why do most 3D embroidery projects fail at the machine when the digitizing software says they’re perfect? It’s a common frustration for professionals who deal with foam peeking through stitches or frequent needle breaks that halt production. You’ve likely experienced the disappointment of “hairy” designs or inconsistent results across different hat types. Mastering the technical art of digitizing for 3d puff embroidery is about more than just software settings; it’s about mastering stitch physics and terminal capping to ensure a flawless finish.
You can transform your workflow from a trial-and-error headache into a streamlined, high-impact process. This guide provides the professional secrets needed to create clean, crisp 3D embroidery that works the first time. We’ll cover essential techniques for density management, foam coverage, and the latest 2026 software updates from industry leaders like Wilcom and Tajima. By the end of this article, you’ll have a reliable framework to reduce downtime and deliver flawless results. Whether you are refining your own skills or looking for professional embroidery digitizing that guarantees production-ready files, these insights will elevate your output.
Key Takeaways
- Master the specific density requirements necessary for digitizing for 3d puff embroidery to ensure complete foam coverage and a premium finish.
- Learn why satin stitches are essential for maintaining height and why fill stitches often lead to collapsed, unprofessional designs.
- Discover the importance of terminal capping and tack-down sequences to seal foam edges and prevent unsightly foam peeking.
- Solve common production issues like hairy edges and needle breaks by optimizing your stitch logic and perforation lines.
- Understand how expert manual digitizing reduces machine downtime and improves ROI compared to automated software settings.
What is Digitizing for 3D Puff Embroidery?
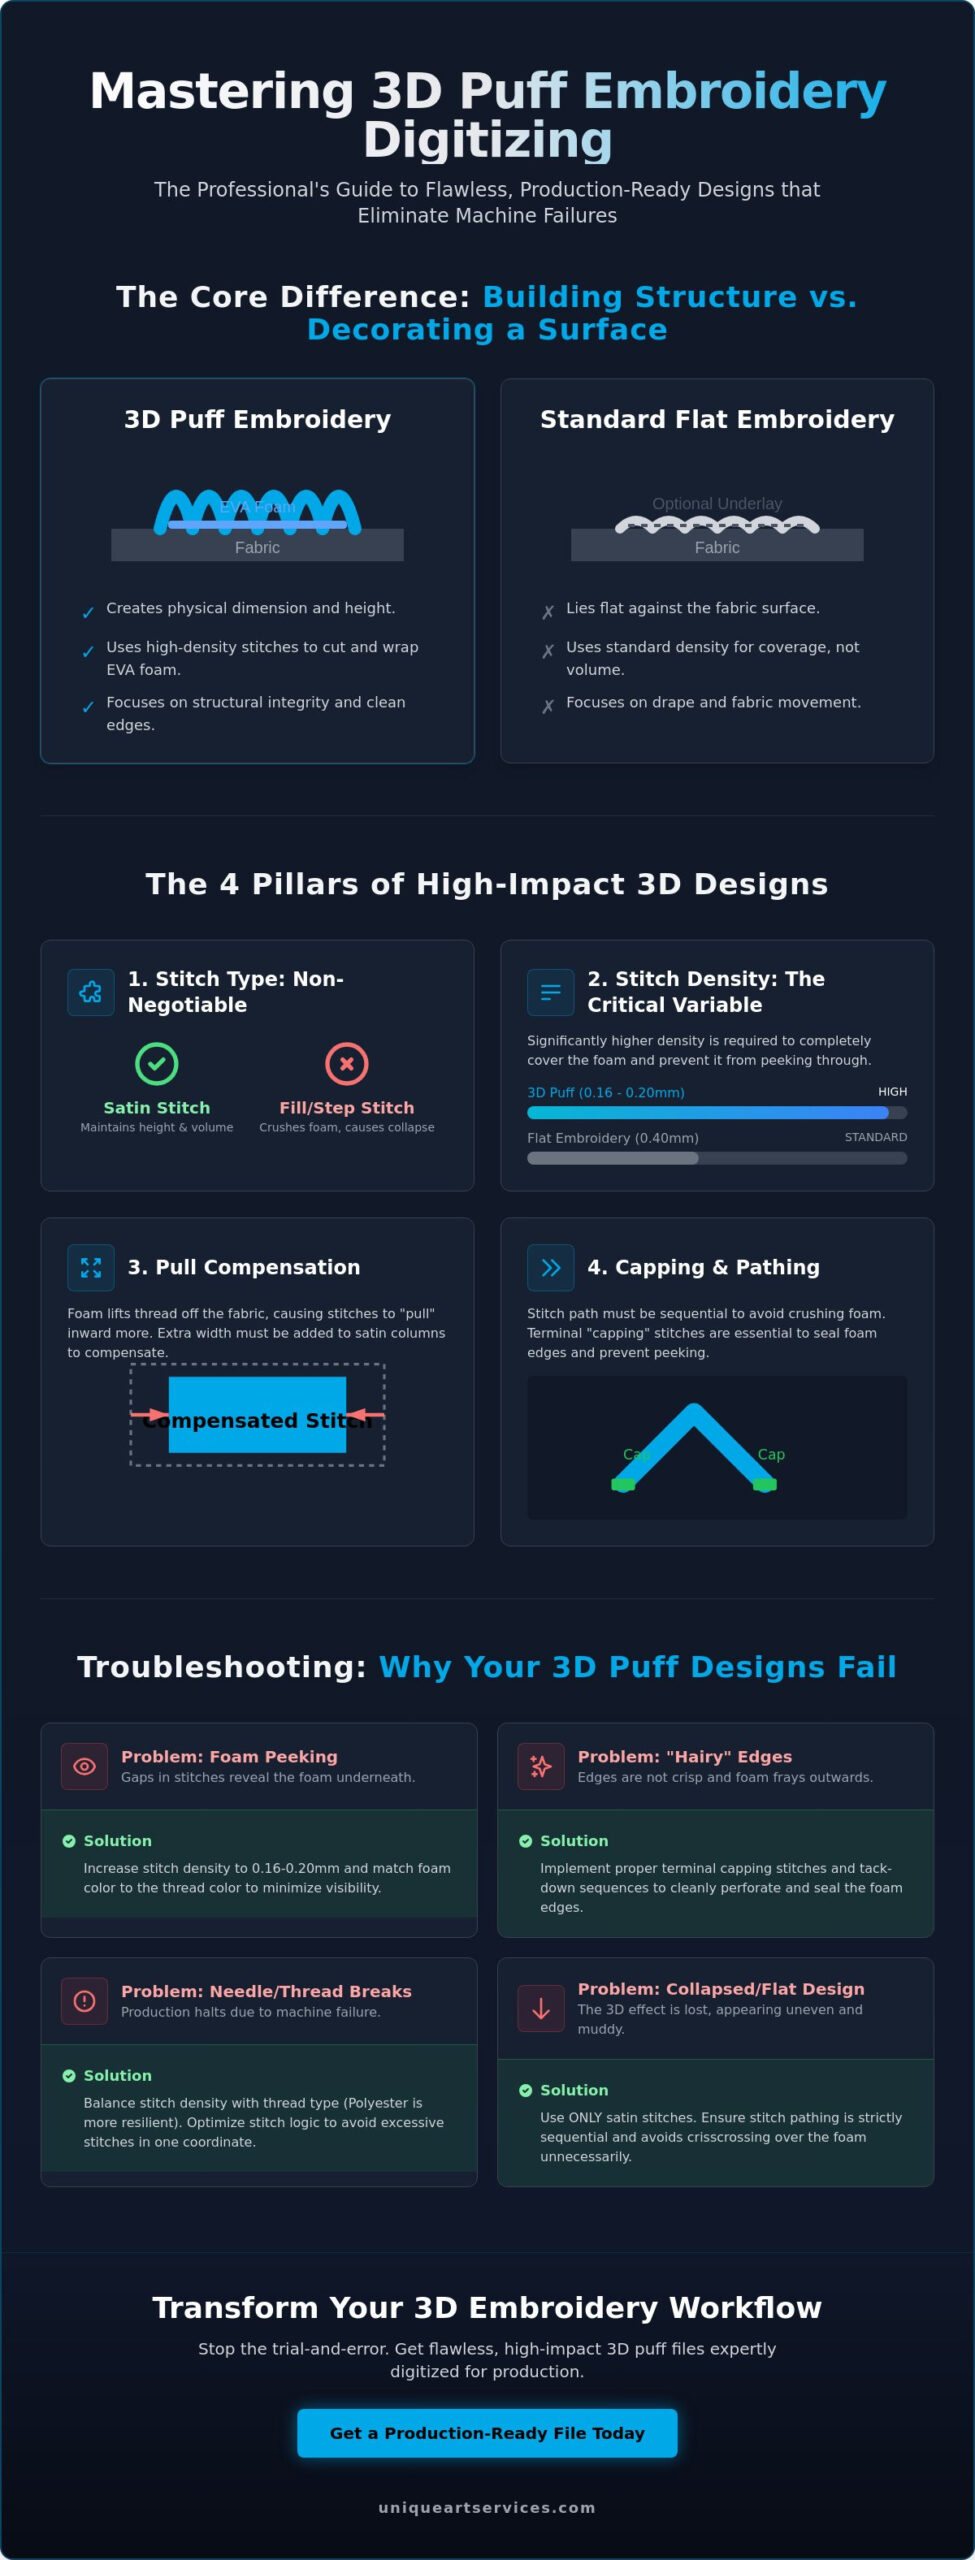
3D puff digitizing is a technique where raised depth is achieved through high-density satin stitching over foam. While standard embroidery lies flat against the material, this specialized process uses Ethylene Vinyl Acetate (EVA) foam to create a physical dimension that literally stands off the fabric. Mastering the art of digitizing for 3d puff embroidery requires a shift in how you view stitch logic. You aren’t just decorating a surface; you’re building a three-dimensional structure.
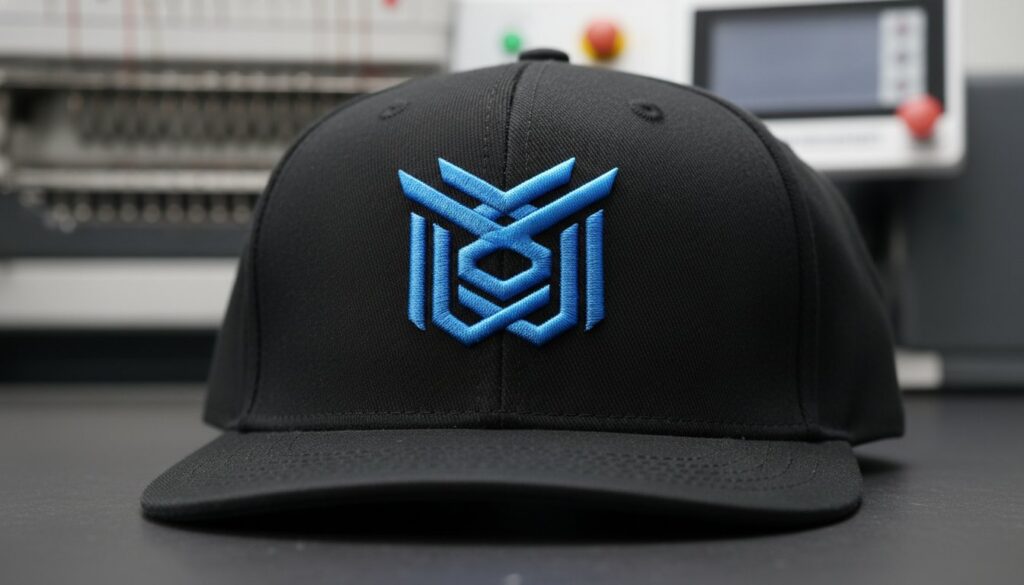
The primary goal in this process is to “cut” the foam with the needle while “encapsulating” it with thread. This requires significantly higher stitch density than flat embroidery. If the density is too low, the foam will peek through the gaps, making the design look unfinished. When done correctly, the needle perforates the foam along the edges of the satin columns, allowing the excess material to be pulled away easily after the machine stops. This creates the sharp, clean edges seen on professional sports caps and high-end streetwear.
Understanding the foundational machine embroidery process is essential for any professional, but 3D puff adds a layer of technical complexity. It demands precision in how thread tension and stitch direction are managed. Unlike flat designs, every stitch in a 3D file must contribute to the structural integrity of the raised effect without collapsing the foam before the design is complete.
3D Puff vs. Flat Embroidery Digitizing
Flat digitizing focuses on the drape and movement of the fabric. In contrast, 3D digitizing focuses on volume and edge-cutting. Flat designs rely on standard underlays to stabilize the stitch, but 3D puff often eliminates traditional underlays entirely to prevent unnecessary bulk. The pathing in 3D puff must be strictly sequential. If the machine moves back and forth across the foam in an unorganized way, it will crush the material prematurely. This leads to an uneven, deflated appearance that lacks the professional crispness your clients expect.
The Role of EVA Foam in Production
The choice of material dictates the digitizer’s settings. Foam thickness, usually 3mm or 6mm, determines the necessary stitch length and density. A 3mm foam is the industry standard for most headwear, providing a balance of height and stability. The hardness of the foam also plays a critical role. Harder foams provide more structural integrity but require more aggressive perforation to ensure clean removal. It’s also vital to match the foam color to the thread color. This minimizes visibility issues if there is any slight movement during the high-speed production process.
Technical Requirements for High-Impact 3D Designs
High-impact 3D designs depend entirely on the structural integrity of the stitch choice. Satin stitches are mandatory for this technique. Step or fill stitches will simply crush the foam, destroying the intended 3D effect and resulting in a flat, muddy appearance. Professional digitizing for 3d puff embroidery requires a deep understanding of how thread interacts with the foam’s height to maintain volume throughout the production run.
Density settings are the most critical variable in your file. For total foam coverage, settings typically range from 0.16mm to 0.20mm. This is significantly tighter than the standard 0.4mm used for flat designs. High density alone isn’t enough, though. You must also increase pull compensation. Because the foam lifts the thread away from the fabric, the stitches naturally “pull” inward more than they do on flat surfaces. Without adding extra width to your satin columns, the final design will look thinner and less impactful than the original artwork intended.
Travel stitches require careful placement to maintain a clean finish. They should never be visible on top of the finished design. Instead, hide them beneath the foam or place them along the very edges where they can provide additional stability. If you aren’t sure how to manage these complex paths, partnering with a specialist for professional embroidery digitizing can ensure your files are production-ready without the risk of ruinous machine errors.
Mastering Satin Stitch Density
Over-stitching is often necessary to prevent foam from showing through the peaks of the design. When using Polyester thread, you can usually push the density slightly higher because the thread is more resilient. Rayon is softer and may require a more delicate balance to avoid thread breaks. Excessive stitches in a single coordinate will cause the needle to shred the thread or break entirely. This leads to costly downtime and ruined garments. Success lies in finding the exact point where the foam is hidden but the machine still runs smoothly.
The ‘No Underlay’ Rule in 3D Puff
Traditional zig-zag underlays are a major mistake in 3D production. They flatten the foam before the top satin stitch can cover it, which minimizes the loft you’re trying to achieve. Instead, use a tack-down stitch. This secures the foam to the garment without pre-compressing the areas that need to stay raised. A single center-run walk stitch should only be used if it’s absolutely necessary for registration on complex, multi-part designs. Keeping the underlay minimal preserves the maximum height of the EVA foam.
The 3D Puff Workflow: Step-by-Step Digitizing Logic
Successful digitizing for 3d puff embroidery requires a methodical sequence that prioritizes the machine operator’s efficiency as much as the final aesthetic. The process begins with a thorough analysis of the artwork to identify every “open end” in the design. These are the specific points where the foam will naturally want to protrude if not properly sealed. Before any decorative stitching occurs, you must program a “stop” command into the file. This ensures the machine pauses, allowing the operator to place the foam sheet over the garment before the cycle continues.
Once the foam is in place, the tack-down run begins. This is typically a simple walking stitch that traces the perimeter of the design to secure the material. Following the tack-down, the digitizer applies terminal “caps” or “plugs” to the ends of every satin column. These small, high-density blocks are the secret to a professional finish. Finally, the high-density satin stitches are layered over the design in a continuous, logical path. This minimizes jumps and trims, ensuring the machine maintains a brisk, purposeful rhythm throughout the production run.
Manual control over this workflow is what separates professional results from amateur attempts. While some software offers automated “3D puff” tools, these often create messy capping or inefficient paths that lead to thread breaks. A skilled digitizer manually plots each point to ensure the needle perforates the foam exactly where needed for a clean tear-away later. Saving your completed work in the correct format is equally critical, and understanding the full range of embroidery file types and their compatibility standards ensures your production-ready files run without errors on any commercial machine. For shops running Tajima or similar industrial equipment, knowing how a dst embroidery file encodes stitch commands is essential to preventing machine errors before they occur.
Precision Capping and Corner Termination
Capping is the process of closing the ends of a satin column so the foam remains fully encapsulated. Without these “plugs,” the foam will stick out of the ends, creating a “hairy” and unfinished look. To achieve a seamless blend, use an overlap technique where the cap stitches sit slightly under the main satin body. When digitizing sharp corners, you must choose between mitered joins or capped joins. Mitered joins work best for geometric shapes, while capped joins provide better coverage for rounded or organic terminations in 3D designs.
Tack-Down Stitches and Foam Management
The tack-down stitch serves a dual purpose. It secures the foam and creates a perforation line that makes foam removal effortless for the operator. If this line is too loose, the foam will be difficult to pull away; if it’s too tight, it may cut the foam too early. The final pathing must ensure the last stitch “locks” the design securely. This lock stitch should be hidden beneath the satin coverage to avoid creating an unsightly knot on the surface of the raised embroidery. This logical approach guarantees a reliable file that works the first time on the machine.
Troubleshooting: Why Your 3D Puff Designs Fail
Failures in 3D production are rarely the fault of the embroidery machine alone. Most issues stem from the file itself. Mastering digitizing for 3d puff embroidery means anticipating mechanical challenges before the production cycle begins. Common problems like foam peeking usually indicate insufficient density or a total lack of terminal capping. If you see foam through the thread, your satin columns are likely too narrow or your density is set too low for the foam thickness used.
Hairy edges are another frequent complaint. These occur when the needle doesn’t create a clean perforation line, leaving ragged foam remnants behind. This is often solved by refining your pathing logic. Thread breaks, on the other hand, are typically caused by “bird-nesting.” This happens when too many stitches are packed into a small area, causing the thread to tangle and snap. Finally, design shifting is a stability issue. If the design moves during production, it’s usually because the tack-down run was too loose or the garment wasn’t hooped with enough tension.
If you’re tired of wasting materials on failed samples, it’s time to switch to professional embroidery digitizing services that get it right the first time.
Managing Machine Tension and Needle Selection
Technical adjustments on the machine are vital. 3D puff requires looser top tension than flat embroidery. This allows the thread to “wrap” the foam rather than pulling tight and crushing it. Needle selection is equally important. A 75/11 or 80/12 sharp needle is superior to a ballpoint for this application. Sharp needles pierce the foam cleanly, creating the necessary perforation for a crisp finish. Machine speed should be reduced by 20-30% for 3D puff to prevent thread shredding.
Preventing ‘Hairy’ Designs with Better Pathing
Clean edges depend on how you digitize your “cut lines.” These lines act like a cookie cutter for the foam. They must be placed precisely at the edges of your satin columns. Incorporating short stitches in corners is a professional trick to ensure clean perforation in tight turns. Refining your approach to digitizing for 3d puff embroidery involves knowing when to simplify. Avoid over-digitizing small details. Foam cannot support intricate, tiny elements. If a detail is too small, the foam will simply collapse or the stitches will sink, ruining the 3D effect.
Scaling Production with Professional 3D Digitizing Services
Scaling a commercial embroidery business requires moving beyond technical hurdles to focus on output and efficiency. While modern software offers various automated tools, manual digitizing for 3d puff embroidery by seasoned experts remains the gold standard for high-volume production. Automated settings often fail to account for the specific stitch physics required to encapsulate foam without crushing it. By choosing professional manual pathing, you eliminate the trial-and-error phase that often plagues complex 3D projects.
The return on investment for first-time-right digitizing is measured in saved machine hours and reduced material waste. A single poorly digitized file can lead to hours of machine downtime, wasted foam sheets, and ruined premium headwear. Unique Art Services LLP manages these complexities with a 12-hour standard turnaround, allowing your shop to maintain a brisk production pace. To meet the high-speed demands of 2026, we also provide 4-hour rush processing for time-sensitive orders that require immediate attention.
Reliability is the backbone of a profitable shop. When your files are built correctly from the start, your operators can focus on loading garments rather than troubleshooting thread breaks. Professional digitizing ensures that every cap, tack-down, and satin column is optimized for the specific foam thickness and garment type you are using.
The Unique Art Services LLP Manual Advantage
Our team brings over 15 years of experience in technical analysis and manual pathing to every project. This deep industry knowledge allows us to maintain a 99% first-time-right rate. For experienced shops, this means our files rarely require test runs before moving into full production. We operate global support hubs across the US, UK, and Australia time zones. This ensures that expert digitizers are available to assist you regardless of your location or production schedule. We don’t just provide a file; we provide a production-ready asset built for speed and precision.
Streamlining Your Embroidery Shop’s Workflow
Outsourcing complex 3D work allows your internal team to focus on high-volume production and customer service. Instead of spending hours adjusting density settings or fixing hairy edges in-house, you can rely on our specialized expertise. We offer predictable flat-rate pricing for 3D puff projects, making it easier for you to quote jobs accurately and maintain your profit margins. This transparency removes the guesswork from your operational costs. Ready for flawless 3D puff? Get your design digitized by Unique Art Services LLP today.
Elevate Your Production with Precision Digitizing
Mastering the technical nuances of density, capping, and pathing transforms 3D puff from a production gamble into a reliable revenue stream. By prioritizing satin stitch integrity and eliminating traditional underlays, you ensure every design maintains its loft and sharp edges. These professional techniques prevent common failures like foam peeking and thread breaks, allowing your machines to run at peak efficiency. High-quality digitizing for 3d puff embroidery is the foundation of every successful high-profile project.
When your shop requires consistent, high-impact results, expert manual pathing is the only solution. Unique Art Services LLP brings over 15 years of manual digitizing expertise to your workflow. We deliver a 99% first-time-right accuracy rate and a 12-hour standard turnaround to keep your production schedule on track. Stop struggling with inconsistent files and start delivering the premium quality your clients expect. Start Your 3D Puff Project with Professional Digitizing today and experience the difference that precision makes. Your path to flawless, high-impact embroidery begins with the right technical foundation.
Frequently Asked Questions
What is the best density for 3D puff embroidery digitizing?
The optimal density for digitizing for 3d puff embroidery typically ranges between 0.16mm and 0.20mm. This tight spacing is necessary to ensure the EVA foam is completely encapsulated and hidden from view. If your density is set any looser, you risk the foam peeking through the peaks of your satin stitches, which results in an unfinished and unprofessional appearance.
Can I use any embroidery machine for 3D puff designs?
Most modern commercial embroidery machines can handle 3D puff designs as long as they allow for manual tension adjustments. You’ll need to loosen the top tension to let the thread wrap around the foam without crushing it. While hobbyist machines can technically attempt these designs, industrial equipment provides the necessary stability and power required for consistent, high-density production runs.
Why is the foam showing through my satin stitches?
Foam visibility is usually the result of insufficient stitch density or a lack of terminal capping. If you don’t seal the ends of your satin columns with “plugs” or caps, the foam will naturally protrude through the openings. Increasing your density to the 0.16mm range and ensuring all open ends are properly capped will solve this common production issue and ensure a crisp finish.
Do I need special needles for 3D puff embroidery?
You should use a sharp needle, such as a 75/11 or 80/12, rather than a standard ballpoint needle. Sharp needles are essential because they cleanly perforate the foam along the edges of your design. This precise perforation makes it much easier for the operator to tear away the excess material after the machine stops, resulting in a cleaner and more professional edge.
What type of foam should I use for 3D embroidery?
High-quality EVA (Ethylene Vinyl Acetate) foam is the industry standard for 3D embroidery. It’s commonly available in 3mm and 6mm thicknesses, with 3mm being the most popular choice for headwear and apparel. Always match the foam color to your thread color to minimize the visibility of the material if any minor shifts occur during the high-speed stitching process.
How do I digitize small text for 3D puff?
Digitizing small text for 3D puff is challenging because the foam requires a minimum satin column width to remain stable and visible. Letters should generally be at least 1/4 inch thick to prevent the foam from collapsing or the stitches from sinking into the material. If your text is too small for these requirements, it’s better to digitize it as flat embroidery to maintain legibility.
Can I digitize 3D puff for garments other than hats?
You can certainly apply these techniques to hoodies, jackets, and heavy bags. The key is ensuring the base fabric is stable enough to support the extra weight and high density of the foam. When digitizing for 3d puff embroidery on softer garments, use a heavy-duty stabilizer to prevent the fabric from puckering under the tension of the high-density satin stitches.
How much pull compensation is needed for 3D foam?
Pull compensation for 3D puff must be significantly higher than for flat designs, typically ranging from 0.3mm to 0.5mm. Because the foam lifts the thread away from the garment, the stitches naturally pull inward more aggressively. Adding this extra width ensures your finished design matches the original artwork dimensions and maintains its intended visual impact on the final product.