Comprehensive Guide to Embroidery File Types: Formats, Compatibility, and Production Standards
Why does a perfect digital design often turn into a bird’s nest of tangled thread the moment it hits the machine? It is a common frustration for professionals and hobbyists alike. You probably already know that selecting the wrong embroidery file types can lead to broken needles, ruined garments, and hours of wasted production time. It is exhausting to manage the technical gap between a beautiful piece of vector art and a machine-ready stitch file. Accuracy matters in this industry, and even a small compatibility error can stall a high-volume run.
You can eliminate this friction by mastering the technical landscape of embroidery file formats. This guide provides the clarity you need to ensure seamless production and flawless stitch results every time. We will examine the specific requirements for major brands like Brother and Tajima, explain why files behave differently during the manufacturing process, and show you how to convert designs without sacrificing quality. By the end, you will have a predictable workflow that protects your design integrity from the first stitch to the last. Let’s turn technical confusion into professional precision.
Key Takeaways
- Distinguish between standard graphic pixels and stitch coordinates to prevent machine malfunctions and data loss.
- Master the technical differences between common embroidery file types, including commercial standards like DST and consumer formats like PES.
- Understand the hierarchy of native and expanded formats to determine which files allow for editing and which are strictly for production.
- Align your design extensions with your specific hardware requirements to ensure 99% first-time-right results on the factory floor.
- Discover why manual digitizing remains the gold standard for maintaining structural integrity compared to automated software conversions.
Demystifying Embroidery File Types: The Digital Blueprint for Stitches
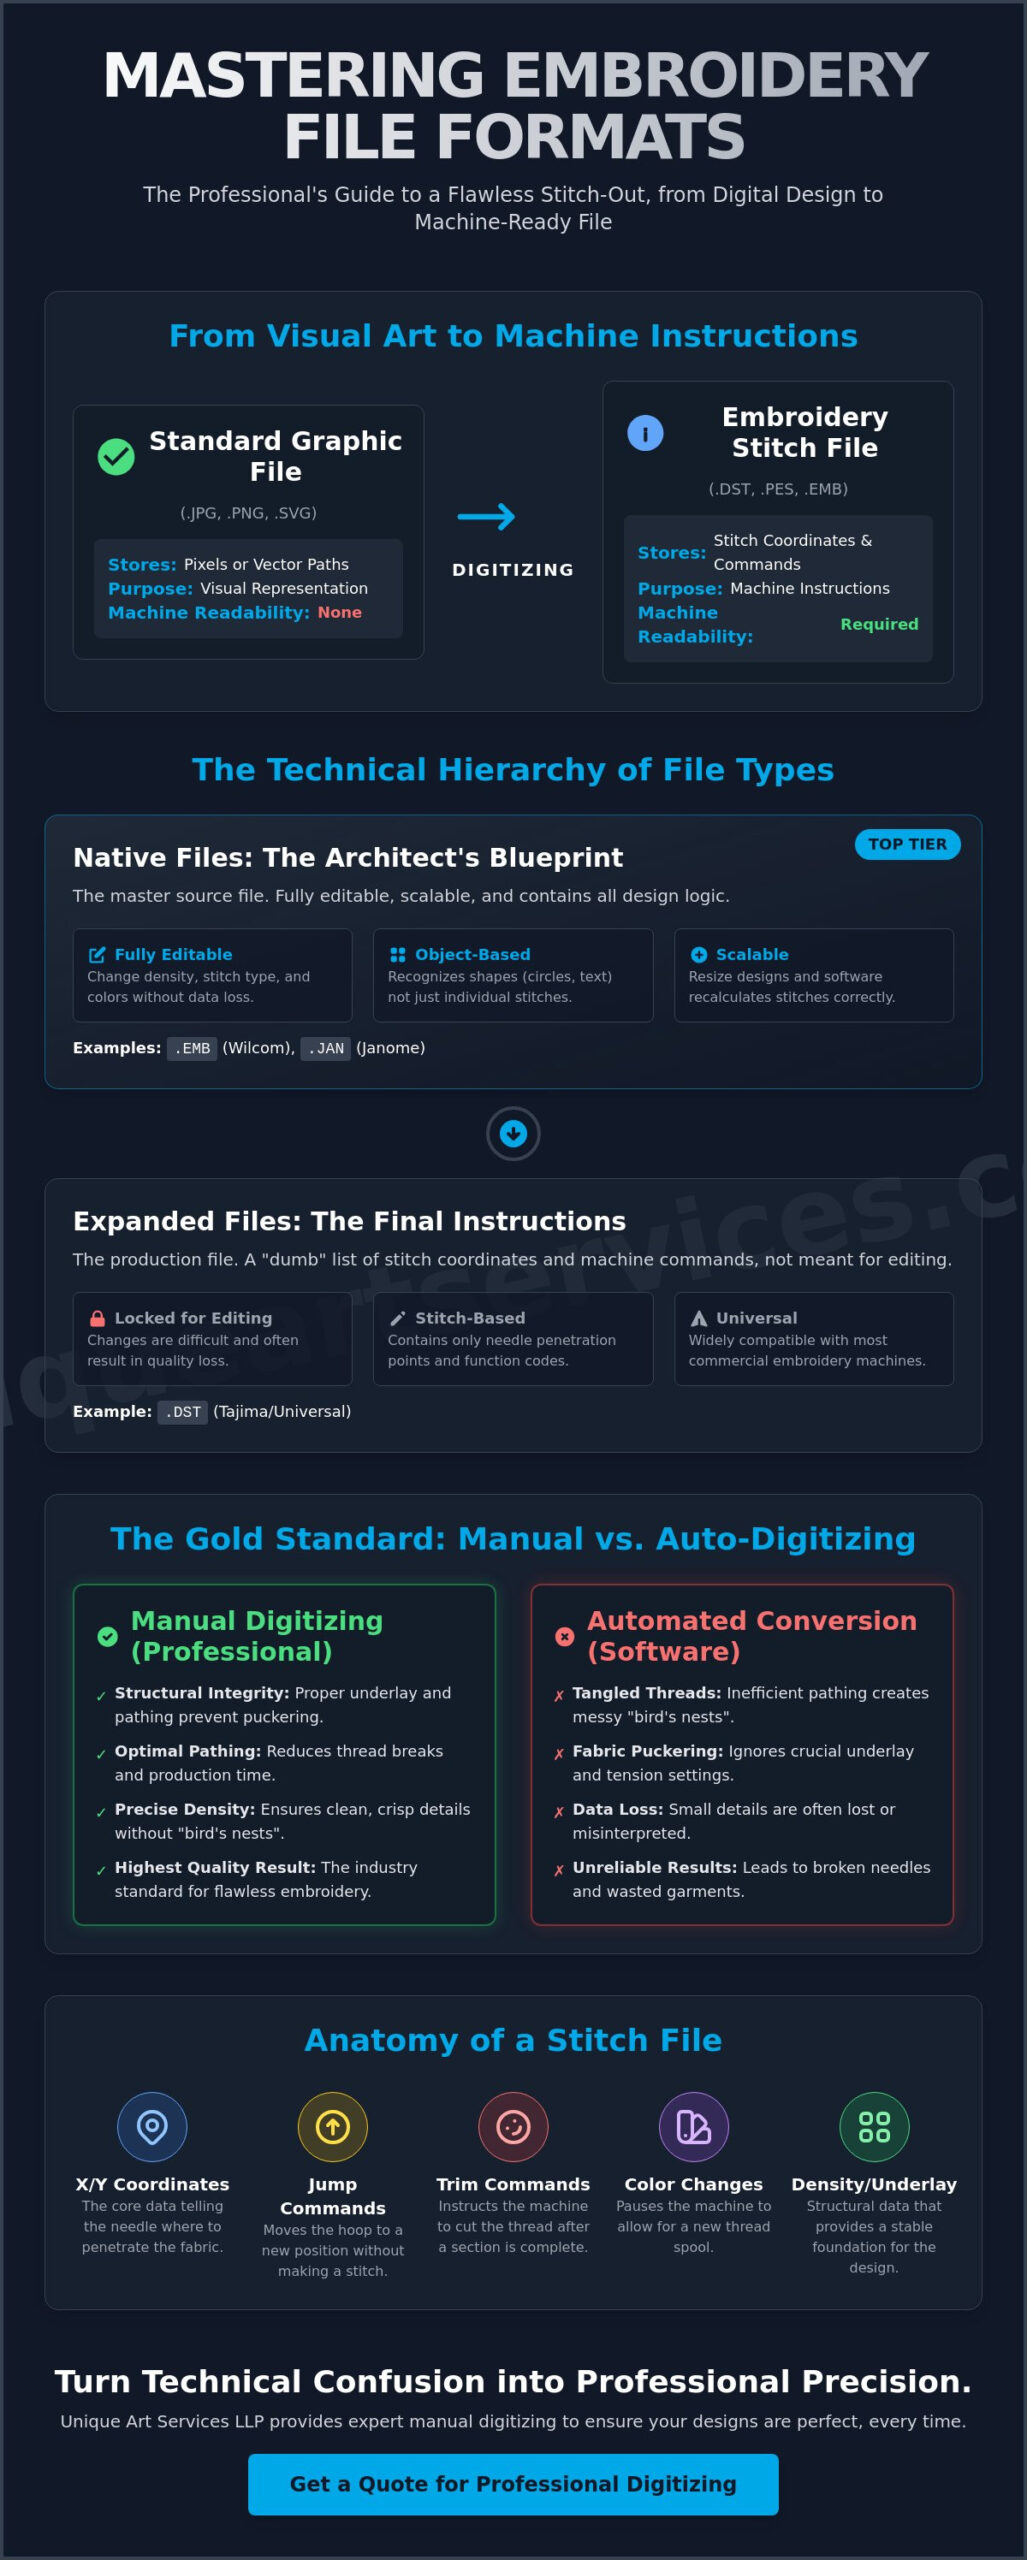
An embroidery file is more than a digital image. It’s a complex set of instructions. While a standard graphic file like a PNG or JPEG stores pixels or mathematical curves, embroidery formats store motion commands. These files act as a digital blueprint, telling a needle exactly where to go and how to behave. Standard images are maps of color; they don’t contain information about thread tension, stitch direction, or needle depth. This is why computerized embroidery machines cannot simply open a logo and start sewing. They require a specialized language.
The transition from art to thread requires a process called digitizing. A professional digitizer takes your visual concept and translates it into a language the hardware understands. They determine the pathing, the density, and the sequence of every single stitch. Without this phase, your machine wouldn’t know the difference between a solid fill and a delicate outline. It’s a technical transformation that turns static art into mechanical action.
The Anatomy of a Stitch File
At its core, a stitch file is a massive list of X and Y coordinates. Each coordinate represents a specific point where the needle must penetrate the fabric. But coordinates alone aren’t enough. The file also contains specific command codes that control the machine’s mechanical behavior. These include instructions for a jump, which moves the hoop without stitching; a trim, which cuts the thread; and a color change, which stops the machine for a new spool. Modern embroidery file types also embed critical data like density settings and underlay patterns. These hidden layers provide the structural foundation that prevents fabric from puckering during production.
Why So Many Formats Exist
The current variety of embroidery file types is a result of industry history. In the early days, manufacturers like Tajima, Brother, and Janome developed proprietary systems to lock users into their specific hardware ecosystems. This was the era of physical paper tapes and specialized punch cards. As technology evolved toward USB-loaded digital formats, these brand-specific languages remained. Today, the landscape is divided between commercial standards and home-use formats. Commercial machines often rely on expanded files like DST, which prioritize universal production commands. Home machines usually require native files that retain more metadata, such as specific thread brand colors. Choosing the right format is about matching the digital instructions to the physical native tongue of your specific machine.
The Technical Hierarchy: Native, Expanded, and Machine File Formats
Not all embroidery file types serve the same purpose in a production environment. A strict technical hierarchy of embroidery formats determines how much control you have over a design after it leaves the digitizing software. At the top of this hierarchy are native files, often called “working files.” These are the master documents. Below them are expanded or machine files, which are the production-ready outputs. Understanding this distinction is the difference between an easily adjustable logo and a “dumb file” that resists even the simplest modifications.
Native Files: The Architect’s Original Plans
Think of a native file as the architect’s original blueprint. These extensions, such as .EMB for Wilcom or .JAN for Janome, are object-based. This means the software recognizes a circle as a shape with specific properties, not just a series of dots. Because they retain full metadata, you can scale these designs without distortion. If you need to change the density for a heavier fabric, the software recalculates the stitches automatically. Professional digitizers always work in these formats because they preserve the structural logic of the design. You should always request the native file from your embroidery digitizing partner. Working with Unique Art Services LLP ensures you receive these master copies for future edits and long-term brand consistency.
Expanded Files: The Final Blueprint
Once the design is finalized, it is exported as an expanded file. The DST embroidery file format is the most common example of this type. It is the universal language for commercial multi-head machines. However, expanded files are essentially “dumb files.” They strip away the object data and color information, leaving only the raw X and Y coordinates for needle drops. This allows any commercial machine to read the movement commands without needing the original software that created them.
This hierarchy creates significant production risks if handled incorrectly. If you try to resize a .DST file by 20%, the machine or software won’t know to add or subtract stitches. It simply spreads the existing stitches further apart or crowds them together. This results in poor coverage or broken needles. Additionally, because .DST files don’t store color data, the machine operator must manually map every thread change. This is why professional manual digitizing from Unique Art Services LLP is superior to automated conversion. It ensures the final expanded file is optimized for the specific machine brand without losing structural integrity during the transition from the native working file.
Comparing Major Embroidery Formats: From DST to PES and Beyond
Choosing the right extension is the first step in a successful production run. While the industry utilizes dozens of embroidery file types, a few specific formats dominate the landscape. The DST format, developed by Tajima, remains the undisputed commercial king. It is a universal language for multi-head machines. Because it focuses on mechanical commands, it is exceptionally reliable for high-volume production. However, as established in previous sections, it lacks internal color data. This requires the operator to set thread sequences manually at the machine console.
In contrast, the PES format is the standard for Brother and Babylock machines. It is the most popular choice for the home and hobbyist market. Unlike DST, PES files retain color information, allowing the machine to display a visual representation of the final design. Other notable formats include EXP, used by Bernina and Melco, and brand-specific extensions like JEF for Janome or HUS for Husqvarna. Each of these serves a specific segment of the market, but they all share the same goal: translating digital art into physical stitches.
Commercial vs. Home Embroidery Formats
Commercial shops prefer .DST because it is lean and predictable. Industrial machines often have limited internal memory compared to modern computers. A .DST file keeps the data size minimal, which prevents the machine’s processor from lagging during complex runs. One critical limitation of the .PES format is its internal stitch count cap. Older versions of .PES often struggle with designs exceeding 30,000 or 50,000 stitches. If your project involves a high-density jacket back or a large banner, the DST embroidery file format is the safer choice. It handles massive stitch counts without the software-level restrictions found in many home-oriented embroidery file types.
File Compatibility and Naming Conventions
Technical success often depends on how you save and store your files. Many embroidery machines still utilize legacy operating systems that require the “8.3” naming rule. This means your filename should be eight characters or fewer, followed by a three-character extension. Avoid using special characters, spaces, or symbols like # or %. These can cause the machine’s card reader to fail or skip the file entirely.
Storage structure also matters. Most industrial machines scan only the root directory of a USB drive. If you bury your designs inside multiple folders, the hardware might not find them. Finally, always verify your field size. If a design is even one millimeter larger than the machine’s physical hoop limit, the software will often refuse to load the file. Precision in the digital phase prevents mechanical failure on the factory floor.
Production-Ready Standards: How to Choose the Correct Format for Your Project
Hardware compatibility is the foundation of a successful production run. You must match the extension to the machine’s “native tongue” to avoid load errors or mechanical stalls. However, selection goes beyond the extension itself. For complex projects like digitizing for 3D puff embroidery, the file must contain specific density and capping instructions that standard “Save As” conversions ignore. High-performance production requires more than just a compatible wrapper; it requires a file built for the specific physics of the design.
Software plays a deceptive role in this process. Most programs allow you to export various embroidery file types with a few clicks. This often creates a “false positive” where the file looks correct on a computer screen but fails at the machine. True production readiness comes from manual pathing. A well-pathed file minimizes thread breaks and optimizes travel time. The extension is simply the delivery vehicle. The internal logic determines your efficiency and your profit margins. If the pathing is inefficient, even the correct file format will lead to slow production times.
Troubleshooting Format Errors
Machines often fail to recognize files due to simple administrative errors. If your hardware doesn’t “see” a design on a USB drive, check your drive formatting first. Most industrial machines require the FAT32 file system to read data correctly. Large drives or complex folder structures often lead to recognition failures. Additionally, if you notice “tails” or long jump threads, the issue likely lies in the trim commands within the file data. In these cases, re-exporting rarely solves the problem. You need a professional digitizer to re-evaluate the command sequence and stitch logic. Corrupt files are often just files with improper command headers.
Managing Your Design Library
High-volume shops rely on strict organization to maintain speed. Establish a naming convention that includes the client name, date, and stitch count. Always back up your native working files alongside the expanded production versions. This allows for quick edits if a client requests a size change later without starting from scratch. Most importantly, never skip the stitch-out test. Running a sample on scrap fabric confirms that your chosen embroidery file types are behaving as expected before you commit to a full garment run. This step is the final gatekeeper of quality control.
Ready to optimize your production? Order professional embroidery digitizing today to ensure your files are machine-ready every time.
Beyond the Extension: Why Professional Manual Digitizing is the Real Key to Quality
The extension on your file is merely a container. It does not guarantee a clean stitch-out or an efficient machine run. While understanding different embroidery file types is necessary for hardware compatibility, the internal logic of the design is what truly determines your success. Automated “converters” often fail because they lack an understanding of fabric tension, push-pull compensation, and density. These tools create chaotic paths that lead to thread breaks, bird-nesting, and wasted garments. A file that looks perfect on a screen can still be a disaster on the factory floor if the pathing isn’t handled by an expert.
At Unique Art Services LLP, we believe that professional embroidery digitizing is a manual craft that requires technical precision. We bring over 15 years of industry-specific expertise to every project, resulting in a 99% first-time-right rate. By manually pathing every element, we ensure your machine runs at peak efficiency without unnecessary stops or needle changes. This manual oversight turns a simple digital graphic into a production-ready masterpiece. It’s the difference between a design that just “works” and one that excels.
Vector Art to Stitch File: The Critical Link
High-quality vector art is the essential starting point for any professional embroidery file. If the source image is low-resolution or pixelated, the final stitches will likely be uneven. Unique Art Services LLP doesn’t rely on automated tracing software that ignores the nuances of a logo. Instead, our team manually redraws designs to ensure every curve and corner is optimized for needle movement. Understanding the best file format for embroidery digitizing at the artwork stage is just as critical as selecting the right machine format at production. This manual precision ensures that your embroidery file types remain compatible across all major global machine brands, including Tajima, Barudan, and Brother. We bridge the gap between digital art and mechanical reality through meticulous pathing.
Partnering for Production Success
Efficiency is the backbone of a profitable embroidery business. We offer a standard 12-hour turnaround to keep your production schedule moving. For urgent client deadlines, our rush order processing provides a 4-hour turnaround to handle the pressure. This speed doesn’t come with hidden costs. Our flat-rate digitizing fees allow for predictable business overhead, making it easier for you to quote prices with confidence. Before you send any file to the machine, follow this final checklist:
- Verify the file extension matches your machine’s requirements exactly.
- Check that the design dimensions fit within your physical hoop limits.
- Ensure the USB drive is formatted to FAT32 for older hardware recognition.
- Perform a test stitch-out on a scrap piece of the same fabric type.
By combining technical knowledge of file formats with professional manual digitizing from Unique Art Services LLP, you remove the friction from your creative process. You stop fighting with your equipment and start delivering high-quality results to your clients.
Mastering Your Digital Production Workflow
Navigating the technical landscape of embroidery file types is essential for maintaining a high-capacity production environment. You now understand that the difference between a native working file and an expanded production file determines your ability to scale and edit designs. Proper hardware alignment, from naming conventions to file system formatting, ensures your machines operate without friction. The most critical takeaway remains that the file extension is only a container. The true value lies in the manual pathing and structural logic within the design itself.
Precision in the digital phase eliminates costly errors on the factory floor. With 15+ years of industry experience and a 99% first-time-right rate, Unique Art Services LLP helps you bridge the gap between creative art and mechanical reality. Our global hubs in the US, UK, AU, and Canada provide the reliable support your business needs to scale. Get your production-ready embroidery files in 12 hours or less with Unique Art Services LLP. If you’re facing an urgent deadline, our 4-hour rush processing is available to keep your schedule on track. It’s time to stop worrying about technical malfunctions and start focusing on your craftsmanship.
Frequently Asked Questions
What is the most common embroidery file format for commercial machines?
The DST format is the undisputed standard for commercial multi-head machines. Developed by Tajima, it provides universal compatibility across almost all industrial hardware brands. While it’s reliable for production, it only contains stitch coordinates and mechanical commands. It doesn’t store specific thread color information, which requires the operator to set the sequence at the machine.
Can I convert a JPEG directly into an embroidery file?
No, you can’t convert a JPEG or any other image file directly into a stitch file. Embroidery machines require coordinate-based instructions that tell the needle exactly where to move. You must go through a digitizing phase where a professional manually redraws the art into a machine-ready format. Automated converters usually produce poor results that can damage your fabric or machine.
Why does my embroidery machine not recognize the DST file on my USB?
Recognition issues usually stem from incorrect USB formatting or file naming. Most machines require a USB drive formatted to FAT32 and won’t read drives larger than 32GB. Ensure your filename follows the “8.3” rule by using eight characters or fewer with no special characters. Placing files in the root directory rather than subfolders also improves hardware visibility.
What is the difference between an EMB file and a DST file?
An EMB file is a native working format that contains full object metadata and editing instructions. A DST file is an expanded production format that only contains raw stitch data. You use EMB files for making design adjustments and DST files for the actual embroidery process. It’s best to keep your native files for any future modifications to the design.
Do I need special software to open embroidery files on my computer?
Yes, standard operating systems can’t preview or open most embroidery file types without specialized software. You need a dedicated embroidery program or a basic file viewer to see the design on your screen. Without these tools, your computer will treat the files as unrecognized data types. Many manufacturers offer free basic viewers for this purpose.
Why are the colors wrong when I open a DST file in my embroidery software?
The colors appear incorrect because the DST format doesn’t store thread color information. It only records where the machine should stop for a color change. When you open a DST file, your software assigns random default colors to each segment. You must manually reassign the correct thread shades in your software or at the machine console based on your original art.
Can I resize an embroidery file without losing quality?
You can only resize designs without losing quality if you use a native working file like .EMB or .JAN. These files are object-based and recalculate stitch density automatically. Resizing an expanded file like a .DST often leads to production errors. The software can’t adjust the stitch count properly, which results in poor coverage or broken needles during the run.
Which file format should I request from a professional digitizing service?
You should always request both the native working file and the expanded production file. Requesting the native format ensures you can make future edits without starting from scratch. For the production side, specify the embroidery file types that match your machine’s requirements. This usually means a .DST for commercial use or a .PES for Brother and Babylock machines.