Preparing Artwork for Vinyl Cutting: The 2026 Professional Guide
A vector file extension alone doesn’t guarantee a professional finish on your plotter. In reality, there’s a significant difference between a file that looks good on screen and high-quality artwork for vinyl cutting that performs under the blade. You’ve likely experienced the frustration of a cutter chewing through expensive specialty vinyl or leaving jagged, un-weedable edges on a complex logo. It’s a common technical bottleneck that stalls production and drains your margins in a global market currently valued at over $675 million. High-tech precision requires more than just a basic trace; it requires mathematical path accuracy.
We understand that mastering software like the 2026 version of Adobe Illustrator can feel overwhelming when you just need a clean cut. This guide provides a solution-oriented approach by outlining the precise technical requirements for vinyl-ready files and teaching you how to convert any image into clean, cuttable paths. You’ll learn a reliable workflow for transforming raster images into scalable vectors that never lose quality. We’ll walk through the essential steps to ensure your designs are efficient, precise, and ready for the modern production environment.
Key Takeaways
- Understand why vinyl cutters require vector-based mathematical paths instead of standard raster formats like JPEG or PNG.
- Ensure your artwork for vinyl cutting features closed circuits and zero overlapping lines to protect your equipment and reduce material waste.
- Learn why manual vector redrawing provides the precision needed for complex logos that automated software often fails to replicate.
- Establish a standardized workflow for auditing and importing designs into vector software to maintain consistency across every project.
- Discover how professional design integration allows high-capacity shops to scale production while ensuring every cut is clean and weedable.
What is Artwork for Vinyl Cutting and Why is it Different?
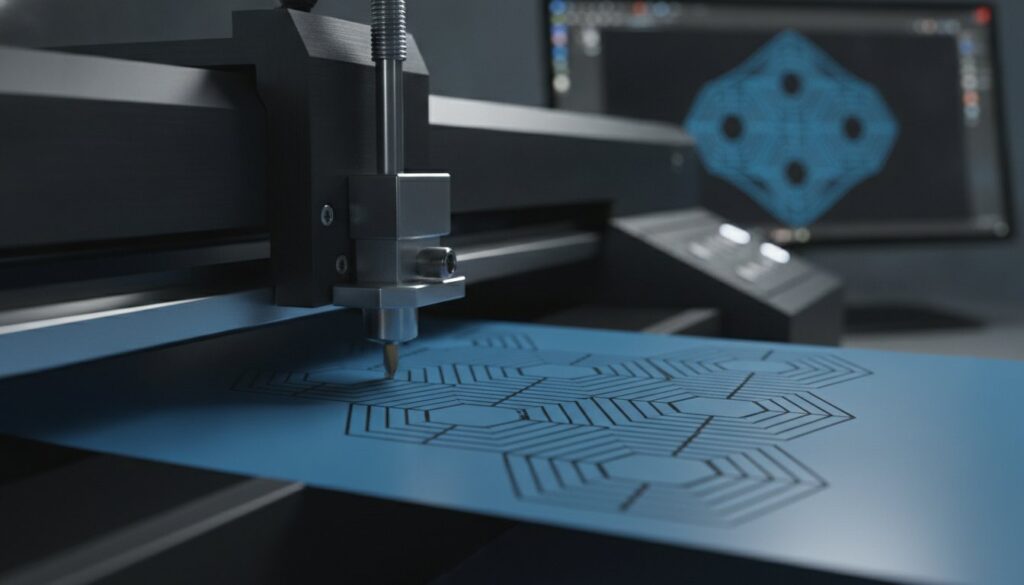
Designing for production requires a shift in how you view digital files. A standard printer uses dots of ink to recreate an image, but a vinyl cutter uses a physical blade to carve shapes out of material. This machine doesn’t recognize color or shading; it only understands coordinates. Professional artwork for vinyl cutting consists of these mathematical paths, known as vectors, which guide the blade with absolute precision. Without these paths, your equipment is essentially blind. It cannot distinguish the edge of a logo from the background of a photo.
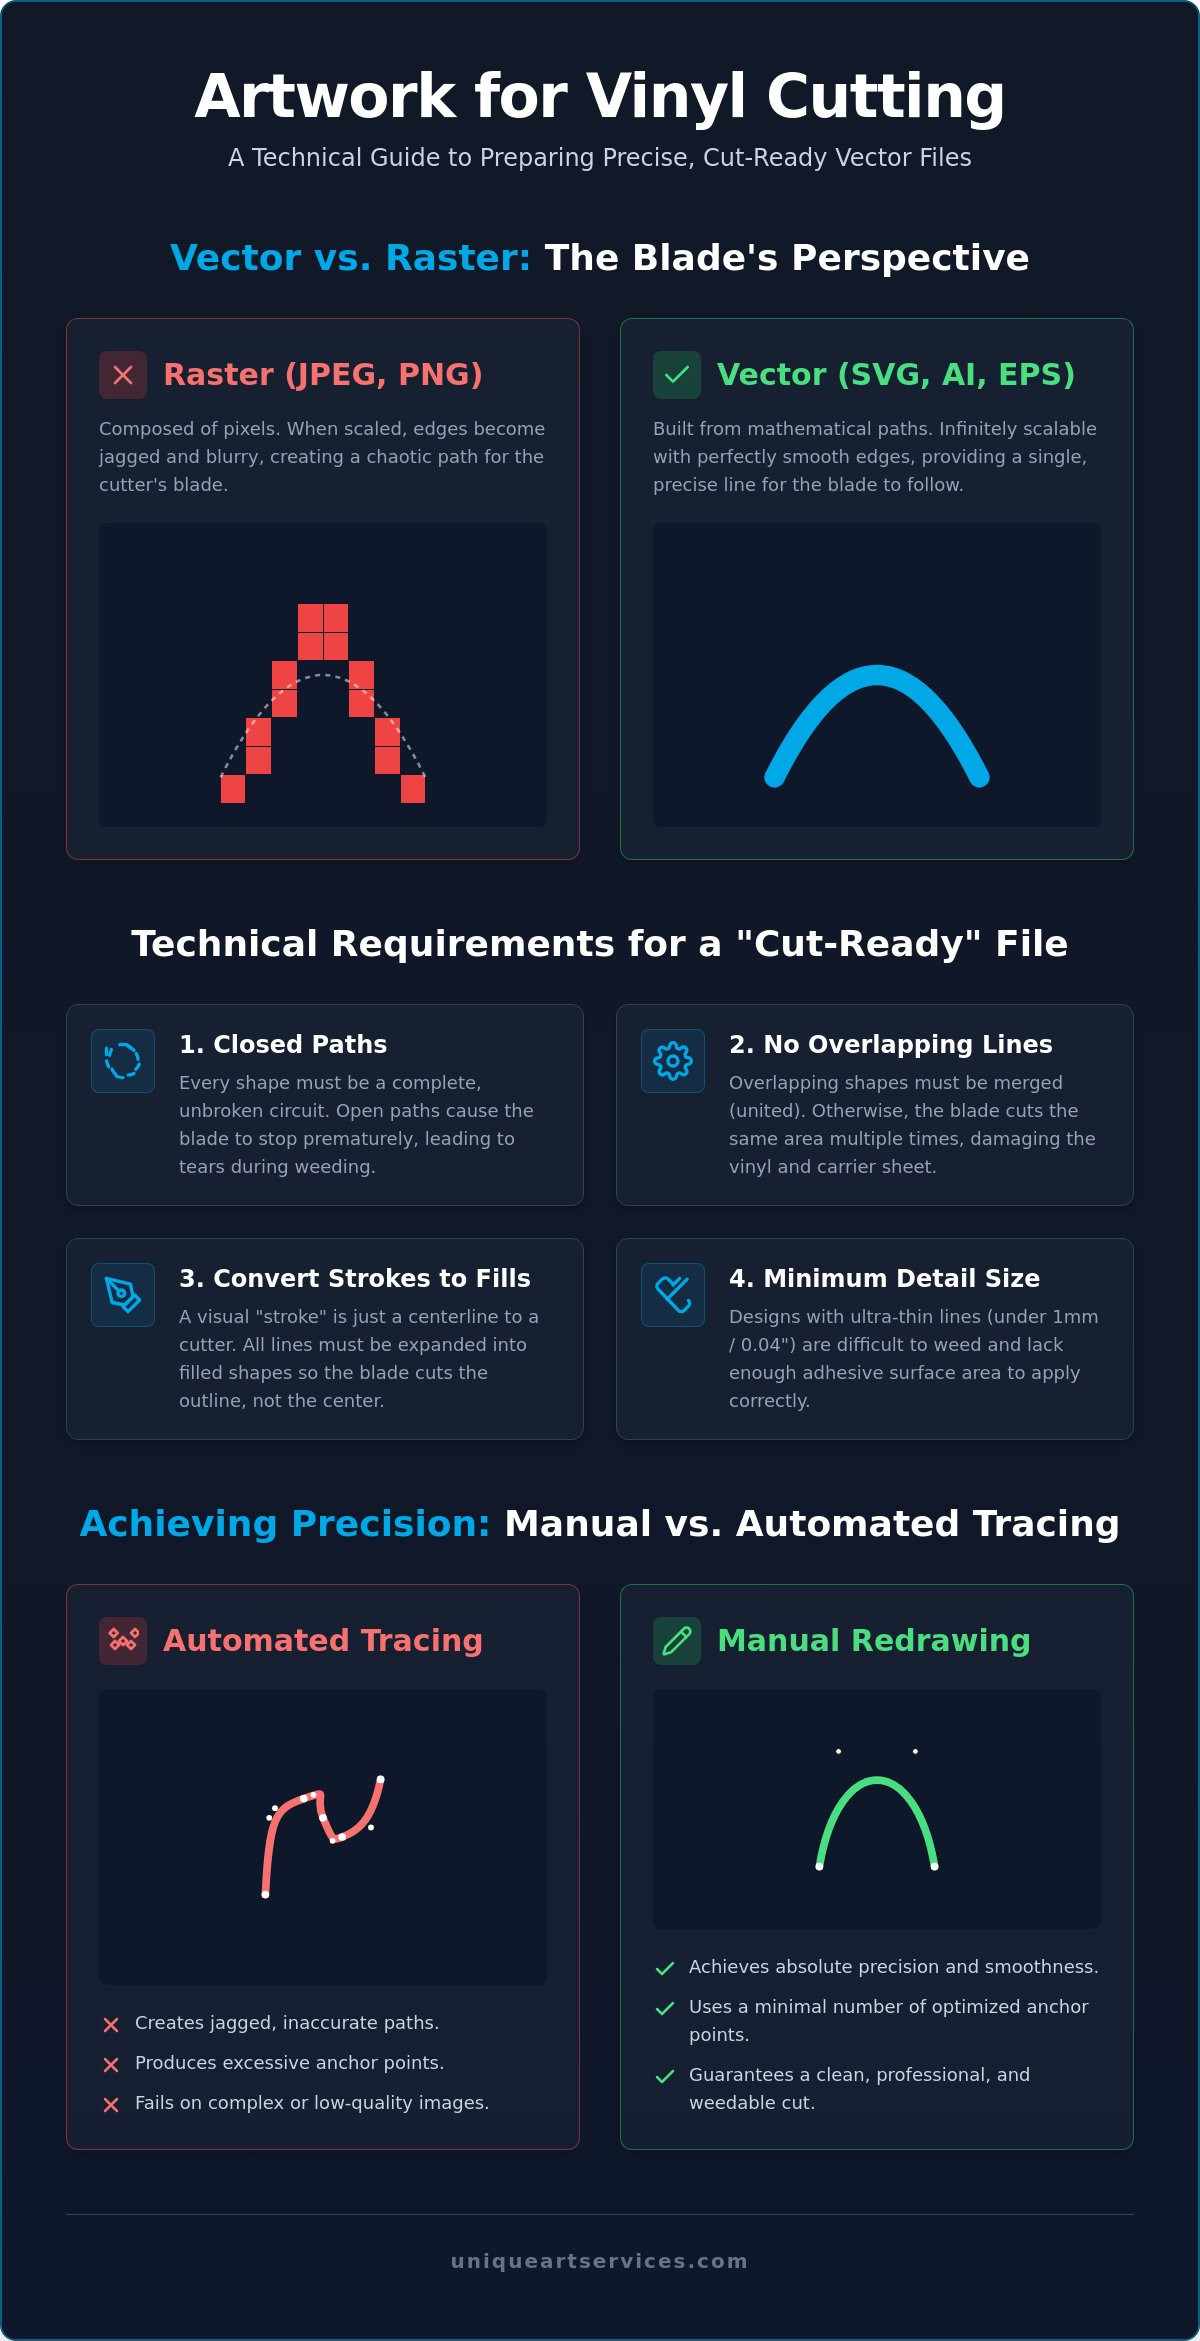
The “cut line” is the most critical element of your design. It represents the exact journey the blade will take across the vinyl surface. In a raster image, such as a PNG or JPEG, edges are defined by a grid of pixels. If you zoom in, those edges look like a staircase. A cutter attempting to follow that staircase will produce jagged, rough edges that are nearly impossible to weed cleanly. Vectors use anchor points and Bezier curves to create smooth, continuous lines. This scalability is why vectors are the industry standard. You can enlarge a design to fit a massive billboard without ever losing the crispness of the cut line or the integrity of the design.
Vector vs. Raster: The Blade Perspective
From the machine’s perspective, pixels are chaotic data points. A high-resolution JPEG might look sharp to the human eye, but the cutter sees a blurry mess of varying color values. This confusion often leads to the blade vibrating or “chewing” the material as it tries to find an edge. Vectors solve this by providing a single, continuous line for the blade to follow. If you want to understand why this distinction matters for your brand identity, you can read our deep-dive on vector vs raster for logos. Clean paths ensure your plotter moves with speed and precision, saving both time and expensive specialty vinyl.
Common File Formats for Vinyl Cutters
Choosing the right format is the first step in a reliable production workflow. Industry standards include .SVG (Scalable Vector Graphics), .EPS (Encapsulated PostScript), and .AI (Adobe Illustrator). These formats are natively supported by professional software like VinylMaster and Flexi, as well as hobbyist platforms like Cricut Design Space. You should be cautious with .PDF files. While they can hold vector data, they often hide raster images inside. Always verify that your PDF contains actual paths before sending it to the plotter. Using the correct artwork for vinyl cutting prevents software errors and ensures your hardware performs exactly as intended every time.
Technical Requirements for a “Cut-Ready” File
A vector file is only the beginning. To achieve a professional result, your file must meet specific mechanical criteria. The most fundamental requirement is the use of closed paths. Unlike digital printing, where a line can simply end, a vinyl cutter needs every shape to be a complete circuit. If a path remains open, the blade won’t return to the starting point. This leaves the vinyl partially attached, leading to tears when you try to remove the scrap material. Every shape in your design should be a fully enclosed loop to ensure a clean release.
Equally important is the elimination of overlapping lines. If two shapes overlap on your screen, the software sees two sets of instructions. The blade will cut through the same spot twice. This often slices through the carrier sheet or ruins the adhesive backing, making the design impossible to transfer. You must also convert all strokes into filled shapes. A “stroke” in design software is a visual property, but a cutter only sees the center line. Expanding these strokes ensures the blade travels around the perimeter of the design. When you prepare artwork for vinyl cutting, you’re essentially creating a map for a physical tool.
Minimum detail size is another critical factor. Ultra-thin lines, specifically anything under 1mm or 0.04 inches, frequently fail during the application process. They lack enough surface area to bond securely to the substrate. If you’re struggling with complex conversions or jagged paths, our professional vector art services can help you refine these technical details before production begins. High-quality files save you from wasting expensive rolls of vinyl on failed designs.
The “Weeding” Factor in Design
Weeding is the manual process of removing excess vinyl after the cut. Your design should facilitate this, not hinder it. Avoid creating “islands”—tiny, disconnected fragments that are likely to peel off during weeding. Spacing is also critical for success. Heat Transfer Vinyl (HTV) is generally more forgiving than adhesive vinyl, but both require a minimum of 2mm between separate elements. This gap prevents the material from bunching up as the blade changes direction. Learning the basics of SVG for web and app design can provide a strong foundation for understanding how these paths are structured in a digital environment.
Path Simplification and Anchor Points
High-quality artwork for vinyl cutting utilizes the fewest anchor points possible. Every anchor point represents a coordinate change for the machine. If a path is “noisy”, which is common with automated tracing tools, the cutter will “stutter” as it processes thousands of unnecessary points. This creates a serrated edge on the vinyl and increases wear on your blade. Manual simplification results in smooth, high-speed cutting. A clean path allows the plotter to maintain its velocity, leading to a more consistent finish and faster production times.
How to Prepare Your Artwork for Vinyl Cutting
Moving from a visual concept to a production-ready file requires a methodical workflow. You can’t simply open a photo and send it to the plotter; the machine requires specific geometric data. Preparing artwork for vinyl cutting involves five distinct stages to ensure the final product is both accurate and easy to process. This sequence removes friction from your creative process and minimizes material waste.
- Step 1: Audit your source image. Examine the file for gradients, drop shadows, or complex textures. These elements won’t translate to a physical blade and must be removed or simplified before you begin.
- Step 2: Import into vector software. Load your file into a professional environment like Adobe Illustrator, CorelDraw, or Inkscape. These tools provide the precision needed for high-capacity production.
- Step 3: Manually trace the image. Use the Pen tool to redraw the design. This creates the mathematical paths the blade follows. Avoid the temptation to use automated shortcuts that produce messy, inefficient lines.
- Step 4: Clean up path intersections. Use the “Pathfinder” or “Weld” tools to merge overlapping shapes. This prevents the blade from cutting through the same spot multiple times, which preserves the carrier sheet.
- Step 5: Export to a production format. Save your final file as an .EPS or .SVG. These formats are universally recognized by cutting software and maintain their scale perfectly.
Handling Low-Resolution Source Files
Working with a blurry logo is a common challenge in the vinyl industry. It’s a mistake to believe that “upscaling” a raster file adds the necessary detail for a clean cut; it only creates larger, more pixelated edges. When you’re dealing with a low resolution image to vector conversion, you must use human judgment to interpret where the blade should travel. Manual redrawing allows you to fix distorted corners and smooth out jagged lines that automated tools simply cannot see. This step is the difference between a professional finish and a failed project.
Testing Your Paths Before Production
Always verify your artwork for vinyl cutting before loading your material. Use the “Outline View” in your software to see the design exactly as the blade will see it. This view reveals hidden paths or stray anchor points that aren’t visible in the standard preview. Modern cutting software often includes a “Simulate Cut” feature; use this to watch the virtual blade’s path and spot potential snags. Finally, add a “weeding box” around your design. This simple rectangle cut around the perimeter makes it much faster to peel away the excess vinyl without pulling up your actual design.
Manual Redrawing vs. Auto-Tracing: Why Precision Matters
Many designers rely on the “Image Trace” or “PowerTrace” features found in standard design software. While these automated tools offer immediate speed, they lack the technical intelligence required for professional artwork for vinyl cutting. Auto-tracing software interprets pixels literally. It creates thousands of unnecessary anchor points along what should be a straight line or a smooth curve. This “jagged path” problem forces the vinyl cutter to make micro-adjustments every fraction of a millimeter. The result is a serrated edge on your material and a significant increase in production time.
Manual redrawing eliminates this digital noise by using the minimum number of points needed to define a shape. A human designer understands the intent behind a logo; they know that a circle should be perfectly round and a corner should be exactly 90 degrees. Automated tools often round off sharp corners or create flat spots in curves. Fixing a bad auto-trace frequently takes longer than redrawing the file from scratch. Investing in manual precision ensures a 99% first-time-right rate, which keeps your production floor running without interruptions or wasted material.
When Auto-Tracing Fails
Automated tools struggle to interpret complex gradients and shadows. Instead of a clean cut line, they produce “path soup,” which is a chaotic mess of overlapping layers that a blade cannot follow. Small text and fine details often lose their definition, turning into indistinguishable blobs that are impossible to weed cleanly. The physical impact on your hardware is also a factor. The constant “stuttering” caused by excessive anchor points puts unnecessary strain on your plotter’s stepper motors. This can lead to premature equipment failure and inconsistent cut depths over time.
The Value of Professional Vector Conversion
Leveraging over 15 years of industry experience, we understand the specific needs of high-capacity sign shops and apparel decorators. Our team provides a reliable 12-hour turnaround for standard projects, ensuring your production schedule remains on track. Clean, manually created paths aren’t just about the cut; they also save hours during the weeding phase. When the blade travels along a single, smooth path, the excess vinyl peels away effortlessly in one piece. If you want to stop wasting material and start scaling your output, you can order professional Vector Art today to ensure your files are truly production-ready.
Scaling Your Production with Expert Design Support
High-volume production demands more than just technical knowledge; it requires a scalable workflow. While understanding the mechanics of path construction is vital, many shops reach a point where manual redrawing becomes a production bottleneck. Transitioning from a DIY approach to a strategic partnership allows you to focus on application and client acquisition while experts handle the technical pathing. Outsourcing your artwork for vinyl cutting ensures that your design department never slows down your production floor.
Integrating professional design support into your daily operations removes the friction of file errors and material waste. We operate as a stable backbone for your business, providing the precision of a high-tech firm with the accessibility of a dedicated partner. Whether you’re managing a single custom project or a massive commercial rollout, having a reliable source for vector art ensures your plotters stay active and your deadlines are met with confidence.
Outsourcing for Efficiency
Reducing overhead is a primary objective for any growing sign or apparel shop. By utilizing flat-rate vector art conversion fees, you gain total predictability over your design costs. You won’t have to worry about the time-consuming process of cleaning up “noisy” paths or fixing open circuits. Professional files significantly reduce machine downtime and eliminate the cost of ruined specialty vinyl. This commitment to production-ready standards is identical to the logic used when choosing the best embroidery digitizing services for high-end garment decoration. Quality at the source prevents failure at the finish.
Beyond Vinyl: Multi-Platform Design
A masterfully created vector file is a versatile asset for your entire brand. The same clean paths used for your plotter can be repurposed for screen printing, laser engraving, or large-format digital printing without any loss in quality. There is a powerful synergy between custom logo design for embroidery and vinyl cutting. Both disciplines require an expert understanding of how a physical tool, whether a needle or a blade, interacts with a surface. We provide the technical expertise to ensure your artwork for vinyl cutting is engineered for success across every medium you serve.
Unique Art Services offers 4-hour rush processing for those urgent signage projects that require immediate attention. We pride ourselves on getting it right the first time, helping you maintain a reputation for excellence in a competitive market. Stop fighting with jagged edges and complex software. Convert your artwork today and experience the efficiency of production-ready design.
Mastering Production Precision
Precision in your digital files directly impacts the quality of your physical output. Mastering the technical requirements of artwork for vinyl cutting is the most effective way to reduce material waste and maximize your plotter’s efficiency. You now understand that clean, closed paths and manual redrawing are essential for creating weedable designs that won’t stall your production line. Moving beyond the limitations of automated tracing tools allows you to scale your operations with confidence and speed.
Unique Art Services provides the dependable expert support you need to handle high-volume demands. With over 15 years of design experience and a first-time-right rate exceeding 99%, we specialize in 100% manual redrawing for absolute accuracy. We remove the technical friction from your creative process so you can focus on growing your business. It’s time to stop fighting with jagged edges and start delivering professional-grade signage and apparel. Get Production-Ready Vector Art in 12 Hours and ensure every cut is perfect. Your path to consistent, high-quality results starts with a clean file.
Frequently Asked Questions
What is the best file format for vinyl cutting?
.SVG, .EPS, and .AI are the industry standards for professional production. These vector formats store mathematical coordinates rather than pixels, allowing the cutting software to communicate precise paths to the blade. Using these formats ensures your design remains perfectly sharp and scalable without any loss of detail, which is essential for large-scale signage or intricate decals.
Can I use a JPEG for vinyl cutting?
You cannot use a JPEG directly for cutting because it consists of a pixel grid. A vinyl cutter’s blade requires a continuous path to follow, which a raster image simply doesn’t provide. To make a JPEG cut-ready, you must first convert it into a vector format. This process involves creating clean outlines that the machine can interpret as physical cut lines.
Why does my vinyl cutter cut jagged lines?
Jagged edges are usually the result of “noisy” paths created by automated tracing tools or low-resolution source files. When you use auto-trace, the software creates thousands of unnecessary anchor points that cause the blade to “stutter” as it moves. Manually redrawing your artwork for vinyl cutting is the most effective way to achieve smooth, professional curves and sharp corners.
What does it mean to “weed” vinyl?
Weeding is the manual process of peeling away the excess vinyl material from the carrier sheet after the machine has finished cutting. It’s a critical post-production step that requires patience and precision. High-quality file preparation, such as ensuring all paths are closed and adding weeding boxes, makes this task significantly faster and prevents the design from lifting or tearing.
How do I convert a logo to a vector for my Cricut or Silhouette?
The most reliable method is to import your logo into vector software like Adobe Illustrator or Inkscape and redraw the paths using the Pen tool. Once the manual trace is complete, export the file as an .SVG. This format is natively supported by both Cricut Design Space and Silhouette Studio, ensuring your hobbyist plotter receives clean, production-grade instructions.
Is manual redrawing better than using Adobe Illustrator’s Image Trace?
Manual redrawing is far superior for production environments because it provides total control over path construction. While Image Trace is fast, it often creates messy intersections and fails to recognize perfect geometric shapes. Manual redrawing uses the minimum number of anchor points required, which reduces machine wear and ensures a much cleaner finish on the final vinyl product.
Why are overlapping lines a problem for vinyl cutting?
Overlapping lines force the plotter’s blade to travel over the same area multiple times. This double-cutting often slices through the carrier sheet or ruins the adhesive backing, making the design difficult to transfer to the final surface. You should always use the “Weld” or “Unite” tools in your software to merge overlapping shapes into a single, continuous path before cutting.
How long does it take to get a professional vector conversion?
Standard professional vector art conversion typically takes 12 hours to complete. This timeframe allows for a 100% manual redraw of your artwork for vinyl cutting, ensuring a 99% first-time-right rate. For urgent signage projects that require an immediate turnaround, rush processing options can deliver production-ready files in as little as 4 hours without sacrificing path precision.