Artwork for Laser Engraving: The 2026 Guide to Production-Ready Files
That “Auto-Trace” button in your design software might be the very thing sabotaging your production speed. You’ve likely felt the frustration of a laser machine rejecting a low-resolution file or, worse, producing jagged, unprofessional edges on a premium piece of wood. It’s a common bottleneck in a market where 35% of consumers are now willing to pay a premium for perfectly personalized goods. To achieve these professional results, you must master the technical nuances of artwork for laser engraving and move beyond basic automated tools.
This 2026 guide will show you why manual vector conversion is the only way to ensure precision and how to prepare files that work the first time on any CNC or laser machine. We’ll break down the essential differences between raster and vector settings, cover the latest ANSI Z136.1-2026 safety standards, and provide a methodical workflow for error-free production. By the end, you’ll have a clear path to faster turnarounds and flawless engraving quality that meets the highest industrial standards.
Key Takeaways
- Understand why vector paths are the essential language of laser machines and why standard JPEGs often lead to production failure.
- Learn to choose between raster scanning and vector scoring to achieve the specific depth and detail required for your material.
- Identify the “auto-trace trap” and see how manual redrawing creates the crisp, professional artwork for laser engraving that high-end clients demand.
- Master a technical pre-flight checklist to eliminate common errors like missing fonts, hidden layers, and jagged edges before they reach the machine.
- Discover how professional vector art fulfillment can reduce your design overhead and keep your laser machines running with 4-hour rush processing.
What is Artwork for Laser Engraving and Why Does it Matter?
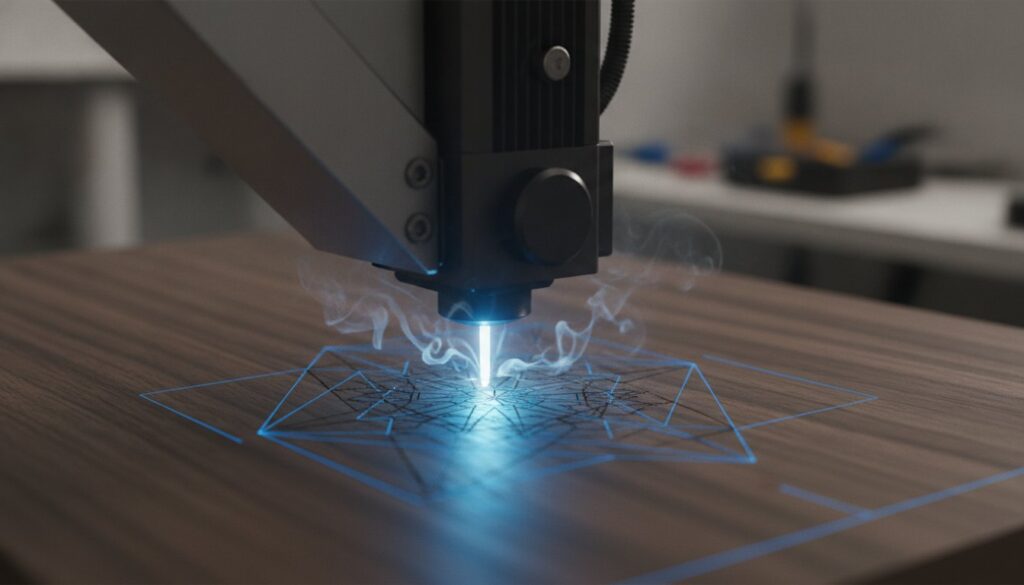
Production-ready artwork for laser engraving is essentially a digital blueprint. It isn’t just a visual representation of a logo or design. Instead, it’s a precise set of mathematical paths that guide the laser head across a material’s surface. While traditional printing focuses on adding ink to a substrate, what is laser engraving in a technical sense? It is a subtractive manufacturing process. It uses a high-powered beam to vaporize or remove material, creating a permanent mark through depth and texture.
This mechanical nature is why standard raster images, such as JPEGs or PNGs, often fail in a production environment. A raster file is a grid of colored pixels. It lacks the directional data required to tell a laser where to start and stop. When a machine tries to interpret a low-resolution raster, the result is often a “stepped” or jagged edge. High-quality artwork for laser engraving eliminates this guesswork. It provides clean, smooth lines that the machine can follow with absolute consistency.
The stakes for file quality are high. Using sub-par artwork doesn’t just result in an ugly product. It leads to real financial loss. Every minute your machine spends trying to process a messy file is a minute of lost revenue. Jagged paths can cause the laser to stutter, leading to mechanical wear or even scorched edges on delicate materials. Wasted sheets of premium acrylic or expensive leather quickly eat into your profit margins. Precision is the only way to ensure a predictable, profitable workflow.
The Role of Vector Graphics in Precision
Vectors are the backbone of the engraving industry. Unlike raster images that blur when enlarged, vectors use mathematical coordinates to define shapes. This allows for infinite scalability. Whether you’re engraving a small jewelry charm or a large wooden sign, the lines remain perfectly sharp. The laser follows these paths as a continuous stroke, which is vital for achieving a professional finish. Designers must ensure they use “closed paths.” If a shape isn’t fully enclosed, the software cannot identify the “inside” area, which prevents the laser from applying a consistent fill or “raster” engrave correctly.
Common File Formats for Laser Machines
Different machines have different preferences, but a few industry standards dominate the market. Adobe Illustrator (AI) remains the gold standard for its deep feature set and reliability. Scalable Vector Graphics (SVG) have become the go-to for modern, browser-based controllers like those used by Glowforge. For heavy industrial applications, Drawing Exchange Format (DXF) is often required. You should be wary of PDF files. While they are convenient for viewing, they can be deceptive. A PDF can contain raster images disguised as vectors, which will still cause production errors if the internal data isn’t properly converted.
Raster vs. Vector Engraving: Choosing the Right Path
Raster engraving, often called scanning, is the process where the laser head moves rapidly back and forth across the X-axis while incrementally advancing along the Y-axis. It functions much like an inkjet printer, depositing dots of energy to create a filled shape. In contrast, vector engraving, or scoring, directs the laser to follow the exact path of a line at a lower power setting than a cut. Understanding these two modes is vital when preparing artwork for laser engraving because the machine treats these instructions fundamentally differently.
The choice between these two methods usually depends on your material and the desired visual effect. Wood reacts beautifully to both methods, allowing for deep raster fills and sharp vector outlines. When working with metal or glass, the strategy changes. Metal often requires rastering for logos to ensure a consistent mark, while glass usually demands rastering to prevent the material from cracking along a single, intense score line. When your goal is achieving fine detail in laser engraving, the path you choose determines the final texture and clarity of the piece.
Precision requires clarity. If you are unsure which path is best for your design, outsourcing your vector art preparation can ensure your files are optimized for your specific machine settings. This eliminates the trial and error that often leads to wasted materials.
Preparing Files for Raster Engraving
Success in rastering starts with high contrast. You should aim for pure black-and-white images whenever possible. While modern software can process grayscale, it often leads to inconsistent depth because the laser varies its power based on the shade of gray. This can result in a “muddy” appearance on materials like wood. For the cleanest fills, optimize your resolution to between 300 and 600 DPI. Higher DPI settings provide more detail but significantly increase the run time on your machine.
Preparing Files for Vector Scoring
For the laser to recognize a line as a score rather than a fill, you must set the line weight to “hairline” (typically 0.001 inch or 0.072 pt). Many industrial machines use color coding to distinguish between different actions. A common standard is using RGB Red for cutting and RGB Blue for scoring. You must also ensure there are no overlapping lines. If two lines sit on top of each other, the laser will fire twice in the same spot, which often causes scorching or unintended deep burns.
Manual Redrawing vs. Auto-Tracing: The Quality Gap
Relying on “Auto-Trace” or “Image Trace” buttons is a common trap in the production world. These automated tools attempt to guess where a path should lie based on pixel contrast, but they lack the human eye’s ability to distinguish between a shadow and a structural line. The result is often a “dirty” file filled with jagged edges and misaligned curves. For high-end production, manual redrawing is the only reliable method to create artwork for laser engraving that meets professional standards.
Manual conversion isn’t just about aesthetics. It’s about how the machine interprets the data. A human artist can prioritize sharp corners and smooth tangents that an algorithm will simply ignore. This distinction becomes painfully obvious when you move from a digital screen to a physical material like wood or acrylic. Clean paths lead to clean results. Messy paths lead to rejection.
The Problem with Excessive Nodes
Nodes are the anchor points that define the shape of a vector path. Automated tracing tools often generate hundreds of unnecessary nodes along a single curve. This creates a significant technical hurdle for your machine. Every node represents a new instruction for the laser controller. When nodes are too close together, the laser head may “stutter,” causing it to pause for a fraction of a second. These micro-pauses result in “burn marks” or melted “blobs” on your material. Professional node reduction ensures the laser moves in a fluid, continuous motion, which dramatically improves production speed and final quality.
Accuracy and Scalability in Branding
Corporate logos demand absolute fidelity to brand guidelines. An auto-traced logo might round off a sharp serif or distort a specific curve, which is unacceptable for professional clients. Manual redrawing allows an artist to correct lens distortion or perspective issues in a provided photograph before the vectorization process begins. This ensures that the logo remains perfectly proportional whether it’s engraved on a small pen or a massive wall sign. To understand the broader implications of file types on brand identity, you can explore our Vector vs Raster for Logos: The 2026 Guide. Using correctly prepared artwork for laser engraving protects the integrity of the brand and your reputation as a maker.
Production efficiency is the backbone of any successful engraving business. When you start with a manually redrawn file, you eliminate the “stacked node” problem where multiple points occupy the same space. This prevents the laser from firing repeatedly on the same coordinate, which can cause fires or material damage. Investing in quality art services up front saves hours of machine troubleshooting later.
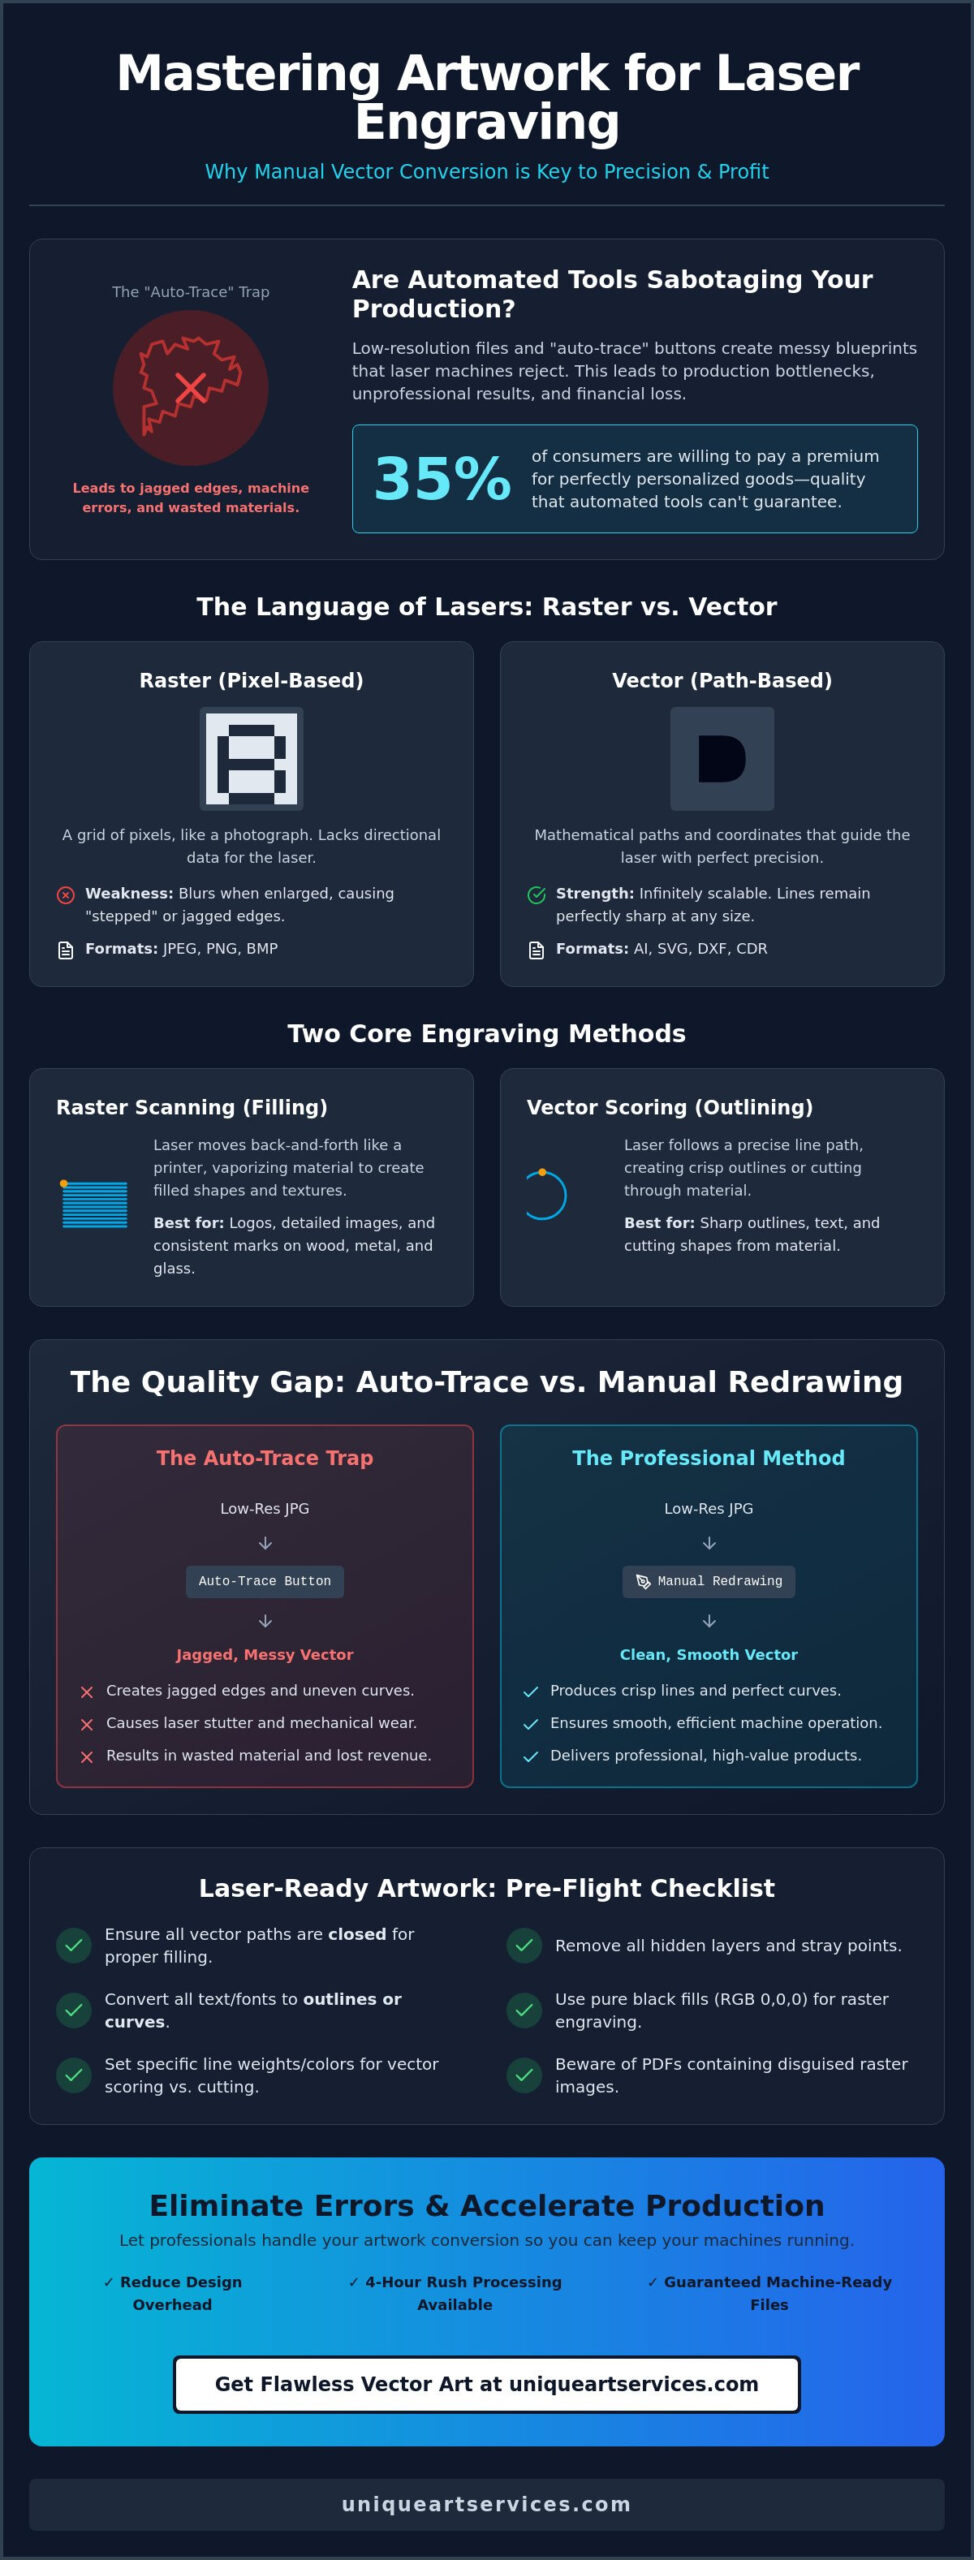
Technical Checklist for Laser-Ready Artwork
Achieving a perfect result requires a rigorous pre-flight process. Even a visually perfect design can contain hidden data that causes your laser to fail. To ensure your artwork for laser engraving is production-ready, you must follow a methodical technical checklist before sending any file to the machine. This step eliminates the frustration of “file rejected” errors and prevents the waste of expensive materials.
- Step 1: Convert all text to outlines. This transforms live fonts into permanent vector shapes that any machine can read.
- Step 2: Remove clipping masks and hidden layers. Laser controllers often detect “invisible” data, causing the laser to fire in unintended areas.
- Step 3: Flatten all transparency. Lasers cannot interpret opacity levels. Flattening ensures the machine sees a single, solid path rather than overlapping layers.
- Step 4: Join all lines. Ensure there are no gaps in your perimeters. Gaps prevent the software from identifying shapes for clean fills or continuous cuts.
- Step 5: Verify 1:1 scale. Your digital artboard must match the physical dimensions of the final product to ensure the design fits your material or jig perfectly.
Font Handling and Text Conversion
Laser machines follow paths, not characters. They don’t have access to your computer’s font library. If you don’t “Create Outlines” or “Expand” your text, the machine software will substitute a default font, which destroys your branding. Legibility is also a factor of scale. For materials like wood or leather, avoid using text smaller than 6 to 8 points. The heat from the laser can cause small characters to “bleed” or char, making them unreadable. For intricate scripts, manual redrawing is often necessary to thicken thin lines that might otherwise disappear during the engraving process.
Color Mapping and Layer Management
Efficiency depends on how you organize your file. Divide your work into distinct layers labeled for specific actions: Cut, Score, and Engrave. You should also standardize your RGB values for your specific software. Most industrial controllers recognize RGB Red (255,0,0) as a cut command and RGB Blue (0,0,255) as a score. Finally, scan your workspace for stray points. These are orphaned nodes left behind after editing. The laser will interpret these as tiny, unintended dots, potentially ruining a smooth surface finish.
If your production schedule is tight and you can’t afford a file error, let our experts handle the technical heavy lifting. You can order professional vector art that is guaranteed to be machine-ready and optimized for your specific laser setup.
Professional Artwork Conversion: The Unique Art Services LLP Advantage
The technical demands of preparing artwork for laser engraving shouldn’t be a barrier to your business growth. While the checklists and pathing requirements we’ve discussed are essential, executing them manually for every client order is time-consuming. Unique Art Services LLP removes the “file rejected” headache by providing production-ready vectors that work perfectly on your machine software the first time. Our team bridges the gap between a client’s low-resolution sketch and a high-precision engraving run.
Speed is a critical factor in the engraving industry. We offer a 12-hour standard turnaround to keep your production queue moving. For urgent projects that need to hit the machine today, our 4-hour rush fulfillment ensures you never miss a deadline. This level of responsiveness is supported by our global network of hubs in the UK, USA, AU, and NZ. We provide round-the-clock service so you can upload a file at the end of your workday and have it ready before you open the next morning.
Quality remains our absolute priority. We don’t use automated tracing software. Every file is manually redrawn by artists with over 15 years of industry experience. This human-led approach ensures that every curve is smooth and every node is optimized for high-speed industrial lasers. You get clean paths that prevent the machine stuttering and burn marks discussed earlier in this guide. We treat every logo as a precision engineering project.
First-Time-Right Production Standards
Our commitment to precision is reflected in our 99%+ accuracy rate. Before the manual conversion begins, our specialists perform a technical analysis of your design. We check for potential issues like thin lines that won’t hold detail or overlapping paths that could cause double-firing. This rigorous standard is the same one we apply across all our departments. You can see our methodology in action by learning about Choosing the Best Embroidery Digitizing Services for other production needs. We treat your laser files with the same industrial-grade scrutiny.
Scaling Your Engraving Business
Outsourcing your artwork preparation allows you to focus on what actually generates revenue: keeping your machines running. Instead of spending hours fighting with nodes in Illustrator, you can handle high-volume orders with confidence. Unique Art Services LLP provides consistent, scalable results that grow alongside your enterprise. Whether you’re a boutique shop or a high-capacity industrial plant, we act as the stable backbone for your creative process. Ready to streamline your workflow? Upload your artwork for a professional laser-ready conversion and experience the difference of precision-engineered artwork for laser engraving.
Mastering the Future of Precision Engraving
High-quality production starts long before the laser fires. As we’ve explored, the difference between a successful project and a wasted sheet of material often comes down to the integrity of your vector paths. By moving away from unreliable auto-trace tools and sticking to a rigorous technical checklist, you ensure your artwork for laser engraving translates perfectly from screen to surface. This precision reduces machine stutter, eliminates burn marks, and keeps your production schedule on track.
Scaling a business requires reliable partners who understand these technical nuances. We bring 15+ years of manual vector art expertise and a 99% first-time-right accuracy rate to every project. With dedicated service hubs in the UK, US, AU, and NZ, our team is ready to support your workflow around the clock. We handle the technical heavy lifting so you can focus on delivering premium products to your clients.
Get Your Professional Laser-Ready Vector Art in 4 Hours and eliminate the design bottlenecks holding your business back. You’ve got the vision; let’s provide the technical precision to make it a reality.
Frequently Asked Questions
Can I use a JPEG for laser engraving?
You can use a JPEG for raster engraving, but it’s not suitable for cutting or scoring. JPEGs are composed of pixels, which lack the mathematical path data a laser needs to follow a line. For logos and text, it’s better to convert your JPEG into a vector. This prevents the “stepped” or blurry edges that occur when a machine tries to interpret low-resolution pixel data.
What is the best file format for laser engraving?
AI, SVG, and DXF are the most reliable formats for professional production. Adobe Illustrator (AI) files are the industry standard because they manage layers and color mapping with high precision. SVG is the preferred format for modern controllers like Glowforge. If you’re using industrial CNC software, DXF is often required. Always ensure your artwork for laser engraving consists of clean, closed vector paths before exporting.
Do I need to convert my text to outlines for laser engraving?
Yes, you must convert all text to outlines or curves before sending a file to production. Laser software doesn’t “read” font files like a word processor does; it only follows physical paths. If you don’t expand your text, the machine will likely substitute your font with a generic one, which ruins your branding. Converting to outlines ensures the laser follows the exact shape of your typography.
What is the difference between scoring and engraving?
Scoring follows a vector path at low power to “draw” a thin line, while engraving scans back and forth to fill an entire area. Think of scoring as a quick outline and engraving as a dense fill. Scoring is much faster and works well for architectural details or borders. Engraving, or rastering, provides the depth and visual contrast needed for solid logos and bold text on wood or acrylic.
How do I fix a “jagged” engraving result?
Jagged results are usually the fault of low-resolution raster files or “dirty” vectors created by auto-tracing tools. To fix this, you should manually redraw the paths to ensure smooth curves and sharp corners. Check that your DPI is set between 300 and 600 for raster fills. If the file is a vector, reduce the number of unnecessary nodes to prevent the laser head from stuttering as it moves.
Can you vectorize a photo for laser engraving?
You can vectorize a photo, but it requires a high-contrast manual conversion to look professional. Simple automated tracing usually results in a muddy, unrecognizable mess. An expert artist simplifies the photo into distinct black-and-white paths that the laser can interpret as depth. This process is essential for engraving clear portraits or complex landscapes onto materials like slate, wood, or coated metals.
How long does it take to get a professional laser-ready vector file?
Our standard turnaround for a production-ready vector file is 12 hours. For shops with urgent deadlines, we provide a 4-hour rush service to ensure your machines don’t sit idle. Every file we deliver is manually redrawn and technically audited to ensure it works the first time. This speed allows you to accept last-minute custom orders while maintaining a 99% first-time-right accuracy rate for your clients.