Professional Artwork for Screen Printing: The 2026 Guide to Production-Ready Design
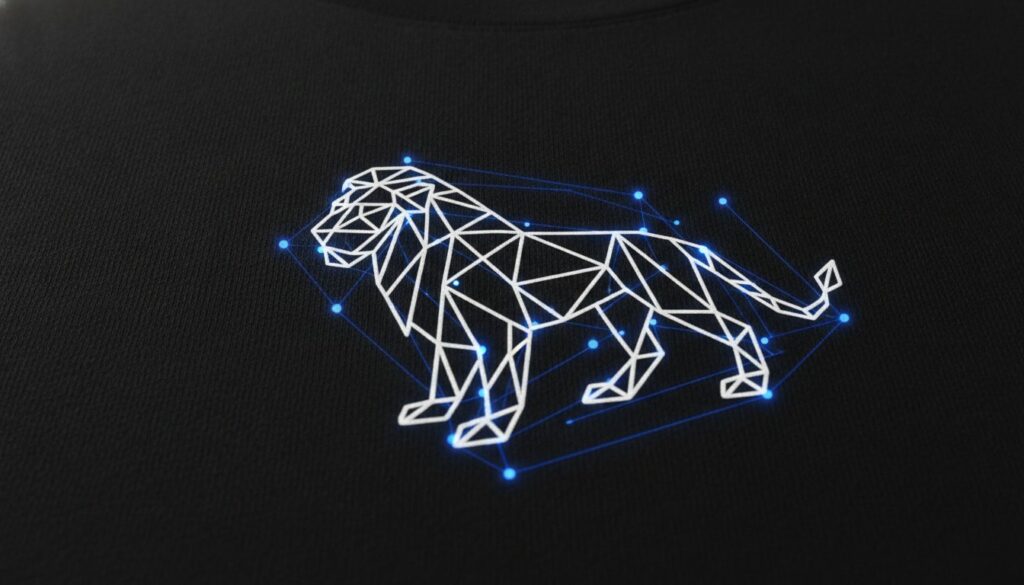
In 2026, the success of your apparel line isn’t determined by the quality of the press, but by the precision of the vector paths in your files. It’s frustrating to submit a design you’ve worked hard on only to be hit with unexpected art prep fees or a rejection email because your file isn’t production-ready. Most creators understand the visual side of branding, but the technical requirements for artwork for screen printing are a different beast entirely. Low-resolution files and blurry edges don’t just look unprofessional; they stall your production and eat into your profit margins.
This guide will show you how to master these technical standards to ensure your prints stay crisp and scalable. You’ll learn why manual vector conversion remains the key to high-quality results, even as AI features continue to evolve in Adobe Illustrator 30.6 and CorelDRAW 2026. We’ll break down the essential differences between raster and vector formats, explain the 300 DPI rule for raster work, and outline a workflow that secures faster turnaround times from your printer. By the end, you’ll have a clear path to cost-effective, professional results that look exactly as you intended on every garment.
Key Takeaways
- Understand how to create production-ready files that require zero printer adjustments for flawless ink placement.
- Master the use of closed paths and minimal anchor points to produce smoother screens and sharper edges.
- Discover why manual vectorization is superior to automated tracing for maintaining clean and scalable files.
- Navigate the technical requirements for artwork for screen printing by using the correct .AI, .EPS, or vector-based .PDF formats.
- Learn how professional vector art services can streamline your workflow with 12-hour turnaround times for high-volume orders.
What Defines High-Quality Artwork for Screen Printing?
Production-ready artwork for screen printing is defined by its ability to move from your digital file to the printing press with zero technical adjustments. In 2026, efficiency is the industry standard. If a printer has to spend time cleaning up your lines or fixing color separations, the file isn’t truly production-ready. High-quality art isn’t just about aesthetics; it’s about mechanical integrity. While a design might look sharp on a high-resolution monitor, the physical process of Screen printing requires “clean paths.” These paths act as the literal boundaries for ink placement on the garment. If your design has jagged edges or stray pixels, the screen burning process will capture those flaws, resulting in a sloppy final product.
Many designers mistake visual quality for mechanical quality. You might have a 600 DPI raster image that looks stunning, but it can still fail in spot-color printing. Raster files are built from a grid of colored squares. When a printer needs to separate those colors for individual screens, these squares create “halos” or blurry transitions. Professional artwork for screen printing bypasses this issue by using defined mathematical boundaries. These boundaries tell the press exactly where one color ends and another begins, ensuring the ink sits perfectly on the fabric without bleeding or overlapping incorrectly.
Vector vs. Raster: The Fundamental Divide
The difference between vector and raster is the difference between a set of instructions and a photograph. Raster graphics are composed of pixels; tiny blocks of color that break apart when you enlarge the image. In contrast, vector graphics use mathematical paths. Because these paths are calculated in real-time by your software, they offer infinite scalability. You can blow a vector logo up to the size of a billboard without losing a single ounce of detail. For a deeper look at how this impacts your brand identity, see our guide on Vector vs Raster for Logos: The 2026 Guide to Production-Ready Branding.
The Role of DPI in Screen Printing Art
If you must work with raster images, DPI (Dots Per Inch) is your most critical metric. For screen printing, 300 DPI at the final print size is the absolute bare minimum. A common mistake is “up-sampling” a 72 DPI web image to 300 DPI. This doesn’t actually add detail. It simply makes the existing blurry pixels larger. DPI determines the precision of the halftone screen burning process. It’s the measurement of how many points of information exist within a linear inch, and it directly dictates whether your gradients will look smooth or like a collection of messy, inconsistent dots.
The Anatomy of Print-Ready Vector Graphics
Building production-ready graphics requires more than just saving a file in a vector format. True artwork for screen printing must be constructed with the physical screen-making process in mind. One of the most critical technical elements is the use of closed paths. When a path is left open, color fills can leak or fail to register correctly in separation software. This causes immediate delays in the darkroom. Additionally, you should aim for the fewest anchor points possible. Excessive points create chatter in digital cutters and result in jagged edges on the final screen. Clean, intentional paths lead to a professional finish that automated tools simply cannot replicate.
Font management is another common hurdle that stalls production. If you don’t convert your text to outlines, the printer’s computer may substitute your carefully chosen brand font with a generic one. This happens because the font file itself isn’t embedded in the vector data. By outlining text, you turn letters into permanent shapes that cannot be altered. You should also pay close attention to line weights throughout your design. In the exposure process, lines thinner than 1pt often fail to hold on the mesh. This leads to missing details or broken lines in your final print. For a deep dive into these technical nuances, Preparing Artwork for Screen Printing offers an excellent breakdown of Illustrator-specific workflows.
Spot Colors and Color Separations
In apparel, we prioritize spot colors, specifically the Pantone Matching System (PMS), over CMYK process printing. Spot colors ensure that a specific shade looks identical on every shirt, regardless of the printer. Vector art simplifies the separation process because each color exists on its own mathematical layer. This allows the printer to easily assign each color to a specific screen for the press. If your design is complex, using a professional vector art service ensures your separations are handled with the precision required for high-speed production.
Managing Overlaps and Trapping
Trapping is the technique of slightly overlapping adjacent colors to prevent light leaks or gaps between colors on the garment. This is necessary because garments naturally stretch and move during the printing process. Without a small trap, even a fraction of a millimeter of movement can reveal the shirt color beneath the design. Conversely, knockouts are used to remove underlying colors to prevent thick, heavy ink deposits. This improves the hand or feel of the print on the chest. Proper trapping accounts for garment stretch while maintaining the crispness of the original design.
The Pitfalls of Auto-Tracing: Why Manual Vectorization Wins
Automated conversion tools like the “Image Trace” button in Adobe Illustrator or “PowerTrace” in CorelDRAW often feel like a shortcut to efficiency. For high-capacity production, however, these tools are the primary cause of messy, unusable files. Automation lacks the human eye’s ability to distinguish between a deliberate design choice and a stray pixel. Instead of creating clean, purposeful lines, automated software generates thousands of unnecessary anchor points. This technical bloat makes the file heavy and difficult to edit, often causing software to lag or crash during the color separation stage. When you submit this type of artwork for screen printing, you’re essentially handing the printer a puzzle they have to solve before they can even start the press.
The most visible failure of auto-tracing is the “jagged edge” phenomenon. Because the software is trying to map a path around every individual pixel, it creates a stair-step effect along curves and diagonal lines. These micro-fluctuations are captured during the screen exposure process, leading to prints that look shaky or low-quality. Printers often charge significant “art prep” fees because they must spend hours manually cleaning up these automated errors. Relying on a single-click solution often results in a design that looks digital and cold, losing the organic flow of the original creative vision.
Precision Through Manual Redrawing
Manual redrawing is the gold standard for creating production-ready files. This process involves a specialist using the Pen Tool to trace over the source image, ensuring every curve is smooth and every corner is sharp. It’s the only reliable method for handling low-resolution source images, such as a 72 DPI logo pulled from a website. By manually defining each path, you ensure 100% accuracy and a file that is optimized for the physical realities of the press. If you are struggling with poor-quality files, our Low Resolution Image to Vector: The 2026 Professional Buying Guide provides deeper insights into how professional conversion protects your brand integrity.
Handling Complex Detail and Gradients
Automation struggles significantly with gradients and fine details. When an auto-trace tool encounters a gradient, it often breaks the smooth transition into “stepped” blocks of solid color. This ruins the visual effect and makes color separation nearly impossible. Manual experts maintain the artistic integrity of your design by pathing these elements strategically. They ensure that thin lines meet the minimum 1pt requirement and that sharp corners stay crisp. Following an Adobe Illustrator screen printing guide can help you understand these technical setup needs, but manual pathing remains the only way to guarantee that complex sketches translate perfectly to apparel.
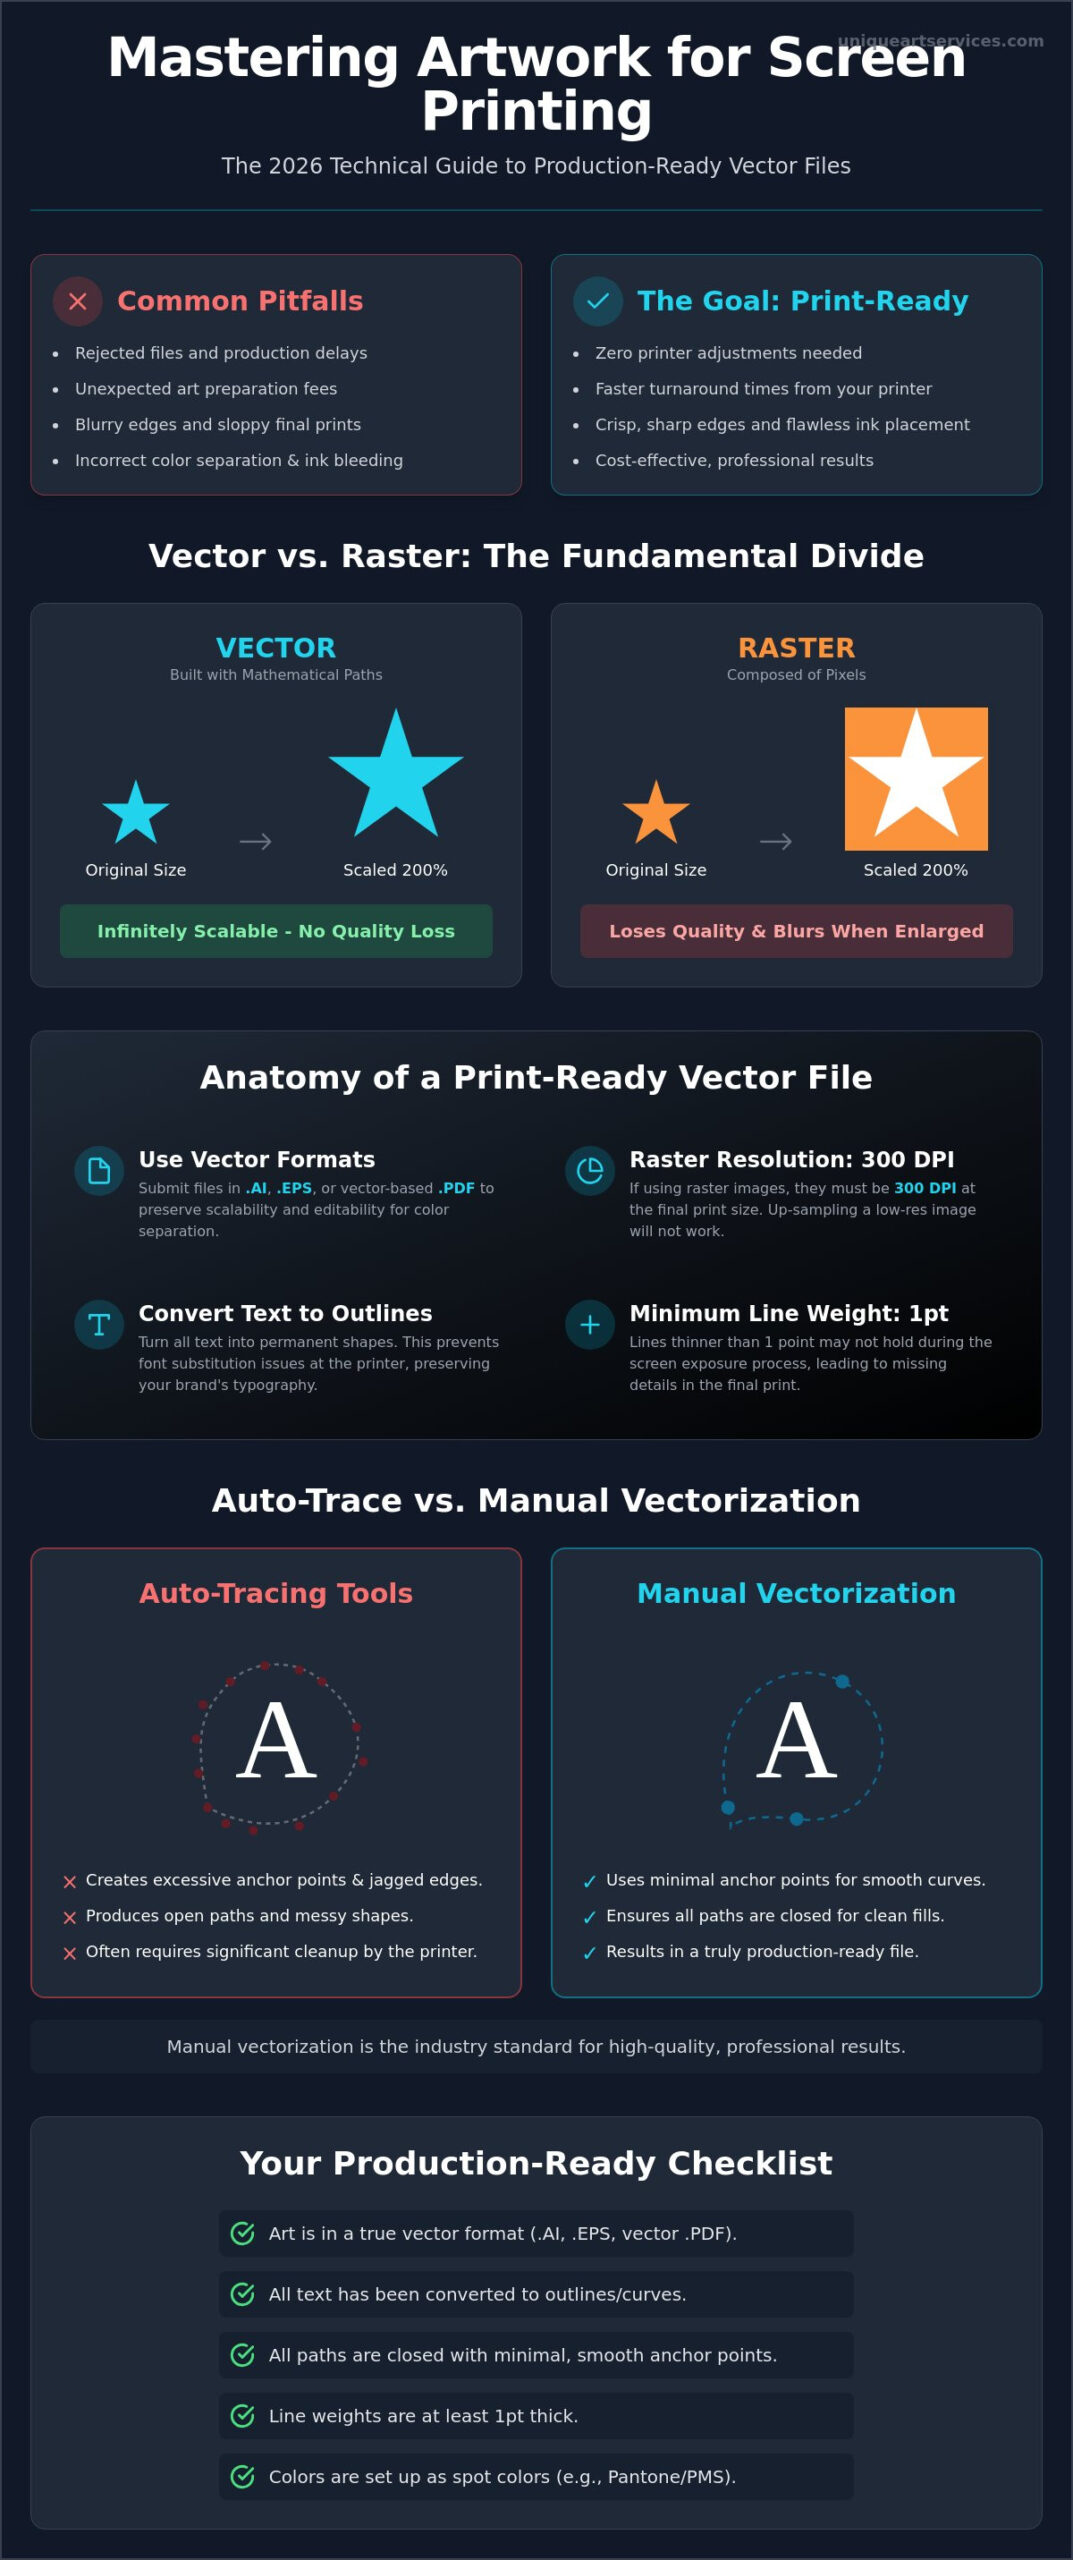
Technical Requirements for Screen Print Art Preparation
The final hand-off to your printer requires a transition from creative design to technical specification. To maintain the integrity of your artwork for screen printing, you must adhere to a strict set of file standards. The industry relies on the “Big Three” vector-based formats: .AI (Adobe Illustrator), .EPS (Encapsulated PostScript), and .PDF (Portable Document Format). While .AI is the native standard for most shops, .EPS remains a reliable universal format. However, .PDF files can be deceptive. A .PDF can contain either vector paths or raster pixels. You can verify your file by zooming in to 1000%. If the edges remain perfectly smooth, it’s a vector; if they become pixelated, it’s a raster and will likely require professional conversion.
If your design includes raster elements that cannot be vectorized, such as complex photographic textures, you must embed these linked images directly into the file. Failing to do so results in a “missing link” error when the printer opens your document. Furthermore, color accuracy depends entirely on your swatch library. All colors in a production-ready file must be labeled as Pantone Solid Coated swatches. This allows the ink department to mix precise formulas that match your digital intent, eliminating the guesswork associated with standard RGB or CMYK screen colors.
Sizing and Placement Specifications
Precision in sizing removes the risk of “eyeballing” a design on the press. You should always submit your artwork at the actual print size. For a standard full chest print, this is typically 12 inches wide. Clearly defining your placement is equally vital. Common standards include Full Chest, Left Chest, Back, and Sleeve. While a digital mockup shows how the design looks on a shirt, it is not a production file. A production file is a flat, technical document containing only the printable assets, stripped of any t-shirt templates or background textures. If you need assistance preparing these technical assets, you can order professional vector art to ensure your files are press-ready.
Font and Typography Standards
Typography requires specific mechanical adjustments to survive the screen printing process. Beyond the “Create Outlines” command, you must consider the texture of your garment. On heavy fabrics like fleece or pique, tiny fonts will disappear into the weave. Maintain a minimum font height of 0.125 inches for legibility. Script fonts present a unique challenge; because their letters overlap, they create “intersections” in the vector path. You must “weld” or “unite” these overlapping letters into a single continuous shape. This prevents the laser or film output from cutting into the adjacent letters, ensuring a smooth, unbroken ink deposit on the garment.
Optimizing Your Production with Professional Vector Art Services
Managing an in-house art department is often the most expensive bottleneck for a growing print shop. While a full-time graphic designer brings value, their hourly wages and overhead can quickly erode the profits of a high-volume order. Outsourcing your artwork for screen printing to specialized firms like Unique Art Services LLP allows you to convert these fixed costs into variable, flat-rate fees. This transition ensures you only pay for the art you need, when you need it. With a 99%+ first-time-right rate, you eliminate the back-and-forth corrections that stall production lines and frustrate clients. High-capacity shops rely on our 12-hour turnaround times to keep their presses running at maximum efficiency, ensuring that technical file preparation never becomes a barrier to growth.
The precision of a specialist is particularly evident in complex apparel manufacturing. When a design requires intricate trapping or specific color separations for dark garments, a generalist designer might miss the mechanical nuances. Our team operates with a solution-oriented mindset, treating every file as a blueprint for a physical product rather than just a digital image. This dedication to getting it right the first time positions your business as a stable partner for your own clients, reducing waste and increasing your shop’s overall throughput.
Scaling Your Print Shop Capacity
Meeting impossible client deadlines is a standard part of the apparel industry. When a large-scale project arrives with low-quality assets, our Rush Order Processing becomes a vital tool for your survival. By utilizing global service hubs, we offer overnight file preparation that works while your shop is closed. This means you can upload a messy raster file at 5:00 PM and have a production-ready vector file waiting in your inbox by 8:00 AM the next morning. If your business also handles corporate branding through stitching, you may find our guide on Choosing the Best Embroidery Digitizing Services for Production Success in 2026 helpful for maintaining consistency across different decoration methods.
The Unique Art Services LLP Workflow
Our process begins with a comprehensive technical analysis of your source file. We don’t rely on automated shortcuts because they fail to meet the mechanical standards required for professional printing. Instead, our experts perform manual redrawing for every path, ensuring that anchor points are minimized and lines are perfectly smooth. This manual precision guarantees that your art is scalable for anything from a standard t-shirt to a large-format promotional banner. We conclude every project with a rigorous quality check to verify that all colors are mapped to Pantone swatches and all text is properly outlined. Get your production-ready vector art from Unique Art Services LLP today to streamline your workflow and protect your bottom line.
Streamline Your Path to Production-Ready Design
Adhering to the technical standards of artwork for screen printing is the most direct way to eliminate production bottlenecks and reduce art prep fees. By prioritizing manual vectorization over automated shortcuts, you ensure that every line is crisp and every color separation is press-ready. Clean paths and outlined fonts aren’t just technical details; they are the foundation of a high-capacity apparel business. This precision protects your profit margins and guarantees a professional result on every garment.
Unique Art Services LLP brings over 15 years of industry experience to your creative workflow. We provide a 12-hour standard turnaround and a 4-hour rush option to keep your presses moving without interruption. With a 99% first-time-right accuracy rate, we remove the friction from your design hand-off so you can focus on delivering quality products to your customers. Scale your production with professional vector art conversion services today. Your designs deserve the precision of expert craftsmanship, and we’re ready to help you achieve it.
Frequently Asked Questions
What is the best file format for screen printing artwork?
Vector formats such as .AI, .EPS, and .PDF are the industry standard for production. These formats utilize mathematical paths rather than pixels, which allows for infinite scaling without any loss of detail. This ensures that your artwork for screen printing remains sharp and clean during the film output and screen exposure stages. Using these files prevents the jagged edges commonly associated with raster images.
Can I use a high-resolution JPEG for screen printing?
You can use a high-resolution JPEG, but it is not the ideal choice for spot-color printing. JPEGs are raster files that often create blurry transitions or “halos” during the color separation process. If you must use one, it should be at least 300 DPI at the final print size. However, converting that JPEG into a vector file is the only way to guarantee a crisp, professional finish on the garment.
What does it mean to ‘convert fonts to outlines’?
Converting fonts to outlines transforms editable text into permanent vector shapes. This step is vital because it prevents font substitution errors if the printer does not have your specific typeface installed. Once you outline the text, it is treated as a graphic path. This ensures your branding remains exactly as you designed it across all software platforms and production environments without the risk of layout shifts.
Why does my printer keep asking for a vector file?
Printers require vector files because they provide the mathematical precision necessary for color separations and high-quality screen burning. Unlike raster images, vector files don’t pixelate when they are resized for different garment areas. This allows the printer to create sharp film positives. These positives are essential for the ink to sit correctly on the fabric without jagged edges or unintended bleeding between colors.
How much does it cost to have artwork professionally vectorized?
Professional vectorization costs vary depending on the complexity of the design and the required turnaround time. Many industry specialists offer flat-rate fees for standard logo conversions. While automated tools are inexpensive, they often produce messy files that require additional manual cleanup. Investing in a manual redrawing service ensures your file is production-ready and helps you avoid expensive “art prep” fees from your screen printer.
What is the difference between spot colors and CMYK in screen printing?
Spot colors use specific premixed inks, typically from the Pantone Matching System, to achieve exact color matches. CMYK uses four translucent inks to create a spectrum through overlapping dots. Spot colors are preferred for apparel because they provide more vibrant, consistent results. They are also significantly easier to separate in artwork for screen printing, leading to a cleaner and more efficient setup on the press.
How long does it take to convert a raster image to a vector?
The time required depends on the complexity of the original image and the level of detail involved. A simple logo can often be manually redrawn in a few hours. Professional services typically provide a standard 12-hour turnaround, with rush options available for urgent projects. While manual redrawing is slower than clicking an auto-trace button, it is the only way to ensure the file meets mechanical production standards.
Can you vectorize a hand-drawn sketch for screen printing?
Yes, hand-drawn sketches can be professionally vectorized through a manual redrawing process. A specialist traces the scanned sketch using the Pen Tool in software like Adobe Illustrator. This process cleans up shaky lines and ensures the design meets technical requirements like minimum line weights. It transforms an organic drawing into a precise, scalable file that is ready for high-speed production on any screen printing press.